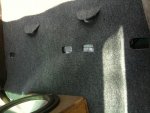
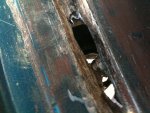
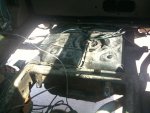
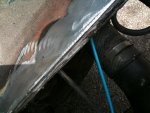
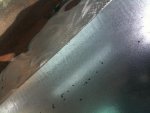
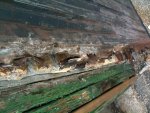
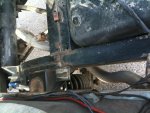
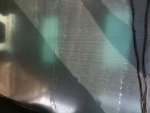
So, I pulled out the carpet in the trunk of my D1 to start work on my new cargo area storage. Needless to say, I found a butt load of rust. At least 1/3 of the seam between the center floor and the body was rusted through. The rest was showing tons of surface rust. I figured it would be dumb to build a nice new cargo area on top of a bunch of rust. I decided to replace the bad metal. I started by drilling out the spot welds. Unfortunately a good portion was too rusted to save. I ended up having to cut the whole thing out, including the supports. I then picked up a sheet of .78 galvanized steel. I had it cut to fit and then bent a 1/4in lip on one end. The bent end will be towards the rear of the truck because I had to cut the lip that the original sheet was spot welded to all the way around. I made my cut at the high point of the floor. The rear most lip is 1/4 lower. As of this moment I have it all in place and tacked in a couple places. I'm going to finish welding it in tomorrow morning. I'm going to seam seal it, then cover it with Dynamat before building my new storage. I also had to move the brake hard lines because they originally ran through one of the floor supports. They now terminate on the passenger side frame rail.
Rusty ass
- Thread starter lunchbox
- Start date
You are using an out of date browser. It may not display this or other websites correctly.
You should upgrade or use an alternative browser.
You should upgrade or use an alternative browser.

more...
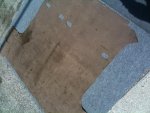
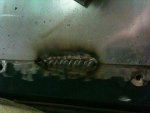
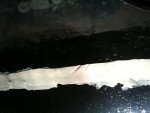
The first pic is the original floor leaning up against a wall. You can see how much rust there was.
The first pic is the original floor leaning up against a wall. You can see how much rust there was.
Attachments
Last edited:
Oooo pretty new metal! ")
You may know to be careful welding the galvi plated metal - but just a heads up if not, the fumes are nasty and can mess you up.
I hope you sealed the hell out of stuff with por15 or something before you covered it back over? Always nice to see an older truck get some new metal to breath a little new life into her!
ptschram
Well-known member
I'm in the middle of a similar job. Right now, I'm waiting for my new plasma cutter to arrive
Rust repair is a hard job to get started on as it can be so daunting, but when it's done, it's ALWAYS worth it!
BTW-I believe new loadspace sheetmetal is still available and it's surprisingly inexpensive.
Rust repair is a hard job to get started on as it can be so daunting, but when it's done, it's ALWAYS worth it!
BTW-I believe new loadspace sheetmetal is still available and it's surprisingly inexpensive.
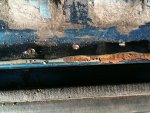
Speaking of rusty asses...
My cargo area doesn't look too bad. But the area where my body mounts meet up with the frame is almost gone. My rear is sagging a good 1-2" because of this. Anybody have a good solution?
My cargo area doesn't look too bad. But the area where my body mounts meet up with the frame is almost gone. My rear is sagging a good 1-2" because of this. Anybody have a good solution?
Lake_Bueller said:Speaking of rusty asses...
My cargo area doesn't look too bad. But the area where my body mounts meet up with the frame is almost gone. My rear is sagging a good 1-2" because of this. Anybody have a good solution?
A pressure treated 2x4 is 1.5 inches so it's probably just right. Use a big hammer to pound it in there - done.
Skip the Dynamat - Grace Ice and Water Shield is far far cheaper and works about as well. For real.
Me = Cheeeep-ass.
Me = Cheeeep-ass.
sven said:Lookin good. Are you concerned about leaving the gas tank in while you weld and cut stuff?
All welding and cutting is done. I had a mat over the tank and inlet while welding.
Roving Beetle said:Skip the Dynamat - Grace Ice and Water Shield is far far cheaper and works about as well. For real.
Me = Cheeeep-ass.
I've been using Dynamat since the early 90s in car audlio applications. I swear by it. The doors and pillars are already done. I'm pretty loyal to the brand. But I also only use yellow tops, so I'm a bit of a dipshit.
lunchbox said:I've been using Dynamat since the early 90s in car audlio applications. I swear by it. The doors and pillars are already done. I'm pretty loyal to the brand. But I also only use yellow tops, so I'm a bit of a dipshit.
:rofl: I love the last line.
No worries - it's a good product, just letting you know that the I&WS works extremely well for a cheaper alternative. I once did the entire tub of an old Heep CJ7 - HUGE difference in the noise and comfort of the truck for almost no $$. I swear by it, I'm pretty loyal to the brand LOL .... but I am also a bit of a dipshit for several reasons!


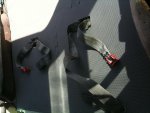
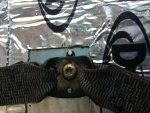
I finally got to work on the trunk some more today. I've spent the last few days replacing gaskets up front. I picked up some indoor/outdoor carpet and playground pad at Lowe's. I used the old carpet as a template to cut out the new goodies. I also got the seat belts bolted back in and the seats back. Next I'm going to start on a storage set up. (which is how all this BS started)