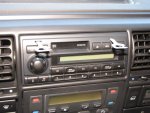
I finally got around to replacing the tape unit in my '04 Disco II (who still has tapes?). Anyhow, I saw a lot of posts looking for information, so here's the brief, slightly illustrated guide on how to do this - retaining factory amps and wiring. I have an SE model with the Alpine tape headunit, with the 6-CD changer under the passenger seat. I replaced this with a unit that had 4-channel RCA pre-outs - this is the simplest type of headunit to install.
Note: this is not an editorial on which is the best aftermarket headunit, and is not intended for those audiophiles that want to bypass the factory amps and subs. It is the easy, painless way to go if you are either on a budget or don't know a lot about stereo installation. It does not retain CD changer use. Steering wheel controls are not integrated today, as my PAC SWI module has not arrived yet.
For this type of install, you will need:
1. Metra 70-1786 wiring harness
2. Metra 89-9400 dash kit
3. headunit removal tools (I used Kenwood D10-7049-04)
4. soldering iron
5. heat shrink wire covers
6. flat head screwdriver (use for prying/bending)
7. wire cutters/strippers
I ordered items 1-3 on eBay; much cheaper than Crutchfield or other sources; I paid ~$35 for them incl. shipping.
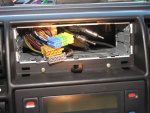
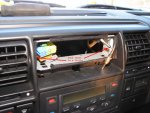
Step 1: Remove existing headunit
All you do is insert the two tools into the headunit slots on the top, and give it a good yank. My tools weren't a perfect fit, so I had to jiggle them until they grabbed onto the unit. Once you slide it out a centimetre or so, you can just pull with your hands on the unit. Disconnect the plugs and plastic modular plugs. Take your flathead screwdriver and prise the tabs on each side of the aluminum DIN sleeve until the tab no longer secures it in place. You should now be able to jiggle the DIN sleeve out.
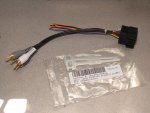
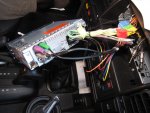
Step 2: Solder the wiring harness to your new headunit's harness
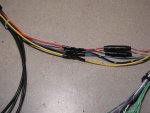
Your new headunit will have 5 connections that you will solder onto the matching wires on the Metra harness. Mine matched colour-for-colour, but please ensure yours matches; specifically:
yellow: constant +12V
orange: illumination
red: accessory +12V
black: common/ground
blue: remote power on (amp)
Once you have connected these wires, and covered the exposed wire with the heat shrink tubes, you're ready to connect the headunit. You do not need the speaker wires on the new harness, as we will be using the RCA pre-outs. I used a twist-tie to bundle them neatly together in case I ever need to re-use them in a different application.
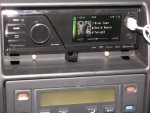
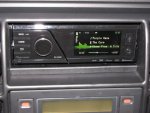
Step 3: Install the new headunit
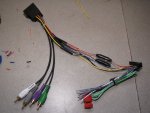
I found the opening to be an "exact" fit for the aluminum DIN sleeve on my unit. So tight, that the tiny rivets on my sleeve stuck out less than a millimetre, and I had to file them smooth to get the sleeve in. Once seated, take your flathead screwdriver and push in a few of the tabs on the sleeve so that it stays firmly in place. Snap your Metra dash kit into place below the DIN opening (not shown, as mine hasn't arrived yet). Connect the existing modular plugs into the Metra harness. The grey one goes in the "bottom" connector, and the brown one goes in the "top" part where the RCA speaker wires come out. The tri-colour connector is not used. Connect the 4 x RCA connectors to the pre-amp outs on your headunit; white/grey and green/purple are for front and rear respectively. Plug the large antenna cable into the unit - I did not use the smaller one (I don't know what that is for). It gets a little tricky with all the wiring and the small gap, but if you push the old wiring and the bulky part of the Metra harness into the back left area, you should be able to gently slide the headunit in until it clicks in place.
That's it - you should now be able to turn your ignition to ACC and run your new stereo.
Other notes:
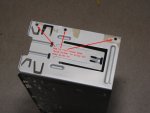
Crutchfield will say that there is a major modification that you need to make in order to put an aftermarket headunit in. There is indeed a large chunk of black metal that secures the original headunit, but I did not need to cut it out in order to make mine fit.
My headunit does bluetooth for my mobile phone - it was relatively easy to snake the microphone wire from the A-pillar, down around through the fuse panel and then back up into the opening for the stereo. Tip is to shine a flashlight through the DIN opening when the original unit is out, and you can see where to fish the wire through.
I have the steering wheel controller on order (the most expensive part - $53) but the instructions I have read indicate that it is a single wire on the tri-coloured connector that connects to the PAC SWI, that then connects via mini-plug to my headunit. Maybe I'll write up one for that when I get it installed.
Rich
2004 Disco II
Note: this is not an editorial on which is the best aftermarket headunit, and is not intended for those audiophiles that want to bypass the factory amps and subs. It is the easy, painless way to go if you are either on a budget or don't know a lot about stereo installation. It does not retain CD changer use. Steering wheel controls are not integrated today, as my PAC SWI module has not arrived yet.
For this type of install, you will need:
1. Metra 70-1786 wiring harness
2. Metra 89-9400 dash kit
3. headunit removal tools (I used Kenwood D10-7049-04)
4. soldering iron
5. heat shrink wire covers
6. flat head screwdriver (use for prying/bending)
7. wire cutters/strippers
I ordered items 1-3 on eBay; much cheaper than Crutchfield or other sources; I paid ~$35 for them incl. shipping.
Step 1: Remove existing headunit
All you do is insert the two tools into the headunit slots on the top, and give it a good yank. My tools weren't a perfect fit, so I had to jiggle them until they grabbed onto the unit. Once you slide it out a centimetre or so, you can just pull with your hands on the unit. Disconnect the plugs and plastic modular plugs. Take your flathead screwdriver and prise the tabs on each side of the aluminum DIN sleeve until the tab no longer secures it in place. You should now be able to jiggle the DIN sleeve out.
Step 2: Solder the wiring harness to your new headunit's harness
Your new headunit will have 5 connections that you will solder onto the matching wires on the Metra harness. Mine matched colour-for-colour, but please ensure yours matches; specifically:
yellow: constant +12V
orange: illumination
red: accessory +12V
black: common/ground
blue: remote power on (amp)
Once you have connected these wires, and covered the exposed wire with the heat shrink tubes, you're ready to connect the headunit. You do not need the speaker wires on the new harness, as we will be using the RCA pre-outs. I used a twist-tie to bundle them neatly together in case I ever need to re-use them in a different application.
Step 3: Install the new headunit
I found the opening to be an "exact" fit for the aluminum DIN sleeve on my unit. So tight, that the tiny rivets on my sleeve stuck out less than a millimetre, and I had to file them smooth to get the sleeve in. Once seated, take your flathead screwdriver and push in a few of the tabs on the sleeve so that it stays firmly in place. Snap your Metra dash kit into place below the DIN opening (not shown, as mine hasn't arrived yet). Connect the existing modular plugs into the Metra harness. The grey one goes in the "bottom" connector, and the brown one goes in the "top" part where the RCA speaker wires come out. The tri-colour connector is not used. Connect the 4 x RCA connectors to the pre-amp outs on your headunit; white/grey and green/purple are for front and rear respectively. Plug the large antenna cable into the unit - I did not use the smaller one (I don't know what that is for). It gets a little tricky with all the wiring and the small gap, but if you push the old wiring and the bulky part of the Metra harness into the back left area, you should be able to gently slide the headunit in until it clicks in place.
That's it - you should now be able to turn your ignition to ACC and run your new stereo.
Other notes:
Crutchfield will say that there is a major modification that you need to make in order to put an aftermarket headunit in. There is indeed a large chunk of black metal that secures the original headunit, but I did not need to cut it out in order to make mine fit.
My headunit does bluetooth for my mobile phone - it was relatively easy to snake the microphone wire from the A-pillar, down around through the fuse panel and then back up into the opening for the stereo. Tip is to shine a flashlight through the DIN opening when the original unit is out, and you can see where to fish the wire through.
I have the steering wheel controller on order (the most expensive part - $53) but the instructions I have read indicate that it is a single wire on the tri-coloured connector that connects to the PAC SWI, that then connects via mini-plug to my headunit. Maybe I'll write up one for that when I get it installed.
Rich
2004 Disco II
Attachments
Last edited: