that's what I use. super easy to form by hand. no issues with it at all.I’m planning to use the AB nickel/copper kit, unless anyone has a horror story that should talk me out of it!
The tinworm cometh
- Thread starter Spark6
- Start date
You are using an out of date browser. It may not display this or other websites correctly.
You should upgrade or use an alternative browser.
You should upgrade or use an alternative browser.
I was able to purchase factory new lines for the rear axle and they were not all that expensive. Whenever I replace front calipers and rotors I upgrade to the Defender vented type and buy new lines for the calipers. The Defender lines are available and inexpensive. However, the first time I did that job I just went to the local auto parts store and bought some short copper nickel lines and bent them by hand. Second time I became aware the factory pre-bent lines were still available. I think it was less than $10 more to get the factory lines as opposed to the off the shelf straight ones at the parts store.
On my current project, the worst rust is on the longer run from the front to the back. For that, I just purchased bulk copper nickel line (Amazon, I think) and I have a flaring tool. I haven’t done that job yet. I will reuse most of the fittings and have saved a bunch from previous projects (Defender front vented upgrades and a parts D1).
I looked at the AB kit but decided for the money I preferred the approach detailed above. If I can retain the “factory look” I prefer that. And, my approach was less expensive.
Last edited:
Excellent data points, all! I ordered the AB kit last night. The entire system needs redoing. The proportioning (or pressure reducing, in Rover-speak) valve too, but AB is out of stock on that, so RN is about to get an order too. They have the body mount hardware as well. I have a flaring tool, but it’s for AN fittings. (37* flare instead of the standard 45*.) I could rent and custom fab the lines for cheaper, but the laundry list is long enough that removing steps on each project is helpful at this point. I’ll get plenty of custom work logged when it comes to fixing the bulkhead body mount. It’s raining for the next week, but I managed to get some exploratory photos yesterday:
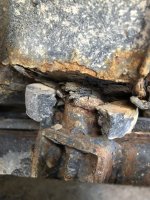
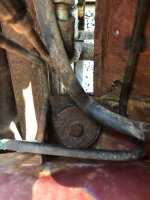
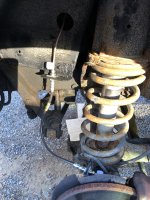
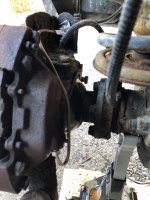
Oof. From the top, it actually doesn’t look TOO bad. But it’s from the bottom where the true degree to which the tinworm has been working becomes clear. I think I’m likely going to just breakout the sawzall and blow through whatever is left of the mounting bolt. There is no way that thing is actually coming out the way it’s supposed to. The good news, is that the vertical parts of the mount on the body *appear* to have a fair bit of metal on them. So, if I end up losing the bottom of the mount, and the first picture indicates I might, then it’ll be a matter of worming the welder in on both sides to get a plate welded in for the bottom of the mount. We shall see. Froggatt’s sells a complete replacement bulkhead mount, but it requires removing the entire front quarter to get access for that job. We’ll save that for when the body comes off down the road.
Off to the dump now. The Disco has proven to be a very useful choring rig. I’m gonna miss it while it’s down for the next little while!
Well, the boxes of parts have arrived, and the truck is up on jack stands. So I suppose there’s nothing for it. Plus deer season starts next week, and I’d like to have something to show for myself before I knock off to sit in the woods…
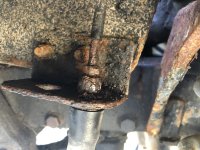
Based on the corrosion on the lines and fittings, it looks like I’ll be cutting them apart. Fortunately, the caliper side of the pipe is in better shape, and looks like it’ll come out. The biggest hurdle is going to be getting a wrench on the fittings on the ABS regulator. Between seized fittings and nearly no access, I don’t quite know how I’m gonna work that without damaging something. The plan for now is the cut the lines and put a socket on the fittings. Hopefully that works, as there’ll be no going back. There are a few good lines on there that I’m hoping to save, but we’ll see.
To add to the adventure, while investigating one of the body rust holes found during the state inspection, it appears that much of the passenger side sill no longer exists. So stay tuned for more welding…
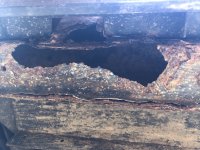
(This photo was taken after some “exploration” with my favorite screwdriver…)

Based on the corrosion on the lines and fittings, it looks like I’ll be cutting them apart. Fortunately, the caliper side of the pipe is in better shape, and looks like it’ll come out. The biggest hurdle is going to be getting a wrench on the fittings on the ABS regulator. Between seized fittings and nearly no access, I don’t quite know how I’m gonna work that without damaging something. The plan for now is the cut the lines and put a socket on the fittings. Hopefully that works, as there’ll be no going back. There are a few good lines on there that I’m hoping to save, but we’ll see.
To add to the adventure, while investigating one of the body rust holes found during the state inspection, it appears that much of the passenger side sill no longer exists. So stay tuned for more welding…

(This photo was taken after some “exploration” with my favorite screwdriver…)
Last edited:
if you weld in new sills, most guys will support the b pillar with a steel cage going from b to b pillar, then a to b to c pillar and then you can cut out what you need below without worrying about anything moving. check theUK crowd photos on Facebook or YouTube about how they do it to their RRCs. you should be able to get panels easily from Rimmer brothers, froggatts, or YRM. of course you could also bend these yourself or have a local metal company bend up some sheet metal for you as well, just in case you didn't have any leads.
Great input, Micheals, thank you! Froggatt’s has been a real wellspring for me; both supplying the parts for the body mount repair, and also using the excellent photos on their website as reference material for repairs.
That sill repair is going to be an interesting one. The rot seems to be localized to the B pillar, but also to go up it slightly. Once I get the brake lines done, I’ll pull the sill cover and get a better look. If it’s possible to custom-fabricate the repair panels here at home, I’ll likely do that. But if not, those are great resources for pre-fab parts!
I’ve spent the morning creeping along on the brake lines. Hand-bending is a bit slow going, but it gives me more control over the end result, as the AB kit seems to give a little more length than needed on each section. So I’ve been massaging each one to terminate at the correct point. Why LR, in their “wisdom,” decided to use hard pipe on the calipers, rather than just take flexible hose directly to the caliper is absolutely mind boggling to me!
Update: got the driver’s side front done. Took longer than planned, but progress. Tomorrow I’ll tackle pax front, which goes across the firewall. I predict shenanigans. For now though, we’re taking the win!


Last edited:
Deer season opened here yesterday, so I’ve been a bit distracted on my LR duties. However, here’s the update: the whole front end, (including a new prop valve, and all the plumbing to THAT) is complete.
Every brake line had to be cut at the fitting to remove it.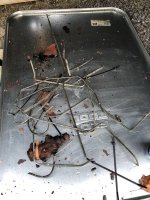
But, the finished product is looking fairly good, if a little like spaghetti!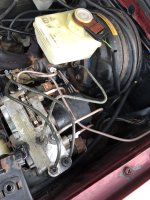
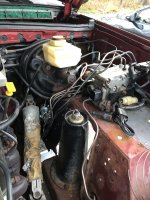
Interestingly, the lines running to the rear of the truck, seem to be in better shape than the ones up front. But I suspect they have been replaced more recently… the fittings on those are 12mm instead of the 11mm specified by LR (and used on the rest of the system). Given this truck’s mysterious history, it’s always fascinating to get a glimpse into what a previous owner must have done.
The present debate is whether to leave the mid-section and rear lines in there for now, or just have it all out. With as much other stuff as needs to be done, and winter fast approaching, if the rear pipes are still serviceable, there’s a temptation to leave them in there. We shall see.
The bigger challenge is that repairing the sill rot is going to dictate the removing of the rear door for access. Which means finding a weather window to do that, as the truck’s already questionable weather-tightness will be rather heavily compromised. I DID manage to do some further investigation with a grinder behind the plastic sill trim, and the picture is bleak.
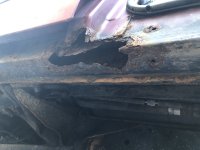
After some exploratory grinding and cutting, we’re closer to the eventual repair area, but the hole will be much bigger before it gets any smaller.
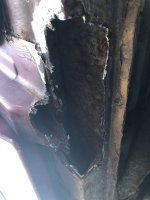
The only silver lining is that the inside of the sill, apart from a fair bit of surface rust, is sound. That’ll be helpful for sure.
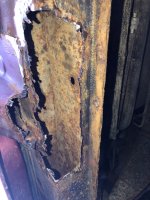
Once I get the repair area cut back to it’s final dimensions, I’ll really clean out, and then scour the sill area. Then once we’re done with the repair, it’ll all get fogged.
The battle wears on…
Every brake line had to be cut at the fitting to remove it.

But, the finished product is looking fairly good, if a little like spaghetti!


Interestingly, the lines running to the rear of the truck, seem to be in better shape than the ones up front. But I suspect they have been replaced more recently… the fittings on those are 12mm instead of the 11mm specified by LR (and used on the rest of the system). Given this truck’s mysterious history, it’s always fascinating to get a glimpse into what a previous owner must have done.
The present debate is whether to leave the mid-section and rear lines in there for now, or just have it all out. With as much other stuff as needs to be done, and winter fast approaching, if the rear pipes are still serviceable, there’s a temptation to leave them in there. We shall see.
The bigger challenge is that repairing the sill rot is going to dictate the removing of the rear door for access. Which means finding a weather window to do that, as the truck’s already questionable weather-tightness will be rather heavily compromised. I DID manage to do some further investigation with a grinder behind the plastic sill trim, and the picture is bleak.

After some exploratory grinding and cutting, we’re closer to the eventual repair area, but the hole will be much bigger before it gets any smaller.

The only silver lining is that the inside of the sill, apart from a fair bit of surface rust, is sound. That’ll be helpful for sure.

Once I get the repair area cut back to it’s final dimensions, I’ll really clean out, and then scour the sill area. Then once we’re done with the repair, it’ll all get fogged.
The battle wears on…
Well, it’s been a long, long winter. It started snowing up here sometime in late November, and the snow/ice persisted in some fashion until about ten days ago. Result: it’s been impractical at best to lie in a snow drift and work on the Rover. Instead, the old battle wagon has sat on jack stands with no front wheels on it, a baleful reminder of the value of indoor workspace. Now, however, as the daytime temps rise and we move into “mud season,” it’s time to get back to the grindstone and get the Disco back to roadworthy status.
Before I can really tackle the sill repair and the body mount, I need to get the brakes finished up, so that’s where we start. In November I was careful to leave the brakes air-tight. I replaced everything forward of the firewall, but left the pipes from the ABS regulator to the rear axle intact, along with those on the rear axle itself. Along the way, I discovered that the distributing block ON the rear axle was in atrocious shape as well, so Rovers North graciously sent me a new one in exchange for some cash.
Now, back to work.
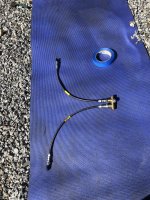
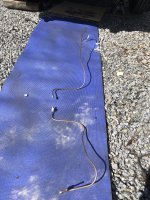
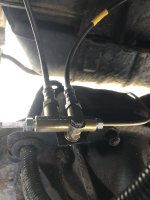
Day One back on the Rover complete. Because I’m now pathologically averse to corrosion, I’m using stainless steel fittings at every opportunity. So the new distribution block is bolted down with all stainless. My big disappointment is that the AB brake pipe kit advertises that their nickel-copper line as noncorroding, but they use steel banjo fittings, so there’ll still be a weak point there.
Yesterday, (Day Two back to Rover work) I was able to remove and replace the mid-body brake lines feeding from the 12mm fitting on the ABS regulator to the right side of the axle distribution block. I’d hoped to get both, and have the brakes ready to bleed next week when I get back from work, but alas, straightening, bending, and then wrestling those long runs of brake pipe took more time than anticipated. So off to work today for a week, and I’ll button up the brakes when I return. It feels good to be moving forward again!
Rover on.
Before I can really tackle the sill repair and the body mount, I need to get the brakes finished up, so that’s where we start. In November I was careful to leave the brakes air-tight. I replaced everything forward of the firewall, but left the pipes from the ABS regulator to the rear axle intact, along with those on the rear axle itself. Along the way, I discovered that the distributing block ON the rear axle was in atrocious shape as well, so Rovers North graciously sent me a new one in exchange for some cash.
Now, back to work.


Day One back on the Rover complete. Because I’m now pathologically averse to corrosion, I’m using stainless steel fittings at every opportunity. So the new distribution block is bolted down with all stainless. My big disappointment is that the AB brake pipe kit advertises that their nickel-copper line as noncorroding, but they use steel banjo fittings, so there’ll still be a weak point there.
Yesterday, (Day Two back to Rover work) I was able to remove and replace the mid-body brake lines feeding from the 12mm fitting on the ABS regulator to the right side of the axle distribution block. I’d hoped to get both, and have the brakes ready to bleed next week when I get back from work, but alas, straightening, bending, and then wrestling those long runs of brake pipe took more time than anticipated. So off to work today for a week, and I’ll button up the brakes when I return. It feels good to be moving forward again!
Rover on.
Sitrep: All brake lines are in place! No pictures, I'm afraid. Still need to work out supporting the lines as they run along the body/isolating them from vibration, but that is minor potatoes. Next hurdle is bleeding the system. I suspect I've lost 95% or more of the fluid in the replacement process. The only area of concern there is getting all the air out of the ABS regulator. I'll be using a Motive PowerBleeder to pressure bleed the system. (Mrs. Spark6, having never done a car project before, doesn't know what a privilege pressure bleeding is as opposed to being the designated brake-pusher!!) The RAVE manual seems fairly unconcerned with technique, so we'll soldier on. But if anyone has any best practices, I'll gladly take them. I'll be glad to have the brakes done and dusted so that, as the nicer weather comes on, I can turn my focus to repairing the body mount and door sills.
Making progress every day! Or at least, every other day.
I had the joy of replacing a front left sill body mount in January thanks to the professionally trained mechanic jacking up my truck on the body mount instead of either the chassis or the rock slider on either side. Being somewhat rusted after 27 years, it crushed pretty handily causing my truck to fail its state inspection. Fancy that. Not even an apology, just the equivalent of a "(whistle), that's gonna fail. Bring it back when you fix it."
I had the joy of replacing a front left sill body mount in January thanks to the professionally trained mechanic jacking up my truck on the body mount instead of either the chassis or the rock slider on either side. Being somewhat rusted after 27 years, it crushed pretty handily causing my truck to fail its state inspection. Fancy that. Not even an apology, just the equivalent of a "(whistle), that's gonna fail. Bring it back when you fix it."
Geez! I'm really sorry to hear that. I imagine you had to cut it off and weld in a new one?Making progress every day! Or at least, every other day.
I had the joy of replacing a front left sill body mount in January thanks to the professionally trained mechanic jacking up my truck on the body mount instead of either the chassis or the rock slider on either side. Being somewhat rusted after 27 years, it crushed pretty handily causing my truck to fail its state inspection. Fancy that. Not even an apology, just the equivalent of a "(whistle), that's gonna fail. Bring it back when you fix it."
The only area of concern there is getting all the air out of the ABS regulator.
So I have no idea if this works, I did this after changing out the ABS modulator on a D2 and it seemed okay...
I put all on jacks and took off the tires.
Started, put it in drive, and just let the rotors roll under idle power. Since there's absolutely nothing to prevent the unladen rotors from locking, when you push the brakes the ABS unit will start going apeshit.
I imagine this is cycling all four lines?
Yeah, it was about about a 10 hour day at Jagspeed's between kibitzing about Boba Fett and the Mandalorian series and cutting/riveting. We ended up welding a bit and riveting a lot. All in all, it went pretty well and looks great. The most epic part was getting the $40 worth of mount and bushings ($30 in shipping) from YRM in England. DHL lost it for over a week since it was wrapped nontraditionally. A box would have kept it safer, but it came looking like a wrapped up nutroll. No wonder it didn't fit through the DHL sorting equipment easily.Geez! I'm really sorry to hear that. I imagine you had to cut it off and weld in a new one?
Jagspeed in Latrobe?Yeah, it was about about a 10 hour day at Jagspeed's between kibitzing about Boba Fett and the Mandalorian series and cutting/riveting. We ended up welding a bit and riveting a lot. All in all, it went pretty well and looks great. The most epic part was getting the $40 worth of mount and bushings ($30 in shipping) from YRM in England. DHL lost it for over a week since it was wrapped nontraditionally. A box would have kept it safer, but it came looking like a wrapped up nutroll. No wonder it didn't fit through the DHL sorting equipment easily.
Yes. He’s still cranking it out over there. Right now, he has a 6 wheel Perentie ambulance undergoing a bit of a refresh. It’s a monster!Jagspeed in Latrobe?
Now that’s some out of the box thinking! I’ll keep that in mind and if we go that route, I’ll be sure to video it!So I have no idea if this works, I did this after changing out the ABS modulator on a D2 and it seemed okay...
I put all on jacks and took off the tires.
Started, put it in drive, and just let the rotors roll under idle power. Since there's absolutely nothing to prevent the unladen rotors from locking, when you push the brakes the ABS unit will start going apeshit.
I imagine this is cycling all four lines?
There’s something about parts from the UK… they always seem to come packed in the most… creative… fashion! Nice that they’ll ship them over here though. Nick Froggatt’s shop has bailed me out repeatedly with this rig.Yeah, it was about about a 10 hour day at Jagspeed's between kibitzing about Boba Fett and the Mandalorian series and cutting/riveting. We ended up welding a bit and riveting a lot. All in all, it went pretty well and looks great. The most epic part was getting the $40 worth of mount and bushings ($30 in shipping) from YRM in England. DHL lost it for over a week since it was wrapped nontraditionally. A box would have kept it safer, but it came looking like a wrapped up nutroll. No wonder it didn't fit through the DHL sorting equipment easily.
Sounds like it went about as well as it could have once you had part in hand. I’m still bummed I never made it out of Jagspeed… We’ll have to come out for a visit one of these days.