Heater Matrix

CORover

Well-known member
Jun 11, 2007
745
65
Colorado, USA
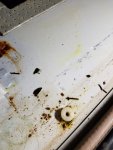
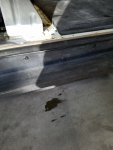
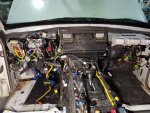
So the PO said the heater matrix was replaced and I believe him. The dash and wire routing were so poorly put back together that I am sure someone was in there, wrong and mismatched screws and bolts everywhere. But I have found antifreeze under the padding on the passenger side floor.

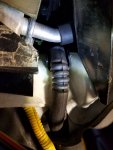
The question is, is this leakage from the replacement procedure, leakage from a current connection or still from the new heater matrix? Can these be pressure tested, just the core, or will doing the whole system do the same thing? I really don't want to rip everything out again but I could put it all back together the correct way...
 

CORover

Well-known member
Jun 11, 2007
745
65
Colorado, USA
I guess everyone is on faceplant now! So I will have to test this using the whole sealed cooling system. But of course the tester I borrowed does not have the correct adapter so I could not get it to seal. I vaguely remember FishEh going through this a while ago, I will search for it. I need to find the correct adapter to use with a standard pressure tester system. I just have to find the correct one.
 

Friday Night Disco

Well-known member
Jan 14, 2018
60
7
Fall City
You can pressure test the heater core by itself. Get some hoses from auto parts store and create two loops. One loop for regular system and second loop for just the heater core.

My guess...coolant does take forever to evaporate and could be left over from the fix. Or, the O rings and clamps on the heater core are leaking. You can pull the center console and look being at the O rings or place a tissue under them and see if tissue is damp
 

Swedjen2

Well-known member
Sep 12, 2018
594
127
California
You can get a UV coolant leak test kit off Amazon pretty cheap. Scotty Kilmer approved. (He's not a Land Rover fan, unless it's a Series vehicle, but he has a lot of good general info)
Add the small bottle of UV liquid to the coolant, run it for 5-10 min., or longer, then turn on your nifty new UV flashlight. Bob's your uncle.
The UV liquid is harmless so you leave it in and don't change the coolant until it's actually due.
 
  • Like
Reactions: JUKE179r

CORover

Well-known member
Jun 11, 2007
745
65
Colorado, USA
I am sure it is heater matrix related now. As a test I had clamped off the heater hoses for a while and monitored fluid in the overflow. it was stable for a month. Now that the cold weather hit us, I removed the clamps and the change was immediate. I could smell coolant in the cabin and the level changed in the overflow tank.

I tried to borrow a pressure tester from one of the auto parts stores but the version they had did not have the correct adapter and it was not possible to nail down which one was needed without ordering several to see which one worked. So I went to an Advance Auto parts store and they had a different and much bigger kit. I brought in a spare overflow tank for testing and found one or two adapters that seem to fit. Next step is to borrow the kit this weekend, pump things up and find the leak. I hope it is just o-rings or a connection issue but I should know this weekend.

The kit I will borrow is the Powerbuilt kit 70. The adapters are numbered and colored so I should be able to tell which one works.
 

CORover

Well-known member
Jun 11, 2007
745
65
Colorado, USA
Things are worse than I thought, the stupid pad they use is saturated with coolant. I am in the process of tearing it all out so I can see exactly where the leak is.
 

Attachments

  • 20191012_164548.jpg
    20191012_164548.jpg
    1.5 MB · Views: 8
  • 20191012_164357.jpg
    20191012_164357.jpg
    1.9 MB · Views: 8

CORover

Well-known member
Jun 11, 2007
745
65
Colorado, USA
So much coolant on the passenger floor that it pooled overnight and dripped out of a hole and onto the garage floor.
 

Attachments

  • 20191013_122753.jpg
    20191013_122753.jpg
    3.5 MB · Views: 5

CORover

Well-known member
Jun 11, 2007
745
65
Colorado, USA
Got the system pressurized and found a leak. It is coming from the upper matrix hose connection and running down the core, then down the tunnel and pooling on the passenger floor. I do not see anyway to get at this without pulling the dash. Anyone have experience with this?
 

Attachments

  • 20191013_141956.jpg
    20191013_141956.jpg
    3 MB · Views: 12

Frobisher

Well-known member
Dec 27, 2012
202
69
Pennsylvania
I had my 95 Disco leak out similar to that two years ago. I came out of work and there was a big puddle pooled on the asphalt below the passenger side. It seemed weird until I started poking around and then it was quite clear. First off, get a Proline or Genuine from Rovers North or AB or somebody reliable. Autozone says their's fits but the edges aren't round enough to make the slot, so no dice.

I worked off the tips at Post #7 here: https://www.landroversonly.com/forums/f9/heater-core-easy-1996-diso-37987/

I attached a ratchet strap from the passenger seat to the dash frame to carefully pull the bottom of the dash out from its position just enough to reach the matrix. If you go this route, you'll find the best place to apply the pull. Pull it back slowly to make sure it's all coming and you didn't miss any bolts anywhere. It really will go back in place when it needs to later. Pull the old matrix, swap in the new, check for leaks before you pack it back up. Sounds obvious but sometimes we rush things. With patience and care, you can get it done the same day you start.

Best wishes for bringing on the heat.
 

CORover

Well-known member
Jun 11, 2007
745
65
Colorado, USA
I decided to go all in and remove the dash. There were just too many issues with the last shop that did the replacement. Missing, wrong and un-tightened nuts and bolts. Broken, missing or incorrectly installed parts. I followed the workshop manual instructions, chassis and body section, dash panel assembly sub section, service repair no. 76.46.23. The instructions were pretty accurate, I was using the manual for 95 and on. Mine is a 99 SD but I did not have that exact manual so I had to improvise a few times. Took around 4 hours to remove but some of that was getting tools out as I needed them and dealing with some poorly routed wires from the last shop.
 

Attachments

  • 20191014_181703.jpg
    20191014_181703.jpg
    2.8 MB · Views: 12
  • 20191014_181613.jpg
    20191014_181613.jpg
    3.8 MB · Views: 12