
Figured some other folks out there may have to retire their D1 and move to a D2. Wanted to pass on what I did and a few of my lessons learned. A lot of this has been discussed before - just my summary of my "lessons learned" and what-all I did.
TECHNICAL LESSONS-LEARNED
• D1 Rovertym front bumper will work on the ‘03/04 DII with only a couple modifications. One of the mounting tabs on each side needs to be trimmed by about 3”. The D1 bumper “returns” too far back into the wheelwell of the DII (DII has larger wheel wells), so it was necessary to trim about 2” off of each of these returns. I don't think it as simple with the earlier D2's (99-02) as their grill drops below the bumper level.
• D1 differential will mount to the DII axle housing. The flange on the D1 differential is thicker, but longer bolts weren't needed for me. If you want longer bolts - Just-so-happens that the mounting bolts for the D1 rear axle half shafts are the right size and just a bit longer.
• I initially used the D1 driveshaft on the rear of the D2, but a few vibes – so I rebuilt a D2 front drive shaft and then had it lengthened for the rear end. I had Tom Woods make an adapter to allow the DC end to bolt to the TC. Unless you have one sitting around, it is probably better/cheaper to get a Tom Woods shaft built.
• For my washer bottle relocation – I went to the local junk yard and pulled a washer bottle with pumps from a Honda minivan. I picked this one as it has two pumps and is a small reservoir. Mounted it to the side of the overflow tank (I have not mounted permanently as it is on there with several zip ties) and extended the wires and hoses as per the tech write-up. Use a rubber stopper to cap the reservoir. Works great and costs about $15 to do.
• I had hoped to cut an 8” Weld-on pipe cap in half and weld on to make a diff-cover. This can be done on a D1/RRC/D90, but will not mount to a DII – the housing is larger on a DII and there is a big enough difference that the outside diameter of the 8” cap is about the same size as the outside diameter of the stock diff housing. As an after-thought, perhaps this could be done by welding mounting tabs to the outside of the cap, then welding those tabs to the axle housing….
• DI sliders will mount to a DII, but need to be shortened as DII wheelwells are larger.
• Pro-Comp ES9000 shocks EXP926505 are the right size for a DII with a 2” lift, but the eyelet diameter is too large for the rover mounting bolt. I tried to find the right size reducers with no luck. Bought some thin gauge sheet metal and made my own.
• The 03/04 DII has a different rear light setup then earlier DII’s. The lights in the bumper are the backup lights and rear fogs. I used ¾” led lights in the Greg Davis to replace the backup lights (http://www.partssystems.com/3-4-combination-clearance-marker-light.html). I used the rear fog power to mount a couple lights under the truck for more light when needed for spotting. Worked out well.
• Front OME shocks for the 2” lift are only about ¼” longer than stock shocks….If you truly want longer shocks, will need to look elsewhere.
• Homemade Snorkel
You will need a couple of these
http://www.spectreperformance.com/#CATALOG.8741
you can get them at most any parts store.
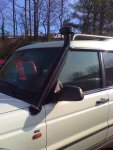
Piece of 3" exhaust pipe bent so it follows your windshield line, then vertical.
Big tube of sensor-safe sealant
Top - either tractor intake or one off ebay like this
http://cgi.ebay.com/ebaymotors/Snork...item2304c0deb2
5 stainless pipe clamps for 3" pipe
Piece of 1" bar stock (1" wide steel) - about 3" long
Self Tapping Screw
Edge moulding for around fender cuts - I found it at an upholstery shop.
You will need to pull the airbox - start by sealing the hole in the bottom of the airbox.
Cut the hard intake piping just next to the airbox - I marked mine then pulled it out of the box to cut it. You can then put a rubber coupler on the end of the flex duct you bought - it should press tight into the end of the cut pipe at the airbox. Seal all around the joint with sensor-safe sealant. I pulled the fender, then cut a larger square opening where the old intake piping left the fender. I connected a second flex duct to the first - there are directions on how to do it on the back of the flex-duct packaging. I coated the joints with sealant as well. I had to trim a bit of the lip where the fender bolts under the hood - just to allow the duct to set b/w the two layers of the fender. I made the fender cut, wrapped the edge of the cut with the edge moulding, then bolted the fender on with a little bit of the flex hanging out. Connected the exhaust pipe and lined it up as needed. I held the little piece of bar stock in place to tack weld it. If you can mark it it is better - If you don't make sure you cover everything up well with welding blankets so it doesn't pit the glass. Weld the tab so it goes from the exhaust pipe to under the roof gutter. Drill a hole in the steel tab for the self-tapping screw. Paint it - then attach the exhaust pipe to the flex duct and use the self-tapping screw to attach the assemble to the gutter by screwing upwards. Attach your top and you are good to go... PM me if you want more info.
Work Done:
• 2” RTE Springs with rear retainers
• D1 rear spring perches - gives a bit more lift in the rear
• Rebuilt front drive shaft with greasable U-joints.
• Rear driveshaft is a rebuilt front D2 DC front drive shaft – lengthened to fit
rear with adapter made by Tom Woods.
• Ashcroft Rear HD half shafts
• RTE D1 front bumper modified to fit DII
• Homemade front skid plate
• RTE CYA rear skid plate
• Homemade rock sliders with nerfs.
• Homemade snorkel with tractor intake top.
• Greg Davis Rear bumper with homemade nerfs
• Lucky8 extended front brake lines.
• RTE rear Stainless brake lines
• RTE Drag Link and Tie Rod with Stabilizer kit
• EBC Sport Rotors w/Greenstuff pads – since replaced all pads with autozone cheapies without issue. Two stuck calipers killed the greenstuffs.
• Ebay special 10000# winch
• 34X10.5 Swamper LTB’s
• Pro-Comp rear shocks (eye-to-eye, not DAP ones)
• Relocated washer bottle
• QT Mud Plugs
• RTE weld-on diff guards
• Removed resonator – exhaust exits behind rear wheel
• Slickrock front sway disconnects.
• Rear sway removed
• Front cross member removed to allow front axle drop.
TECHNICAL LESSONS-LEARNED
• D1 Rovertym front bumper will work on the ‘03/04 DII with only a couple modifications. One of the mounting tabs on each side needs to be trimmed by about 3”. The D1 bumper “returns” too far back into the wheelwell of the DII (DII has larger wheel wells), so it was necessary to trim about 2” off of each of these returns. I don't think it as simple with the earlier D2's (99-02) as their grill drops below the bumper level.
• D1 differential will mount to the DII axle housing. The flange on the D1 differential is thicker, but longer bolts weren't needed for me. If you want longer bolts - Just-so-happens that the mounting bolts for the D1 rear axle half shafts are the right size and just a bit longer.
• I initially used the D1 driveshaft on the rear of the D2, but a few vibes – so I rebuilt a D2 front drive shaft and then had it lengthened for the rear end. I had Tom Woods make an adapter to allow the DC end to bolt to the TC. Unless you have one sitting around, it is probably better/cheaper to get a Tom Woods shaft built.
• For my washer bottle relocation – I went to the local junk yard and pulled a washer bottle with pumps from a Honda minivan. I picked this one as it has two pumps and is a small reservoir. Mounted it to the side of the overflow tank (I have not mounted permanently as it is on there with several zip ties) and extended the wires and hoses as per the tech write-up. Use a rubber stopper to cap the reservoir. Works great and costs about $15 to do.
• I had hoped to cut an 8” Weld-on pipe cap in half and weld on to make a diff-cover. This can be done on a D1/RRC/D90, but will not mount to a DII – the housing is larger on a DII and there is a big enough difference that the outside diameter of the 8” cap is about the same size as the outside diameter of the stock diff housing. As an after-thought, perhaps this could be done by welding mounting tabs to the outside of the cap, then welding those tabs to the axle housing….
• DI sliders will mount to a DII, but need to be shortened as DII wheelwells are larger.
• Pro-Comp ES9000 shocks EXP926505 are the right size for a DII with a 2” lift, but the eyelet diameter is too large for the rover mounting bolt. I tried to find the right size reducers with no luck. Bought some thin gauge sheet metal and made my own.
• The 03/04 DII has a different rear light setup then earlier DII’s. The lights in the bumper are the backup lights and rear fogs. I used ¾” led lights in the Greg Davis to replace the backup lights (http://www.partssystems.com/3-4-combination-clearance-marker-light.html). I used the rear fog power to mount a couple lights under the truck for more light when needed for spotting. Worked out well.
• Front OME shocks for the 2” lift are only about ¼” longer than stock shocks….If you truly want longer shocks, will need to look elsewhere.
• Homemade Snorkel
You will need a couple of these
http://www.spectreperformance.com/#CATALOG.8741
you can get them at most any parts store.
Piece of 3" exhaust pipe bent so it follows your windshield line, then vertical.
Big tube of sensor-safe sealant
Top - either tractor intake or one off ebay like this
http://cgi.ebay.com/ebaymotors/Snork...item2304c0deb2
5 stainless pipe clamps for 3" pipe
Piece of 1" bar stock (1" wide steel) - about 3" long
Self Tapping Screw
Edge moulding for around fender cuts - I found it at an upholstery shop.
You will need to pull the airbox - start by sealing the hole in the bottom of the airbox.
Cut the hard intake piping just next to the airbox - I marked mine then pulled it out of the box to cut it. You can then put a rubber coupler on the end of the flex duct you bought - it should press tight into the end of the cut pipe at the airbox. Seal all around the joint with sensor-safe sealant. I pulled the fender, then cut a larger square opening where the old intake piping left the fender. I connected a second flex duct to the first - there are directions on how to do it on the back of the flex-duct packaging. I coated the joints with sealant as well. I had to trim a bit of the lip where the fender bolts under the hood - just to allow the duct to set b/w the two layers of the fender. I made the fender cut, wrapped the edge of the cut with the edge moulding, then bolted the fender on with a little bit of the flex hanging out. Connected the exhaust pipe and lined it up as needed. I held the little piece of bar stock in place to tack weld it. If you can mark it it is better - If you don't make sure you cover everything up well with welding blankets so it doesn't pit the glass. Weld the tab so it goes from the exhaust pipe to under the roof gutter. Drill a hole in the steel tab for the self-tapping screw. Paint it - then attach the exhaust pipe to the flex duct and use the self-tapping screw to attach the assemble to the gutter by screwing upwards. Attach your top and you are good to go... PM me if you want more info.
Work Done:
• 2” RTE Springs with rear retainers
• D1 rear spring perches - gives a bit more lift in the rear
1" spacers on front springs
• Rebuilt front drive shaft with greasable U-joints.
• Rear driveshaft is a rebuilt front D2 DC front drive shaft – lengthened to fit
rear with adapter made by Tom Woods.
• Ashcroft Rear HD half shafts
• RTE D1 front bumper modified to fit DII
• Homemade front skid plate
• RTE CYA rear skid plate
• Homemade rock sliders with nerfs.
• Homemade snorkel with tractor intake top.
• Greg Davis Rear bumper with homemade nerfs
• Lucky8 extended front brake lines.
• RTE rear Stainless brake lines
• RTE Drag Link and Tie Rod with Stabilizer kit
• EBC Sport Rotors w/Greenstuff pads – since replaced all pads with autozone cheapies without issue. Two stuck calipers killed the greenstuffs.
• Ebay special 10000# winch
• 34X10.5 Swamper LTB’s
• Pro-Comp rear shocks (eye-to-eye, not DAP ones)
• Relocated washer bottle
• QT Mud Plugs
• RTE weld-on diff guards
• Removed resonator – exhaust exits behind rear wheel
• Slickrock front sway disconnects.
• Rear sway removed
• Front cross member removed to allow front axle drop.
Attachments
Last edited: