Sub Woofer Install

D

D Chapman

Guest
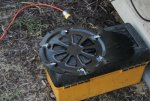
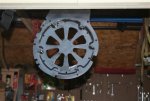
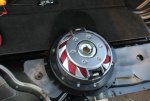
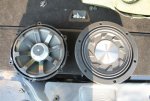
Tami wanted more "thump" to her system. So, she purchased a new subwoofer from Crutchfiled.

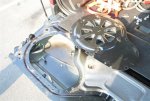
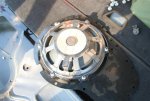
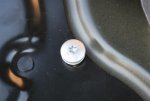
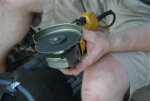
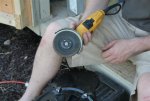
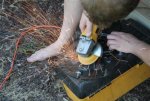
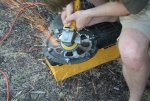
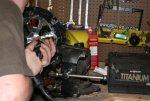
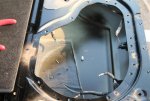
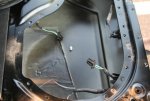
It was a bit of a project to find a subwoofer fit the LR3. The LR3 has a very shallow depth where the stock sub is located from the factory, so that reallt limits your selection.

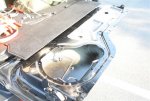
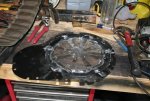
Here is a picture of the area where the stock subwoofer is located.
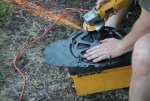
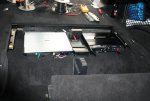
 

Attachments

  • Install 070.jpg
    Install 070.jpg
    55.3 KB · Views: 453
D

D Chapman

Guest
Here is a picture of the stock subwoofer and the mounting bracket it's attached to.
 

Attachments

  • Install 073.jpg
    Install 073.jpg
    56.7 KB · Views: 310
  • Install 072.jpg
    Install 072.jpg
    51.7 KB · Views: 280
D

D Chapman

Guest
From the bottom of the mounting plate, the stock subwoofer is only about 2.5" deep. That's pretty shallow for a subwoofer.

The options are limited for aftermarket subwoofers to fit the stock location in the LR3. But, Tami purchased the Pioneer TS-SW2541D and I was able to make it fit.

I started by removing all the trim on the tail gate. There are four screws located on the outside of the tail gate, just under the rear hatch door. Once those screw are removed, the top trim cam be pried off.

You then need to remove the support cables on the trail gate. There is a small metel, clip located on the outside edge of the connector that need to be pried off. Once that clip is removed, the connector can be removed.

Here is a picture of the clip removed from the ball connector for the tailgate support cables.
 

Attachments

  • Install 071.jpg
    Install 071.jpg
    24.2 KB · Views: 264
D

D Chapman

Guest
....after the support cable have been removed, the actual bracket in which they were attached to need to be removed. They just unscrew.

From here, you can pry the cover off the tail gate.

Once the cover is removed from the tail gate, you will see the subwoofer. The subwoofer is held into the tail gate by way too fucking many bolts. It takes a torques bit to remove these bolts.
 

Attachments

  • Install 075.jpg
    Install 075.jpg
    31.2 KB · Views: 169
D

D Chapman

Guest
Once the subwoofer is out of the truck, you'll have to remove the stock speaker from the mounting bracket. It's just bolted on by 6 bolts.

Then, get out your grinder with a cutting disk.
 

Attachments

  • Install 084.jpg
    Install 084.jpg
    33.5 KB · Views: 240
D

D Chapman

Guest
The Land Rover mounting plate has 6 studs that hold the stock subwoofer in place. These studs are either welded or epoxyed into place. In other words, you can't drive the studs out with a hammer. It's a wonderful design. So, you have to cut them off.
 

Attachments

  • Install 083.jpg
    Install 083.jpg
    61.8 KB · Views: 219
  • Install 080.jpg
    Install 080.jpg
    63.4 KB · Views: 233
D

D Chapman

Guest
Then put on your hard grinding disk.
 

Attachments

  • Install 090.jpg
    Install 090.jpg
    44.1 KB · Views: 179
D

D Chapman

Guest
Because of the odd size of the wonderful Land Rover subwoofer, the new subwoofer does not match the mounting pattern. The new subwoofer will also sit a bit closer to the grill on the stock Land Rover mounting bracket. I did not like this too much. It looks as the new subwoofer could easily extend and hit the mounting bracket when the bass really hits. So, I trimmed the bracket a bit.

I was able to gain about 1/4" of extra clearance by shaving down the ridge in the stock mounting plate.
 

Attachments

  • Install 091.jpg
    Install 091.jpg
    66.3 KB · Views: 290
D

D Chapman

Guest
Now get out your sanding disk.
 

Attachments

  • Install 085.jpg
    Install 085.jpg
    42.5 KB · Views: 120
D

D Chapman

Guest
......and sand everything smooth, getting rid of any sharp edges.
 

Attachments

  • Install 106.jpg
    Install 106.jpg
    64.2 KB · Views: 193
  • Install 103.jpg
    Install 103.jpg
    71.9 KB · Views: 145
D

D Chapman

Guest
I then had to mark and drill my new mounting holes for the new subwoofer.
 

Attachments

  • Install 108.jpg
    Install 108.jpg
    51.9 KB · Views: 178
D

D Chapman

Guest
......and give it a coat of new paint.
 

Attachments

  • Install 117.jpg
    Install 117.jpg
    41.7 KB · Views: 204
D

D Chapman

Guest
The new sub can now be mounted to the mounting plate.
 

Attachments

  • Install 118.jpg
    Install 118.jpg
    47.9 KB · Views: 257
D

D Chapman

Guest
The stock sub has two wires running to it. Both of these wires lead back to the stock amp.

The new sub only needs two wires - a positive and a ground. So, I just cut the stock wiring harness off the wires in the tail gate and wired them together. On the other end of these wires, I'll do the same thing. Basically, I'm taking four wires and making two - one positive and one ground.
 

Attachments

  • Install 111.jpg
    Install 111.jpg
    51.8 KB · Views: 179
  • Install 110.jpg
    Install 110.jpg
    47.8 KB · Views: 200
D

D Chapman

Guest
The new sub can now be mounted back into the stock mounting location.

....some how, we did not get a picture of this.
 
D

D Chapman

Guest
Here is a shitty pictures of the two subs side-by-side
 

Attachments

  • Install 096.jpg
    Install 096.jpg
    57.4 KB · Views: 308
  • Install 098.jpg
    Install 098.jpg
    51.1 KB · Views: 226
  • Install 101.jpg
    Install 101.jpg
    49.1 KB · Views: 263
D

D Chapman

Guest
Tami also got an amp to drive this new sub. She got the Rockford Fosgate Punch P250.2 .

This amp is a 60w x 2. This amp is also bridgeable. So, when bridged into one channel, this amp will be 250w x 1. That's more than enough for this new sub.
 

Attachments

  • Install 115.jpg
    Install 115.jpg
    43.9 KB · Views: 173

umbertob

Well-known member
Apr 26, 2007
230
11
Altadena, CA
I hope it sounds good by the time you are done. Similar installs on the liftgate of the RRS (different door but same sub, judging by your pictures) resulted in very boomy performance at all but the lowest playback volumes. Apparently the location is only good enough for LR's weak "paper" sub driven by the stock amp, anything even slightly more powerful overwhelms the shallow enclosure, causing all sorts of vibrations, rattles, air leaks and just plain crappy bass. Perhaps it's in part due to the RRS one-piece liftgate design. Good luck tomorrow.

http://rangerovers.net/forum/viewtopic.php?f=5&t=12091
 
Last edited: