| Author |
Message |
    
R. B. Bailey (Rover50987)
| | Posted on Friday, January 17, 2003 - 11:27 pm: | 


|
For all of you who helped me get to this point, thanks.
I wanted to show you a PDF (acrobat) file wiring diagram that I made up for the job of getting the Hella work lamp on my roof rack to actually work.
This is Version 2.0! I have improved it so that the components are roughly positioned to look like they would in the car... but it is still very crude and simple, just the way I like it.
Anyway, look it over, see if it looks good to you, let me know if there are any mistakes. Especially with the fuse amp rating - ?? - should it be up to 20?
I am doing the job this weekend. I will take lots of pictures and will document it all on my web site. And if Ho thinks this diagram will work without melting anybody's vehicle, then he can use it in the tech section of this web site.
I will let you know if it melts my vehicle.
http://landrover.mrbaileyshistory.net/graphics/hella_wire.pdf |
Ken Tipton (Irish_Nv)
| | Posted on Saturday, January 18, 2003 - 12:29 am: |
|
The only thing I see is you have a "running light 12v power source" to run the switch for the relay. You could save some trouble and just tap that wire from the main 12v wire you are pulling from the batt. Also you have a 12g 12v wire at the lamp and grounding it with a 14g wire. what ever electrons flow in have to flow out. In this case not a big deal but as a rule of thumb the pos. and neg. should be of the same gage. |
R. B. Bailey (Rover50987)
| | Posted on Saturday, January 18, 2003 - 01:44 am: |
|
Thanks for the heads up about the 12g in 14g out, I thought about it, but didn't change it! (You can tell I'm doing this with little experience, nothing formal.)
I decided to tap into the running lights after the other conversation over the past few days on this web site. I figured it would be easy, and it should now give me an alarm when the light is left on since the running lights need to be on for the work light to get power.
http://landrover.mrbaileyshistory.net |
Jerry Crawford (Jcrawford)
| | Posted on Saturday, January 18, 2003 - 08:04 pm: |
|
I'd like to see how your looming your wire and how your getting it to the lamp on the rear of your roof rack |
R. B. Bailey (Rover50987)
| | Posted on Saturday, January 18, 2003 - 11:32 pm: |
|
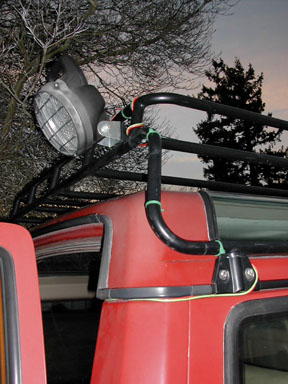
Jerry, I've now got pictures, I will update my web site in a day or two. It wasn't quite as hard ad I had feared. But I am not totally satisfied with the way the wires are entering the cab.
http://landrover.mrbaileyshistory.net
It will be updated on that site. |
John Moore (Jmoore)
| | Posted on Saturday, January 18, 2003 - 11:56 pm: |
|
Jerry,
That is the same lamp I am trying to mount with your bracket. Hella Mattador.
It's been too cold to play with, I will let you know when I get it on my rig.
-John |
joshua Frances (Joshua)
| | Posted on Sunday, January 19, 2003 - 12:12 am: |
|
Hey RB...just a thought
looks good, but if you changed that wire to black, or red and ran it inside the gutter with some adheasive, you wouldnt really see it all at.
also, for looks, you could change the green wire ties to black as well
sweet worklamp and thanks for the wire schematics |
Paul D. Morgan (V22guy)
| | Posted on Sunday, January 19, 2003 - 08:22 am: |
|
Mr. Bailey,
Don't forget about protection for that wiring.
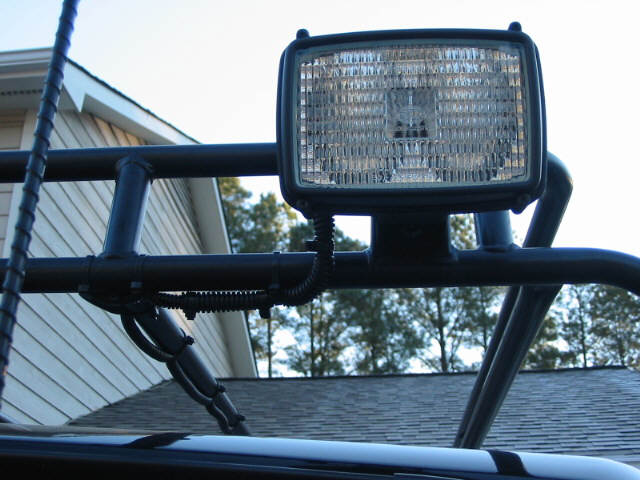
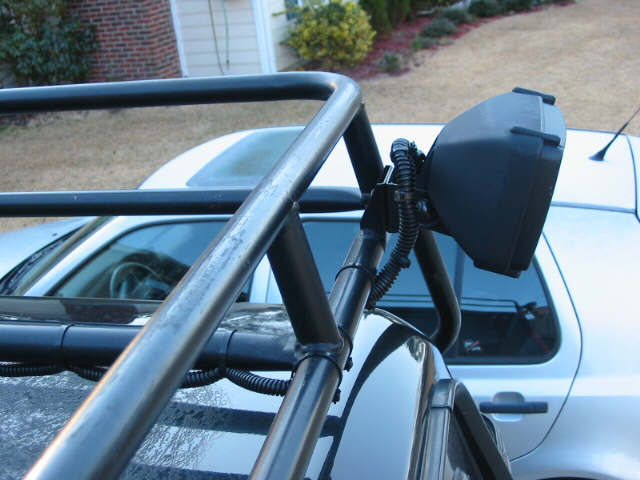
As you can see, I used the basic Home Depot 3/8" flexible conduit. I placed a black tie strap about every 4-6" down the tube. This allows me to hook up cargo straps for when I buy wood at Lowes.
Paul
'00 ROVER |
R. B. Bailey (Rover50987)
| | Posted on Sunday, January 19, 2003 - 07:59 pm: |
|
Yes, as I said, I am not satisfied with the way the wires go down the side and into the cab. I may do that little bit of external wiring again, and I do have some of that flex tube to go over it once I get a permanent solution.
Do any of you know of some heavy duty black tape that will stick to ANYTHING that I could wrap around the wires and the rack? That would be the best set up, except possibly some small conduit that could be bent to fit the curves and feed the wires directly to the entry point at the door.
By the way, I really like having the light tapped into the running lights. I can turn it on without using the key in the ignition, but I get a warning bell if I leave the lights on, and with the interior switch it is independent of the running lights. |
Paul D. Morgan (V22guy)
| | Posted on Sunday, January 19, 2003 - 08:31 pm: |
|
Just double wrap standard electrical tape and you will be fine. |
R. B. Bailey (Rover50987)
| | Posted on Sunday, January 19, 2003 - 10:33 pm: |
|
Yes, but it will start coming off within a week with freezing and wet weather. |
Mike B.
| | Posted on Sunday, January 19, 2003 - 11:55 pm: |
|
Try heat shrinking the wires. Home Depot sells rolls of it. You feed the wires into the heat shrink and then heat it. It looks nice and neat and makes the wires stiffer so they follow the lines of the roof rack without sagging as much. I did this on my Disco and I'm happy with the results.
Thanks,
Mike B. |
gp (Garrett)
| | Posted on Monday, January 20, 2003 - 10:46 am: |
|
i've had electrical tape holding my wires down for well over a year. still there.  |
Greg P. (Gparrish)
| | Posted on Monday, January 20, 2003 - 11:50 am: |
|
I did a little be of an over board method. I soldered each connection with high silver content solder. Then I taped the bare wire. Then I heat shrinked each individual wire. Then I taped the positive and negative wire together around the heat shrink. Then I heat shrinked the whole thing and then taped it again. The, I inserted it all into plastic split loom tubing, and plastic wire tied it every 3 inches or so.
Either I have a really sealed, long lasting wiring job and I didn't waste much time, or if I have a problem it will take me forever to get down to it and it was all for nothing.
I'm hoping for the first one.
Although, it is a bit over board. |
gp (Garrett)
| | Posted on Monday, January 20, 2003 - 12:55 pm: |
|
you really have issues greg. i know of a good therapist. |
Jason Bard (Jbard)
| | Posted on Monday, January 20, 2003 - 02:31 pm: |
|
Garrett, I was thinking the same thing. I didn't think it was possible for anyone to be more OCD than me.
Or, don't work on the Rover when high. |
Paul D. Morgan (V22guy)
| | Posted on Monday, January 20, 2003 - 06:14 pm: |
|
Yeah Man,
There isn't an airplane on the planet that is wired as well as Greg's Truck. If the big A-bomb ever get dropped in Philly, Greg's Hellas will still work. Hell I bet he could even take a hit from our new flying laser that bush approved. |
gp (Garrett)
| | Posted on Tuesday, January 21, 2003 - 07:42 am: |
|
well i just thought you were a pervert anyhow Jason. but a pervert with OCD? damn that takes talent! maybe you two should start some 'special' group.
how can i score a flying laser? i need one. |
Jeremy Parkhouse
| | Posted on Tuesday, January 21, 2003 - 08:57 am: |
|
To Greg Parrish,
Hi there Greg, you've been a great help upto now. I have very nearly finished my wiring of 4 hellas + worklamp.
I have 3 switch panel wired (Nathan), roof loom wired, 'sandwich box' under hood, but none of it is actually connected together yet.
Where 'exactly' and what colour are the wires where you tap into for the supplies to switches pins 1 & 2. I was going to use main beam for roof lights and side lights for worklight.
Sorry to be such a pain but as everyone else is doing, I prefer to double check first and do the job once!
Cheers
Jeremy Parkhouse
(Disco II, Dhahran, Saudi Arabia) |
Greg P. (Gparrish)
| | Posted on Tuesday, January 21, 2003 - 11:53 am: |
|
Jeremy,
I tapped into the running lights for my switch power and I tapped into the battery directly for my light power. I just tapped the running lights down at the bulb itself. That way, I could be sure of the wiring I was using. Just be sure to test for which is the positive wire. |
Jeremy Parkhouse
| | Posted on Tuesday, January 21, 2003 - 11:59 am: |
|
Thanks Greg,
It's taken a bit of time collecting the bits...all obtained outside Saudi ie USA!! With a bit of luck it should all be installed this weekend.
Once it's done I'll post some photos.
thanks for the help
Jeremy |
R. B. Bailey (Rover50987)
| | Posted on Wednesday, January 22, 2003 - 12:11 am: |
|
Jeremy, I just wired mine this weekend and am happy with it. Here is a primitive diagram I made up to help myself remember what to do:
http://landrover.mrbaileyshistory.net/graphics/hella_wire.pdf
I too tapped in at the running light, ran the battery tap and the running light wires up the side of the engine bay and into the cab through a rubber grommit. I was able to pull the wires through by just looking up under the dash and seeing the wires I had just pushed through from the engine bay - easy. |
Shane C. (Qsiguy)
| | Posted on Thursday, January 23, 2003 - 06:20 pm: |
|
The info about alarm installs I posted on this site has good info on locating some of the major electrical circuits like ignition on/off, battery constant, running lights, etc. They're in the tech section called "Alarm install 1995" and "Alarm install 2001". FYI
Shane
Quality Sound
95 DI |
R. B. Bailey (Rover50987)
| | Posted on Sunday, January 26, 2003 - 12:54 pm: |
|
OK, my web site is updated with the description and photos of the wiring process. I will update it again in a few days to show how I did the final version of the external wires from the rack to the interior of the vehicle. It all turned out pretty nice in the end, looks good, and works!
http://landrover.mrbaileyshistory.net |
Jeremy Parkhouse
| | Posted on Saturday, February 01, 2003 - 10:06 am: |
|
Is there any reason why you can't tap into the side lights on the wires running out of the fuze box inside the cab?
I still need two taps from the side lights to go to pins 1 & pins 2 on my bank of three 'ash tray' switches. It would seem pretty neat just to tap in under the dash board?
Also does anyone know where there is an 'in cab' earth point for pins 5 of the switches. Again it seems a shame to have to push wires through grommets if it can be earthed inside the cab?
This is the final part of my install and I'm worried about making sure I get it right!!
Cheers for now
Jeremy Parkhouse |
David Hobbs (Ca_Surveyor)
| | Posted on Saturday, February 01, 2003 - 11:34 am: |
|
I would think about using vacuum hose to protect the wires verses the flex conduit. It would be smoother and foreign matter would not get in the opening. |
R. B. Bailey (Rover50987)
| | Posted on Saturday, February 01, 2003 - 12:09 pm: |
|
Jeremy, you could. But I found that running the wires though the engine bay and through that grommit was the easy part. As far as grounding, the screw that is under the right side foot well trim (side trim) is probably capable of holding 3-4 more wires with the nut that is currently on there. Look at my photos and you will see where I am pointing to. Unless I am not understanding where you want to ground.
http://landrover.mrbaileyshistory.net |