| Author | Message | ||
R. B. Bailey (Rover50987) Member Username: Rover50987 Post Number: 241 Registered: 07-2002 |
OK, I finally got the LR switch for the work light that I wired. The $3.00 on-off switch in the dash right now not only looks terrible, but it is sitting a little cock-eyed in the socket. Anyway, the LR switch has 5 small pins. I have two wires, one to the 12v source, one from the #86 pin on the relay. Which goes where? I have included a photo with the side view and rear end view of the switch. The pins are numbered 1-5 from L-R. 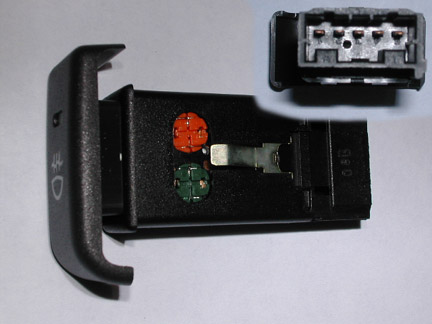 http://landrover.mrbaileyshistory.net | ||
Ken Tipton (Irish_nv) Advanced member Username: Irish_nv Post Number: 67 Registered: 10-2002 |
If you have a multimeter with a continutiy tester mode on it just push the the swith and test the pins in pairs till you hear a beep. when you find a pair turn the switch off if the beep stops that is the pair you need. it doesn't matter where you put the 2 wires as long as it is the two pins you idenified. there should be a 12v in to control the light (on the switch) when depressed as well. | ||
Peter Carey (Pcarey) advanced member Username: Pcarey Post Number: 471 Registered: 05-2002 |
http://www.geocities.com/Baja/Canyon/4628/auxlight.html Matters how you want to do it. If just those two wires will do, then 1 and 4. If you want the switch to light up like the rest, then check that link. | ||
R. B. Bailey (Rover50987) Senior Member Username: Rover50987 Post Number: 242 Registered: 07-2002 |
Yes, that works, I got the light to work with this switch, but I noticed that the switch has two internal lights, one for when the headlights are on so you can see the switch at night, the other for when the light is on, just like the cruise control, or rear fog light switch up by the steering wheel. So I experimented, and got the light to work like I said. I even got the little lights to come on and off when the switch is pushed in, just like they are supposed to. However! After I got everything in and was cleaning up, I started the truck and put it into it's parking place, tested the switch one more time, and while it works perfectly, it does not turn the light off, even when the switch is turned off! I then have to turn the headlights one, then all off, then the work light (WL) will also go off. I am not sure of the specifics, but evidently what is happening is that when I turn on the running lights - which is where I get my 12v source - then turn on the WL it turns on the relay like it is supposed to, but even when the switch is turned off, the relay does not turn off until the headlights and running lights are turned off. So, while I technically have it wired correctly, it is not technically working correctly, because of the technicallity of the relay working off the battery and the switch working off the running lights, which obviously have their own relay that goes off and on with the headlight switch... technically speaking... So how do I wire so I can enjoy my pretty little interior switch lights, and have a functional on-off switch? http://landrover.mrbaileyshistory.net | ||
R. B. Bailey (Rover50987) Advanced member Username: Rover50987 Post Number: 243 Registered: 07-2002 |
Actually, I think the Lighting 101 page will solve my problems, I will need to do a little more wiring though. I was not aware that this switch would have this type of connection - but I should have known! Anyway - question: If I use the same 12v source (running lights) for both pins 1 & 2, shouldn't the switch illumination lights work when the running lights are turned on? And my problem would then be solved if I actually use the ground #5 and the open #4 properly. Right? I am now using both pins 1 & 2, and both illumination lights are on, but I am using pin #5 as my... OPEN I think, or whatever it is that goes to #86 on the relay. Anyway, if you understand what I just said, then reply - if not, then I can't help you and you can't help me so go look at my H2 post in non-tech and have a laugh. | ||
max garcia (Max_n_erica) New Member Username: Max_n_erica Post Number: 1 Registered: 02-2003 |
Mr. Bailey Hi do you have a part# for that switch? Do you know how many amps it is? Thanks for any help | ||
R. B. Bailey (Rover50987) advanced member Username: Rover50987 Post Number: 245 Registered: 07-2002 |
Don't have it on me right now, do a search for "switch" under Discovery I, Electrical at Atlantic British. I think it was $15.00 | ||
Robbie (Robbie) advanced member Username: Robbie Post Number: 297 Registered: 02-2002 |
part # AMR4138 |