| Author | Message | ||
Lawrence Tilly (L_tilly) Member Username: L_tilly Post Number: 67 Registered: 02-2002 |
Hello, Fellow DWebers. My quest to replace my rotoflex has grown in scope (naturally). The damage done when the previous roto went caused some gouges on the three bolt holes on the propshaft. Between that and the fact that the bearing housing appears to be fused permanently into the shaft, I decided to just pull and replace the whole thing. So... I've never messed w/ U-Joints before, and am looking for the easiest method of pulling the old shaft. Here are a couple pics from under my truck for reference. I have hope that there's a way of seperating this at the U-Joint itself, since the four boult holding the other half of the U-Joint look like most others under my truck (rusted into a single piece of metal). 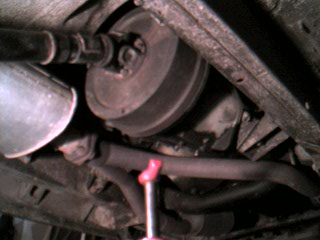 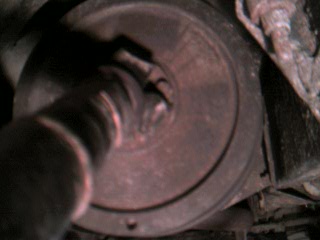 advTHANKS!!! Lawrence [email protected] 96 Disco "Beowulf" NH, USA | ||
Alex Cabrera (Alexcabrera) Member Username: Alexcabrera Post Number: 81 Registered: 12-2002 |
From experience.. its going to be tough! as hell trying to get the u-joints out while still attached. Spray the hell outta the bolts with some penetrating liquid and then you might have a better (easier) chance for the U-joints with the driveshaft down. See thread about the press that you will need to change the ujoints. Spray and lightly tap the rusted bolts. | ||
Brian Dickens (Bri) Member Username: Bri Post Number: 200 Registered: 08-2002 |
I did this on a '95 a couple weeks ago. Although mine looked rusted well, the drive shaft came off without a hitch. | ||
Tbow (Tbow) Member Username: Tbow Post Number: 32 Registered: 12-2002 |
I just did mine a few weeks ago and ya got to take it off from the drum. Just use a 6 point socket and it looks rusty, but it'll come off at the parking brake drum. | ||
Rick Lindgren (Slacker) Member Username: Slacker Post Number: 118 Registered: 06-2002 |
Hit the damned things with some PB Blaster ahead of time. That stuff is great. Tbow is right about the 6 point socket if they are really rusted on bad. I started to strip one of mine with a 12 point before I realized what I was doing. The upside is mine looked bad but came off pretty easily with a good soaking of PB Blaster and some grunting with a 9/16' 6 point socket. Also, regardless of what type nut you use when you put it back together, put some loctite on the threads so it won't be so nasty next time. Rick | ||
Paul T. Schram (Paulschram) Senior Member Username: Paulschram Post Number: 1007 Registered: 02-2002 |
It isn't that big of a deal as everyone else has stated. Use a good end wrench to break the nuts loose, then use a 12-point 9/16 that has been ground to within an inch of its life to provide for more clearance. You will see where to grind once you get started. I have a set of wrenches "Customized" for this process. When pressing the joints back in, do not just lay the yoke on its ear and press away-you'll bust the cups every freakin' time. The yoke is not completely perpendicular to the centerline of the joint and as a result, you will need a fixture to support the yoke independently of the ears. I clamp a piece of 4" tube to my press. The tube has two holes drilled/tapped in it to secure the yoke in a perpendicular attitude to the press. Don't be too concerned about tearing up the nuts you remove. They are merely 3/8-24 nylocs that shouldn't cost more than $0.25/each at NAPA. In fact, you SHOULD be replacing them each time anyway, but I reuse mine once and then replace. Peace, Paul | ||
Rick Lindgren (Slacker) Member Username: Slacker Post Number: 119 Registered: 06-2002 |
Paul, are you talking about grinding a closed end wrench to fit into the tight spots. I would recommend a flare wrench if you can get your hands on one. http://www.sears.com/data/product_images/tools/large/00944171000-dlv.jpg They work great, provide good torque without stripping anything, and even get into that tight area where the front drive shaft attaches to the front diff. Rick | ||
EricV (Bender2033) Member Username: Bender2033 Post Number: 122 Registered: 08-2002 |
Please for the love of all things heavy and made of metal, tell us that you are not using the Y pipe as a jacking point? PLEASE say it is an optical illusion. | ||
Joe Still (Joedisco) Member Username: Joedisco Post Number: 47 Registered: 09-2002 |
Lawrence, I worked on my rflex last weekend. Strarted at the rear and it was gonna have to be pulled at the front to clear- I couldn't get prop shaft pushed fwd enough to clear stuck centering pin. I bailed on mine and put it back temporarily cause my centering pin bushing is shot. Then I found out I coudln't get the bushing separately from Nathan. Did you get the LR kit which has rflex and bushing? Mine was after market so I'm looking for a substitute for the bushing before resuming Joe | ||
Paul T. Schram (Paulschram) Senior Member Username: Paulschram Post Number: 1016 Registered: 02-2002 |
Rick: Yes, I am suggesting that one grind a wrench. Flare wrenches are fine, but the part where the rub (grin) is where the wrench meets the shaft, if you increase the clearance at this point, you gain a few extra degrees of rotation and you need every degree you can get there. I bought a bunch of cheap wrenches to grind down and once I proved it worked, I bought a good wrench to grind. Peace, Paul |