| Author | Message | ||
Lawrence Tilly (L_tilly) Member Username: L_tilly Post Number: 88 Registered: 02-2002 |
I have my old rear propshaft out and am trying to get the new one in, but on the rear diff flange I cannot get the centralizing peg off. Here's the pieces that's kicking my ass (I don't have my laptop this weekend, so I had to steal a pic from the tech section): 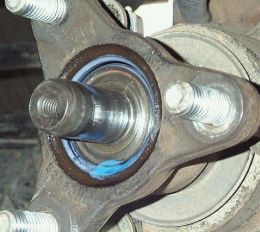 In the pic above there is a pretty blue gunk surrounding a shiny peg. If I'm understanding the process correctly based on what I see in the service manual and tech section, everything "inside" the ring of blue is the centralizing peg that I'm trying to get out (the extended peg itself appears to be a single piece with the wider portion). Now, picture this: That shiny peg is a wonderful shade of rust. The exact same shade, in fact, as the rest of the flange. There is a very thin grove between the peg and flange, not even wide enough to put a sharp knife in more than a hair. I have been heating the peg with a butane torch to the point where there is a wonderfuly noxious white smoke rising from the flange and even as far back as the diff housing is starting to feel a little warm to the touch, but when I take channel locks to the peg it still won't budge a fraction. I'm worried about heating it more due to the risk of buring oil (I have already drained the diff to be safe) and the fact that it has not shown any progress at all. I am trying to track down a bolt to try running thru the peg to try to back it out. In an earlier messge I was told it's an 8mm 1.25 pitch...is that what I need to ask for at the stores? Other than that, does anyone have any other ideas? I need to get this project finished this weekend if at all possible, Monday at the latest, since I need the truck to pick up my wife and baby from her folk's house. Lawrence [email protected] 96 Disco "Beowulf" NH, USA | ||
Eric Ratermann (Ericrat) Member Username: Ericrat Post Number: 41 Registered: 08-2002 |
I used a slide hammer from Napa. The big one for for bulling bearings and such not the little body puller model. There is a sleeve that you slide your 8x1.25 bolt through and then attach the slide hammer. Worked like a charm. Eric | ||
Lawrence Tilly (L_tilly) Member Username: L_tilly Post Number: 89 Registered: 02-2002 |
That would be a great idea, Eric, except I had a turn for the worse a couple hours ago. I picked up a grade 8 bolt this afternoon and tried using it to back out the pin as per an earlier suggestion. It threaded smoothly all the way down but as soon as I tried tightening it more to "push" the peg out, the bolt sheared off flush. Naturally.  I wasn't familiar with the tool you mentioned and hadn't seen that suggested before. As you can imagine right about now I'm wishing I decided to have dinner before I tried the bolt method rather than after (then I would have checked back and seen your message). I wasn't familiar with the tool you mentioned and hadn't seen that suggested before. As you can imagine right about now I'm wishing I decided to have dinner before I tried the bolt method rather than after (then I would have checked back and seen your message). I am afraid at this point my only course is the heat and beat method. Does anyone know if there is a significant risk of fire if I just keep the torch going against the peg? I just have no idea if that white smoke I saw earlier was a Good Thing or a Bad Thing. -Lawrence | ||
Milan (Milan) Member Username: Milan Post Number: 149 Registered: 10-2002 |
Don't you need the rotoflex flange to expand and the peg to shrink? I'd try ice on the peg and heat on the flange. Someone correct me if I'm wrong. I'm not very good with torches, other than lighting things on fire. | ||
Alex Cabrera (Alexcabrera) Member Username: Alexcabrera Post Number: 101 Registered: 12-2002 |
I've done mine and heat worked like a charm... I had my buddy use a torch then some channel locks/vice grips wiggled it out. | ||
Lawrence Tilly (L_tilly) Member Username: L_tilly Post Number: 91 Registered: 02-2002 |
I've been at it with a "plumbers torch" to the point of using up most of one of those canisters, and I haven't seen any change in the thin divider between the peg and surrounding flange. Tomorrow morning I'm going to call around to some auto service places until I find someone that can finish the job for me. It is so frustrating, but so many of my projects on the Disco are made into major problems due to corroded / seized parts. Once I get them off, it's always so easy to finish the job, but dang this is a PIA sometimes. -Lawrence |