| Author | Message | ||||||
Chris Merritt (Smokinbro) Member Username: Smokinbro Post Number: 65 Registered: 08-2001 |
I've done a few searches, but I havn't come up with the information I need. I was working on the '98 D1 on the weekend. I noticed that my alternator is giving me notice that it intends to pack it in soon. (Unpleasant, irregular whine/grind sound). Has anyone had any luck sourcing non-Land Rover alternators. If so, what was the make and part number - cost etc. Thanks for the help! | ||||||
Rob Davison (Nosivad_bor) Senior Member Username: Nosivad_bor Post Number: 109 Registered: 02-2003 |
../7/13492.html"../7/15207.html" target="_blank">../7/15207.html"#333333"> | ken nishikawa (Scubaman99) New Member Username: Scubaman99 Post Number: 28 Registered: 06-2002 |
Hey Chris i just replaced my this weekend. (95 D1) there is a local rebuilder who had one in stock. $128 w/1 yr warranty AutoElectric KEN | ||||
Chris Merritt (Smokinbro) Member Username: Smokinbro Post Number: 66 Registered: 08-2001 |
Ken thanks! Did you get a re-built Land Rover alternator or did they give you something 'similar'? I don't want to fork over huge bucks for an alternator if I can use a 'generic' one and save. | ||||||
Erik Olson (Jon) Senior Member Username: Jon Post Number: 323 Registered: 02-2002 |
Ken, What special tools are required for the swap - I just got my alternator today. Thanks! e | ||||||
Steve Hinton (Steve_h) New Member Username: Steve_h Post Number: 10 Registered: 02-2003 |
No special tools needed just disconnect the battery, remove the top of the fan shroud, take the serpentine belt off the altenator pully (if your careful it will stay on the other pullys) unplug/remove the wires on the back of the altenator, remove the two bolts holding it on and put the new one in and reverse the steps above. Be sure the belt goes completly on all the pullys. Also you'll need to reenter your radio code once your done. All in all it should be about a 20 min job. | ||||||
Erik Olson (Jon) Senior Member Username: Jon Post Number: 324 Registered: 02-2002 |
Okay, I'm without a manual so please forgive what might be a stupid question. How do you get the serpentine belt back on? There is what appears to be a tensioning wheel under and to the left of the alternator. Loosening the only bolt (13mm, same as alternator through-bolts) the flange slides forward about 1/2" off of a locating pin and then will rotate on the center bolt through about 180 degrees. Okay, now exactly how to get it back on? There is what appears to be a leverage point on the flange, but I can't for the life of me get a proper angle to reseat the flange on the locating pin! I know I'm missing something here, because I've never had so much trouble with a belt. Any help is appreciated - and if anyone has a D1 belt diagram, I'd be in your debt! Cheers, e | ||||||
Tbow (Tbow) Member Username: Tbow Post Number: 58 Registered: 12-2002 |
Couple of suggestions. First remove the fan. If you try to do it without removing the fan, you could break the fan blade. Been there done that. to remove the fan, you can get to it with a crecent wrench and hit it sharply to the left, with a composite or hard rubber hammer. It should spin right off. Next use a 15mm socket and pull the tensioner pully down (towards the right) and remove the belt. I would sketch a picture of the belt routing before you take it off. But I can email you a diagram if you need one.. | ||||||
Erik Olson (Jon) Senior Member Username: Jon Post Number: 325 Registered: 02-2002 |
Now that the belt has gone slack, is there a "timing" position that I need to restore - 3.9 V8i? So, what is the wheel down to the left of the alt? Thanks again, I'll pull the fan off before doing any futher work! Cheers, e | ||||||
ken nishikawa (Scubaman99) New Member Username: Scubaman99 Post Number: 29 Registered: 06-2002 |
hey chris sorry for the delay... as for the alt itself... its a "factory unit" they basically take in "bad" alts and refurbish them to "like new" condition and they give you a 1yr warranty to boot as for replacing it rebolt the two mounting brackets. replace the three wires to the back of the alt this should take all of five / ten min... the more difficult part is replacing the belt there are two parts to the tensioner... the first is the bolt that holds the tensioner on the eng block and the second is the tensioner it self.... you dont really need to remove your fan.. least i didnt... the fan isnt symetric... spin it and you will see a bunch of fins close together then a small gap then a bunch of fins together... find the gap now, get a socket wrench with a short extension... i cant remeber the size of the socket but its like 14 or 15mm. put it on the tensioner... crank clockwise. that will create slack by moving the tensioner down slightly... now carefully manuver the belt back in place... the whole job can be done by one person in about 15 - 30 min.... but haveing two people for putting the belt back on is nice... one to move the belt... one to loosen the tensioner... hope that helps.... | ||||||
ken nishikawa (Scubaman99) New Member Username: Scubaman99 Post Number: 30 Registered: 06-2002 |
curtesy of leslieB 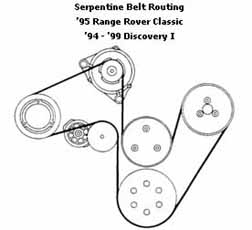 | ||||||
Erik Olson (Jon) Senior Member Username: Jon Post Number: 326 Registered: 02-2002 |
Thanks Ken! I loosened this one - what the hell is this? 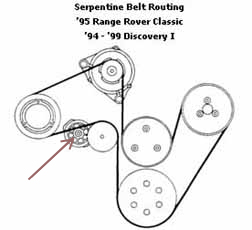 e | ||||||
jerry d quintana (Exjeeper) New Member Username: Exjeeper Post Number: 22 Registered: 02-2003 |
Dont loosen the pully. Use the correct size wrench on the tension wheels nut.usa a cheater bar or a long wrench and push down the belt will loosen. I just did the same alternator change last week. 15 mm wrench. I paid 75 to have mine rebuilt with a warrenty. | ||||||
Erik Olson (Jon) Senior Member Username: Jon Post Number: 327 Registered: 02-2002 |
Thanks everyone - should have consulted before embarking on this project! Cheers, e | ||||||
ken nishikawa (Scubaman99) New Member Username: Scubaman99 Post Number: 34 Registered: 06-2002 |
you loosedend the wrong one... well your not really loosening anything... what happens is the bolt on the tensioner it self is used as a leverage point. | ||||||
Erik Olson (Jon) Senior Member Username: Jon Post Number: 331 Registered: 02-2002 |
The diagram saved a lot of time - here it is with the tensioner indicated: 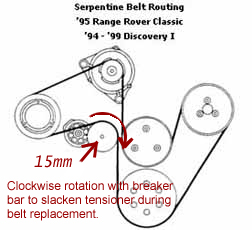 e |