| Author | Message | ||
Mike Bauer (Mikeb) Member Username: Mikeb Post Number: 73 Registered: 02-2003 |
I've finally decided to install my CD player in my glovebox of my D1. I cut out the bottom and back portions of the glovebox to make room for the CD player. I need suggestions on how to make brackets to hold the CD player in place. The old brackets are too short (need to be about 2 to 3" taller). I was going to mount one side of the CD player to the left hand portion of the glovebox, but the glovebox gets narrower as it goes back so the CD player will not mount properly. Thanks in advance, Mike B. 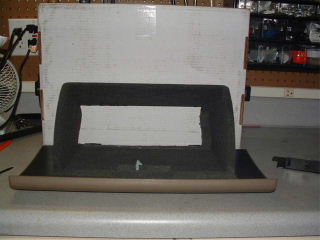 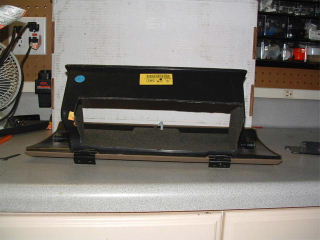 | ||
Mike Bauer (Mikeb) Member Username: Mikeb Post Number: 74 Registered: 02-2003 |
Here is a picture of how I think the CD player should be mounted. Thanks, Mike B. 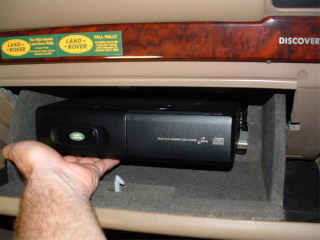 | ||
Jerry (Discovery1) New Member Username: Discovery1 Post Number: 32 Registered: 10-2002 |
Hi: I suggest using 3m velcro. It works perfectly and will cause any issues with skipping. I used it to mount a DVD player in my disco 1. Or you could go to a Home Depot and get some L brackets... | ||
Mike Bauer (Mikeb) Member Username: Mikeb Post Number: 76 Registered: 02-2003 |
Jerry: Good suggestion. I found a 7" x 4" tieplate (part no 044315833205) for $.95 each at Home Depot. I've already bent the bracket to fit. I'll cut down the bracket in the morning and do a test fit. I think this will work fine. Thanks, Mike B. 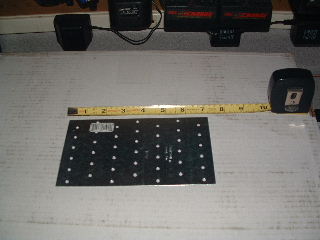 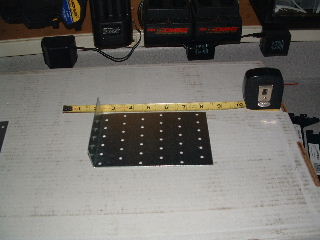 | ||
Mike Bauer (Mikeb) Member Username: Mikeb Post Number: 77 Registered: 02-2003 |
I'll probably paint the brackets black to make the installation neater. How hard is it to paint galvanized metal? Thanks, Mike B. | ||
Mike Bauer (Mikeb) Member Username: Mikeb Post Number: 78 Registered: 02-2003 |
Here are pictures of the bracket templates that I made. 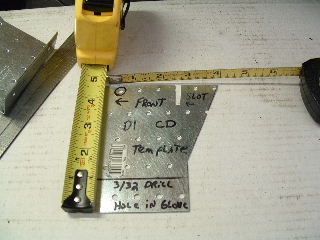 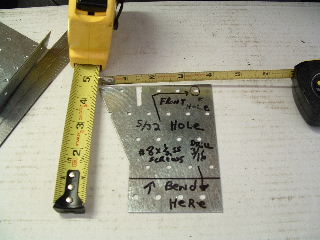 Here are pictures of what the final brackets looked like: 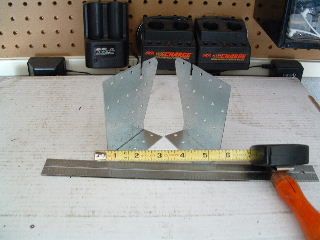 Brackets Installed: 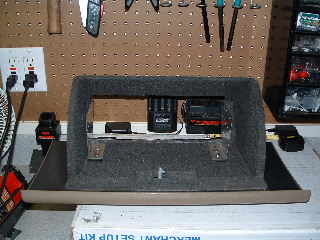 Side access holes (to attach the screws on the left-hand side): 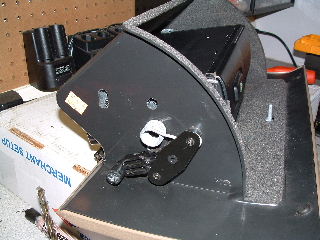 CD Player Installed: 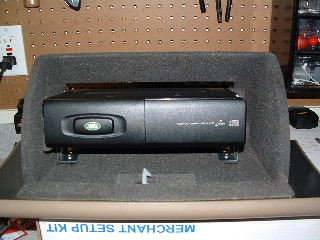 Glovebox Reinstalled: 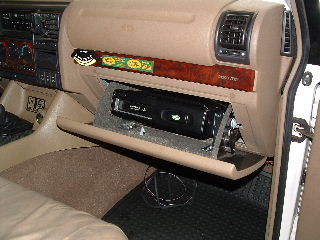 | ||
Mike Bauer (Mikeb) Member Username: Mikeb Post Number: 79 Registered: 02-2003 |
Don't laugh too hard, but this project took me about 16 hours to complete. It took a lot of trial and error to get the brackets designed just right. There is less space behind the glovebox and I thought there would be. There are three pre-drilled holes in the CD player (2 up high and one towards the back and down low). The stock brackets mount using one upper hole and one lower hole. I decided to use the two upper holes. In a small tribute to Henry Ford (He invented the oblong hole!), I cut a slot in the rear of the bracket for the rear mounting screw. This allowed me to adjust the angle of the CD player up and down until I was satisfied with the mounting angle. I used 4 - #8 x 3/4" stainless screws to mount the brackets in the glovebox. The only surprise that I encountered is that the hinges for the glovebox ran up under where I drilled the holes to mount the CD brackets. I found it tricky trying to drill through steel without punching through the soft plastic underneath. Hopefully, the pictures and information presented here will make it easier for anyone else who decides to make this modification to their D1. Thanks, Mike B. mike (at) (discocrazy) (dot) (org) | ||
Dean Brown (Deanbrown3d) Senior Member Username: Deanbrown3d Post Number: 738 Registered: 02-2002 |
Maybe Ho can put this in the tech section? | ||
Jamie (Rover_puppy) Member Username: Rover_puppy Post Number: 161 Registered: 05-2003 |
Wow, that looks really great. I am AWED... I can't believe the ideas you guys come up with and then are ABLE TO MAKE THEM!! Mike, I just might have to come over there and have you move my CD player to glove box!! Congratulations!!  Jamie Jamie | ||
Chris Nuzum (Cnuzum) New Member Username: Cnuzum Post Number: 31 Registered: 02-2003 |
What am I missing? I tried to remove my glove box, but the only screws I see are the 4 directly attached to the bottom of the glove box. I unscrewed those. Are there more screws, pins, ect. that I'm missing? thanks. Chris | ||
Chris Nuzum (Cnuzum) New Member Username: Cnuzum Post Number: 32 Registered: 02-2003 |
Nevermind, figured it out. | ||
Brent Fox (Bfox) Member Username: Bfox Post Number: 93 Registered: 10-2002 |
Hey Mike & Jamie I poured about 1/2 gallon of water out of my CD player this weekend. The worst part is that I had mine in "quick release" where I could remove it with just a few wing nuts. I never thought the water would be that deep. My carpet and padding should be dry by October. P.S. Chris Nuzum is completely resonsible for this! | ||
Jack Edwards (Olered) Senior Member Username: Olered Post Number: 401 Registered: 04-2002 |
Let's hear about wiring. Did you simply splice in longer wiring or what? Thanks | ||
Chris Nuzum (Cnuzum) New Member Username: Cnuzum Post Number: 33 Registered: 02-2003 |
Sorry about that Brent! I;m moving mine up to the glove box as we speak. I;ll bring over some Guinness for when we put the carpet back in, deal? | ||
Chris Nuzum (Cnuzum) New Member Username: Cnuzum Post Number: 34 Registered: 02-2003 |
Jack, as far as the wiring is concerned, All you have to do is undo the zip ties under the seat that hold the changer wires and then pull up the carpet ( unscrew the door well trim piece and the bottom cover of your seat base) and undo those zip ties as well. They only go up till the wires start going vertical to go up under the dash. From there its only a matter of rolling the extra wire up and plugging everything in. Pretty simple work, just time consuming. | ||
Chris Nuzum (Cnuzum) New Member Username: Cnuzum Post Number: 35 Registered: 02-2003 |
Mike, did you screw each of the support brackets into the sides of the glove box? or did you screw them into the bottom? | ||
Mike Bauer (Mikeb) Member Username: Mikeb Post Number: 82 Registered: 02-2003 |
The wiring is a piece of cake. The wiring for the CD player starts up under the dash and then runs down under the carpet along the transmission tunnel to the seat. Pull up the carpet on the front passenger side and you will see what I mean. I undid the zip ties and coiled the CD wires up under the dash (since the cable is now much longer than I need!). No cutting or splicing required! I screwed the supports into the bottom of the glovebox. The sides are not square, so mounting would have been harder in my opinion. I used #8 x 3/4 stainless screws. Thanks, Mike B. |