| Author | Message | ||
Andrew Maier (Newman) Member Username: Newman Post Number: 186 Registered: 04-2003 |
I know this has been done before, but I'm not able to type in the right "magic" combination to find this in the archives. I have 2 Hella 500 driving lights and 2 530 fog lights, and want to mount all 4 to my 96 D1. I can mount on the front bumper and/or the roof rack -- is it as simple as fogs on the bumper/driving on the roof or can I use the fogs as cornering beams? Any suggestions from the other lighting-enhanced Disco drivers out there? | ||
Andrew Maier (Newman) Member Username: Newman Post Number: 190 Registered: 04-2003 |
Anyone? | ||
Andrew Maier (Newman) Member Username: Newman Post Number: 201 Registered: 04-2003 |
Okay, here's what I want to do...I want the 500's in the center (in front of the grill) with the 530's also on top of the bumper to the outside of the driving lights. I do not have a brushguard w/ light tabs or an aftermarket bumper. Can I simply drill holes on top of the factory bumper and install there? I eyeballed it today and there appears to be room for all 4 lights.••••••• suggestions or contrary voices to mounting on the stock bumper? I don't want a brushguard or A-Bar and cannot yet afford a front bumper. I believe the front bumper to be strong enough to hold the lights, and I can still mount my front license plate by drilling small holes in the bumper (right now it's mounted to the plastic plinth in the center of the bumper). I do not want to mount under the bumper for approach angle (and IMHO aesthetic) reasons. Any advice is greatly appreciated as always. | ||
Andrew Maier (Newman) Member Username: Newman Post Number: 202 Registered: 04-2003 |
Why does it red-out the word "a*ny"? (remove the *) Is that so we can't use the short version or nickname for transmission? | ||
mark gomez (Mark) New Member Username: Mark Post Number: 17 Registered: 05-2003 |
Hi Andrew, I have 500s mounted on my stock bumpers. I don't know if 4 will fit (I did'nt check) but just from looking at the top side, it appears it would. Before you drill the bumper, crawl under and look to make sure you have enough room. Also, depending on where you drill the bumper (either towards the front, middle, or back)you may have to trim the lip under the bumper to make room for the nut that holds the light onto the bumper. I would also recommend removing the plith. It does not appear to be sturdy enough to carry its own weight much less anything else. I have a picture of the lights mounted on my stock bumper in my profile. Good luck-Mark | ||
Andrew Maier (Newman) Member Username: Newman Post Number: 203 Registered: 04-2003 |
As usual, there's a response in 45 minutes!  Thanks a lot, Mark....much appreciated! I'll have to take pics so I finally have a section in the photo gallery... Andy | ||
Blue (Blue) Dweb Lounge Member Username: Blue Post Number: 551 Registered: 04-2003 |
I mounted 500's on stock bumper. Drilled through plastic center section & underlying steel stock bumper. Had to put some washers in the gap between plastic & steel though to act as spacers. http://www.discoweb.org/blue/gill4.jpg | ||
Andrew Maier (Newman) Member Username: Newman Post Number: 204 Registered: 04-2003 |
Great help, guys! I'm planning on putting the 500's more to the center than yours, Bill, and put the 530's (small rectangular fogs) outside of them, angling slightly outward if necessary. Thanks again! Now, Blue, isn't time to visit relatives up here by driving so we can wheel in Wisconsin? | ||
Chad M Lock (Cmlmtn) New Member Username: Cmlmtn Post Number: 18 Registered: 08-2003 |
Andrew, Let me know if (and when) you go...I'm new to the LR world, and I only live 1/2 hour south of you. | ||
Andrew Maier (Newman) Member Username: Newman Post Number: 205 Registered: 04-2003 |
Chad, email me off list and let's try to figure something out... | ||
Andrew Maier (Newman) Member Username: Newman Post Number: 217 Registered: 04-2003 |
Okay, so now I've got the lights mounted (500's near the center, 530's outside them). I cannot get the damn wiring to work! I'm trying to splice the 500's into the highbeams -- so they don't have a switch in the "cab," but turn on with the highbeams. I've got a test light and cannot for the life of me figure out: (1) Where the positive wire is for the highbeams -- can someone tell me how to use the test light, in case I'm not doing it right? (2) How to ground the lights themselves. There's only one lead coming out of these lights, and it goes to the power (+) side, right? (3) Where in the engine compartment to ground the relays? Any standard suggestions? Thanks so much! I'm tired of people asking me to see how all those lights on my bumper light up -- I have to tell them they're not hooked up yet!  Andy | ||
Andrew Maier (Newman) Member Username: Newman Post Number: 219 Registered: 04-2003 |
Bump -- anyone? | ||
Blue (Blue) Dweb Lounge Member Username: Blue Post Number: 597 Registered: 04-2003 |
there are thin wires coming out the back of the headlights - it should be apparent which wires connect to the high beams if you study which bulbs light when high beams are on. Just use a t-clip connector to splice the switch lead into that wire (a t-clip is a crimp connector - any hardware store should stock them). As far as ground goes, you should have 2 wires coming out of each hella lamp. Just ground to a good metal base - crawl underneath and drill yourself a hole or piggyback on some bolt, sand off paint/dirt, and just ground with a circular crimp-on wire end secured to ground surface with a nut & bolt. | ||
Andrew Maier (Newman) Member Username: Newman Post Number: 221 Registered: 04-2003 |
OK, now I'm convinced I'm either the dumbest person on Earth or I got bogus lights. (1) I don't have 2 wires coming out of the back of the lights. All I have is one wire wrapped in white "rope" with a male spade connector at the end. (2) I cannot determine which of the wires is the highbeam. I'm tempted to tap into both possible non-black wires (one is blue/orange and the other is blue/purple) and use one for the driving lights (whichever turns out to be the highbeams) and the other for the fogs (the other one). (3) Am I being an idiot by running the yellow Hella wire to the truck's lights? Should I be running the power (red) Hella wire there instead? (5) See, now I'm confused. I can't even number right!!! Andy | ||
Bill Howell (Billh13) Member Username: Billh13 Post Number: 183 Registered: 03-2003 |
OK, Let's try this, pull headlight bulb, turn on high beam headlights. Clip end of tester to a ground (- post on batt is best). Stick other end on poss. side of batt to make sure it works. Works..OK, now stick other end in the plug where one of the wires goes in to bulb. Should be 3 wires in plug. Any who, one of the three should light the tester. Now run a wire from this wire to your relay on the switch side. Make sure to ground relay. Run a power line from the batt to power side of relay. Run a wire to light from other side of power on relay, white one is correct. The body of your disco is the ground. Should light up, if not or let me know. I am getting ready to hook mine up tonight. 2 hour job, I hope. | ||
Bill Howell (Billh13) Member Username: Billh13 Post Number: 187 Registered: 03-2003 |
Just broke open my box of 500's. Messed up just a tad. The housings are plastic. Little hard to make a ground with plastic. The white wire running to the out side has to be plugged in inside the housing. The wires are in there. Put the ground inside the engine compartment. Everything else should be the same. | ||
Bill Howell (Billh13) Member Username: Billh13 Post Number: 195 Registered: 03-2003 |
OK all done. 1 hour 45 min. Andrew, I did my light the way you are wanting to do yours. The blue wire with orange stripe is the high beam. I had it up and running. Then I started the disco up and blue the fuse that runs the light. Only 10 amp fuse. I put in a 20 amp, no problems (hope the 20 amp will blow before the fire). I'm not sure if I like not being able to switch off. Andrew, email me if you need any help. | ||
Andrew Maier (Newman) Member Username: Newman Post Number: 228 Registered: 04-2003 |
Bill and Blue, I'll let you guys know how this works -- should finish the wiring tomorrow night or Tuesday night at the latest (and I have a boatload of fuses just in case!) Thanks a lot, Andy | ||
Blue (Blue) Dweb Lounge Member Username: Blue Post Number: 623 Registered: 04-2003 |
pic is of the area behind the passenger (US) headlight, blue/orange wire is headlight hi-beam wire, light blue plastic clip is the "T" that connects the red relay box wire to the blue/orange hi-beam wire. The other end of the red wire is connected to the switch pin on the relay box (can't remember the pin # on the relay box). This way the activation of the hi-beams (when you turn on or flash your "brights") also turns on the auxilliary lights. 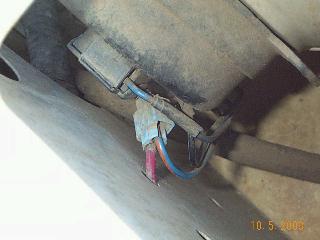 |