| Author | Message | ||
R. B. Bailey (Rover50987) Senior Member Username: Rover50987 Post Number: 682 Registered: 07-2002 |
I would like to finally get rid of the stuff flying about in the rear of my truck. So I am planning on putting tie downs in the cargo area. Someone said that they put a nail up through the hole that is already in the floor so they could find the right place to cut the carpet. The only hole I can find does not go through, I suspect I will have to drill, but isn't it already threaded? First, lets be sure of the right spot: 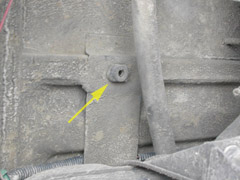 Is that the hole? Once I figure out if it is threaded or not, and what size bolt to use, the process is easy. Thanks for your help | ||
Jaime Crusellas (Jaime) Member Username: Jaime Post Number: 166 Registered: 05-2003 |
I'm assuming D1 right? the holes are threaded, and covered with plastic plugs. The bolt size is a bit hard to find. M11 metric, (I think, I haven't found it yet) You may want to lift the rug and pad, and locate the holes from above, then you'll be able to remove the plugs. | ||
R. B. Bailey (Rover50987) Senior Member Username: Rover50987 Post Number: 683 Registered: 07-2002 |
OK, but that is a big job... dang Hey, while I am at it, I still cannot find a suitable tie down loop. All the ones I have found so far are two or four bolts, I would like just a single bolt. Ideas of where to look? I would rather not have to order something online... Thanks | ||
Matthew A. Barnes (Discoveryxd) Member Username: Discoveryxd Post Number: 153 Registered: 08-2003 |
I got all my needed hardware from true value. The "D" rings, 3/8" bolts ( they are a little smaller than the hole), big flat washers with rubber ones for the bottom so it's waterproof, nylon locking nuts, metal cylindrical spacers, and self made brackets. It looks great, and they are very strong. I my be able to send pics later. The "D" rings lay flat on the carpet too. Matt | ||
Matthew (Lzxray3) New Member Username: Lzxray3 Post Number: 4 Registered: 11-2003 |
These are the anchor points I am going to try. I think someone else on the board tried these already. http://www.mcmaster.com/ part number 88525T31 they are $1.86 each 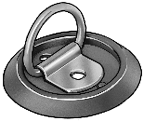 | ||
Matthew A. Barnes (Discoveryxd) Member Username: Discoveryxd Post Number: 154 Registered: 08-2003 |
thats what mine look like, except for the plate on the bottom | ||
Jamil Abbasy (Jamooche) Member Username: Jamooche Post Number: 183 Registered: 05-2003 |
I bought these and they work great. I bought 2 packs for a total of 8 and screwed them to 3/4 inch plywood over my tuffy cargo box. Scroll down for the tie downs: http://www.stowaway2.com/accessories.asp Jamil | ||
R. B. Bailey (Rover50987) Senior Member Username: Rover50987 Post Number: 684 Registered: 07-2002 |
OK, I cannot find anything with only one anchor bolt at True Value, usually they have everything in their 5 isles of hardware!! But no matter, since I cannot find the hole everyone is talking about - The photo above is the only hole I can find, but evidently that is not it?? Otherwise, have others had success simply drilling through an empty area? I will do that if I have to - better than being knocked in the head by a flying tool box in a accident. I like the one pictured above Matt, thanks. | ||
Jamil Abbasy (Jamooche) Member Username: Jamooche Post Number: 184 Registered: 05-2003 |
Make a plywood flooring and bolt everything to that. | ||
Robbie Donaldson (Robbie) Senior Member Username: Robbie Post Number: 479 Registered: 02-2002 |
pulling up the carpet is not a big job. 5 minutes, tops. you will find the rubber plugs covering the holes. pull the plugs, mark the spot in the carpet, drill/cut through the carpet, bolt your cargo ring. i used the mcmaster carr rings. the bottom 'plate' is really just a piece of plastic. didn't even use that, just the rings themselves. 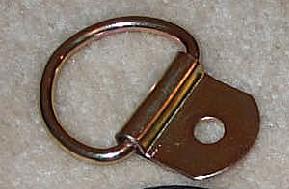 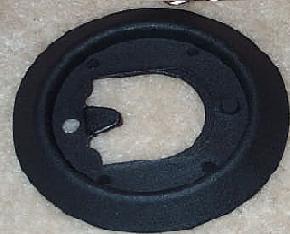 | ||
Robbie Donaldson (Robbie) Senior Member Username: Robbie Post Number: 480 Registered: 02-2002 |
oh, and i used fine thread 7/16" ss bolts, but am told they are a tad too big and the holes are threaded for 11mm (mine fit with some effort). also need to ream out the hole of the cargo ring just "slightly" for the bolt to fit through. | ||
Matthew A. Barnes (Discoveryxd) Member Username: Discoveryxd Post Number: 155 Registered: 08-2003 |
I took one of the plugs out, and took it to true value to match a bolt up with it. I knew I wasn't going to find a bolt to thread in, so I got one that fit in the hole. The bolt was 3/8" x 3 or so inches. The 3/8" dia. fits well in the hole. I then just took some "D" rings and made a bracket like the one above. Two (front plugs)of the four plugs are located directly above the spring mounts. |