| Author | Message | ||
Matt (Doc175) Member Username: Doc175 Post Number: 205 Registered: 11-2002 |
I have the Hella wiring harness and I am about to start the installation of 2 Hella 4000s on my roofrack. 1. Am I going to have to modify the Hella wiring harness any to get it to reach the roofrack? If so, what do I need and how much? 2. Would a straightened-out coat hanger work to pull the wires up under the molding of the A-pillar? If not, what is the best way without have to have some fancy, expensive "snake-like-thingy?" | ||
Brendan Kearns (Howboucha) Member Username: Howboucha Post Number: 171 Registered: 01-2003 |
Matt, I chose the easy route to run the wiring for my 4 Hella 500's on my LR Adventure Rack. I ran the wires from the "doghouse" up to the rack via a wiring loom. If you do this, make sure you buy at least 20' and large enough to hold about 6 10 gauge wires. I forget what size I actually used. You will also need to get some good silicone. I used marine grade clear silicone from Lowes. I don't recall the brand, but it came in a teal-bluish color bottle. You will also need many zip ties too. Make sure it is done in an environment over 75 deg. The photos below should give you a good idea. Install your wires first in the loom so that everything works. Hook your lights up and test them so you don't have to pull your wires through the loom again. When you are satisfied, run a bead of silicone along the window seal from the top of the windshield to the base. Now place your loom in the silicone as close to the windshield seal as possible. Make sure that the slit for the loom is not in the silicone. You do this in case you need to pull your wiring. Zip tie all loose areas, apply silicone to all "open" parts of the loom to prevent water from getting in. It works good and my personal opinion is that it is a very clean install. Brendan 97 XD 98 LE  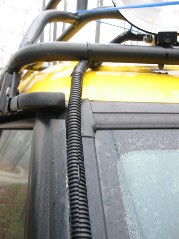  | ||
Victor (Vabiro) Member Username: Vabiro Post Number: 106 Registered: 10-2003 |
Matt, The way I see it, there are two ways to extend the harness: - Extend the power wires to the lights and leave the relay and other stuff under the hood. - Extend the power, ground and switch wires and put the relay up on the rack. There are advantages to both, and in both you will need to pull about 3 wires from the rack.(in 1 the two positive for lights and ground in the second the ground, switch, and positive.). I would be inclined to keep the relay under the hood. I mounted mine behind the right headlight to keep the un-fused portion of the line as short as possable. Regarding your second point, I don't think that a fish would be used. Many have said that using some soapy water and some persuation (ie screwdriver) of the rubber around the window. I have not done this myself so I defer to the others on this. Victor | ||
Matthew A. Barnes (Discoveryxd) Senior Member Username: Discoveryxd Post Number: 269 Registered: 08-2003 |
You will need to add some extra wire if you use the Hella wiring harness. I have 2 Hella black magics, so I think the harness should be the same. Just use the same guage wire that the harness is. I took a straight (unused  ) sewer snake with a small loop on the end. Whatever you use, I would make sure that it is very straight. Kinks in it would just make it harder to pull through. Run the wiring harness wires through the pass. pillar, then add wire to what you need in the engine bay area. ) sewer snake with a small loop on the end. Whatever you use, I would make sure that it is very straight. Kinks in it would just make it harder to pull through. Run the wiring harness wires through the pass. pillar, then add wire to what you need in the engine bay area. Matt | ||
Matt (Doc175) Member Username: Doc175 Post Number: 209 Registered: 11-2002 |
Everything is going well. Thanks for the info. I am about 90% finished and still have a couple detailed questions. 1. Can I splice and combine the two brown grounding wires for the lights and create one common ground (probably to the bolt on the foot of the roofrack)? 2. I am doing this on a D1. I purchased a second fog light switch (the first one goes to the Hellas on front) and want to use that. It came with the small metal "adaptors" but I cannot figure out that puzzle. The wiring harness only has 2 green wires for the control switch. How do I plug it all together? 3. I wired the system (I hope) so that it is constantly "hot" meaning no matter if the Rover is running or not I could turn the lights on. Do I still need to connect the second green wire running from the on/off switch (not the one running to the relay)? | ||
Victor (Vabiro) Member Username: Vabiro Post Number: 109 Registered: 10-2003 |
Matt, 1. I wouldn't share the ground wire for the same reason that you don't share the positive side. Always remember the the circuit runs through the lightbulb, which means that the ground wire requires the same wire thickness as the positive. Try running a really good ground (ie 8 or 10 guage wire) to the truck chasis from the rack. Then use that wire to ground the lights. 2. Check out the site http://www.northbyrover.com/switches.htm. Alan sells the plugs ($2 +$5 shipping) that go into the switch you bought. There's another thread here regarding lights that has a link to the wiring for that switch. 3. The short answer is yes. This is actually what is going to determine when you can switch on the lights. Plug the power in to the kind of power source you'd like. For example you can connect it to the fuse for your high beams so that they will only work when the high beams are on, or ignition switched power so that the key has to be in. Hope this helps. Victor | ||
Jamie (Rover_puppy) Senior Member Username: Rover_puppy Post Number: 637 Registered: 05-2003 |
Brendan, Is that a blue limb riser in your pic? If so, did you make them? I've got to break down and do something like limb risers for my truck. The black pillars encasing the sides of my front windsheild look like they got attacked by an army of cats. Thanks, Jamie | ||
Matt (Doc175) Member Username: Doc175 Post Number: 212 Registered: 11-2002 |
So, the way I am understanding this is..... 1. I need to run 2 spearate (1 from each light) grounding wires. I can not combine them and run just one wire. Will the bolts on the roof rack feet serve as a ground? 2. Where is the most easily accessable place to connect in the green power wire for the switch? It does not matter to me if it is constantly hot or just when the headlights are on. In other words, what's the best way to tap into the fuse for the head lights? I looked at the fuse panel and can not figure out how to get behind it to connect into it. I'm looking for the easiest answer. Could I just tap directly into the headlights? That seems to be how the instructions say to do it. If so, how? There are about 4-6 wires going into the headlight assembly. | ||
Victor (Vabiro) Member Username: Vabiro Post Number: 117 Registered: 10-2003 |
Matt, You're on the right track, but looking at my post I don't think I was very clear about what I was saying. let me try it again. 1. My concern is that the ground wire be up to the task of the two lights, and anything else you might add later (CB antenna, more lights etc.), so I suggest you run a thick (larger than 10 guage) wire directly to the chassis of the truck, not the bolts that hold the roof rack on. You can connect this wire either to the rack or connect the wires from the lights to it. The bolts that hold on the roof rack are clamped to painted surfaces, and might become - or be - intermittent or not complete (high resistance). This could cause the lights to flicker, dim, or stop working when the truck is on the trail or the rack gets loaded. Running a new ground will fix this. By the way, when you connect the ground wire to the chassis (and the rack for that matter) remember to scrape the area to the metal where the head of the screw or bolt makes contact with the chasis. This helps prevent corrosion from impacting the connection later. 2. I connected mine in the fuse pannel to the high beam fuse, so that I could turn them off with the highs if a vehicle came towards me. I did this by tapping into the fuse (fuse 4 I think) for one of the high beams. The fuse is only hot when the high beam is on, so you have to test the fuse with the highs on. I thought it would be a good idea to tap in on the side of the fuse that didn't have power. This means that when the high beam is on, and you have the fuse out, one side of the fuse socket will have power and the other doesn't. I plugged into the side that didn't, so that the connection would be through the fuse. The best way to tap into fuses is to use the "fuse tap connectors" you can buy at auto supply stores. These are little pieces of metal that slip into the fuse socket and present a male spade connector to connect onto. I'm not a fan of tapping into the head light wires, especially with those crimp-on wire taps. They become intermittent and are prone to corrosion. If you have to solder the connector and use very good quality electrical tape. The cheap stuff falls off in cold, and for the one or two dollars a roll it will make your life much easier. Victor | ||
Matt (Doc175) Member Username: Doc175 Post Number: 216 Registered: 11-2002 |
Again, thanks for all the help. I got everything good-to-go (I think). The only thing to do is the ON/OFF switch. I went to 3 different auto store looking for a "fuse tap connector" without any luck. However, they all had what is called an "add-a-line" that sounds similar. The only thing is that the instructions imply that the accessory (in this case the switch) has a fuse. The "add-a-line" has a place for a 10 amp fuse for the accessory. By adding the fuse I am not going to have any issues? Everything else seems pretty basic except for the additional fuse. I took a pic of it but it is "too big" and I do not know how to make it any smaller...Oh well | ||
Jamie (Rover_puppy) Senior Member Username: Rover_puppy Post Number: 649 Registered: 05-2003 |
Matt, If you email the pic to me, I will be glad to download it, reduce it, and send it back to you so you can post it. (click on my name for email and label subject as: pic from matt - or something recognizable) That's what I had to do until I got simple software and could do it myself! Gosh, you have been working hard!! Jamie | ||
Victor (Vabiro) Member Username: Vabiro Post Number: 122 Registered: 10-2003 |
Matt, If the add-a-line is what I think (it plugs into the fuse block in place of an existing fuse, then you have two external fuses: one for the original fuse and the other for your switch) then it sounds perfect. In fact it might be better than the fuse tap that I suggested. It sounds like you're on the right track. Victor | ||
Matt (Doc175) Member Username: Doc175 Post Number: 220 Registered: 11-2002 |
That's what it is. Thanks for all the help | ||
Matt (Doc175) Member Username: Doc175 Post Number: 225 Registered: 11-2002 |
OK! Everything works...Kind'a. Everything works great with the origonal ON/OFF switch. When I hooked up the wires to the new fog light switch I could get the little green light to come on when I depressed the switch but the lights themselves will not come on. No matter what combo I use. I tried to contact the guy at northbyrover.com about the connector but I should be able to use what I have. any suggestions? | ||
Matt (Doc175) Member Username: Doc175 Post Number: 226 Registered: 11-2002 |
Anyone? |