| Author | Message | ||
Josh (Badassm0f0) New Member Username: Badassm0f0 Post Number: 22 Registered: 12-2003 |
after installing a cb to where my sunroof controls use to be all was fine. i started the car turned on the lights and all of the interior lights lit up as well as my cluster of gauges. after doing some running around i parked the car and went into a freinds. when i went to start the car agian and turned the lights on none of the lights in the car came on that are suppose to when your lights are on ie the cluster was not illuminated, the radio lights didnt come on. im stummped i already checked fuse 14, any suggestions? | ||
J Horrobin (Jon_h) Member Username: Jon_h Post Number: 44 Registered: 02-2002 |
I had a similar problem in my 97 Disco. The problem was a build up of corrosion on the contacts within the light switch to the left of the steering column(the one used to turn on the head lights) I'll post pics & instructions when I get home this evening. It's quite a simple process. | ||
Joey (Joey4420) Senior Member Username: Joey4420 Post Number: 505 Registered: 04-2003 |
I would like that too Jon_h, my 97 disco started the dash light issue last night, but of course it could have been the below 0 temps. After the disco go warm inside they came back on. | ||
Josh (Badassm0f0) New Member Username: Badassm0f0 Post Number: 23 Registered: 12-2003 |
i wonder if that could be the issue on my 97 too... i gotta post those pics from the cb install though.. it looks nice especially at night lit up ;) | ||
J Horrobin (Jon_h) Member Username: Jon_h Post Number: 46 Registered: 02-2002 |
Okay, as promised here is the procedure. I'm not saying this is definetly your problem, but I had the same symptoms and this was the cause. Tools required Small Philips head screwdriver Emery cloth (sand paper) Procedure 1. On the underside of the plastic cowling which surrounds the steering column are three screws in recessed holes, undo these screws. 2. Firmly, but cautiously pull apart the top and bottom of the cowling, It snaps together, but do not force it. 3. Turn the steering wheel to the left so that the top of the center body of the wheel is aligned vertically rather than horizontally, which it would be if the driving wheels were straight ahead. It is easier if the engine is running when doing this so that the Power Assisted Steering is working. 4. Before continuing, turn OFF the ignition and remove the key for safety. 5. Access to two small screws used to secure the switch housing to the steering column assembly is now gained. See picture. Remove these two screws. 6. There are two connecter blocks on the back of the switch, disconnect these. 7. Firmly, but again cautiously, pull the switch from the column. It has probably not been removed since vehicle assembly so will undoubtedly be stiff. This took me a little time to work out, but the switch will ONLY come out if pulled straight out through the direction of the drivers door. There are two tracks on the top and two on the bottom of the switch holding its position so it must slide in and out along these tracks. 8. Once the switch is out, remove the two screws on the back and separate the covers from the switch body, there are two, one on top of the other, both held in by the two screws. Be careful when separating the switch as there are moving parts inside which will come out and need to go back in, in the same location. 9. Clean any residue or corrosion from the contacts within the switch using the emery cloth. A light sanding is all that should be necessary, try not to touch the contacts again with dirty fingers. 10. Reassemble the two covers on the back of the switch and plug in the two connecter blocks. 11. Turn on the ignition and try to turn on the lights, if all lights work as they should turn off lights and ignition then reassemble following these instructions backwards.  | ||
J Horrobin (Jon_h) Member Username: Jon_h Post Number: 47 Registered: 02-2002 |
Here's a check to see if the switch is working correctly. Using a volt meter or continuity tester, check the path between the Headlight power In and the two headlight power out terminals, with the switch on and off, to check the circuit is working correctly. Do the same with the tail light circuit. Turn the switch on & off a few times to make sure it's working fine. Here's a bit of a sketch of the back of the switch, showing the terminals. 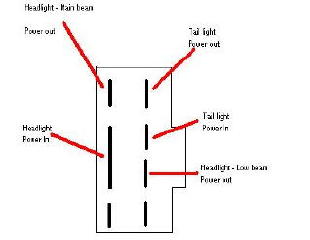 | ||
Josh (Badassm0f0) New Member Username: Badassm0f0 Post Number: 24 Registered: 12-2003 |
thanks for the help guys, and it worked. you know i really appreciate how much help i get on this forum and all of the extra effort everyone always puts in (ie taking pics). thanks josh | ||
Joey (Joey4420) Senior Member Username: Joey4420 Post Number: 512 Registered: 04-2003 |
Thanks, I will look into mine as soon as I can find a warm day (don't want to lose parts while shaking) |