| Author | Message | ||
david summers (Texmoto) Member Username: Texmoto Post Number: 97 Registered: 12-2002 |
I just got my Greg Davis bumper and I'm very impressed with its construction. I will be adding the 2" LED lights rather than doing the turnsignal/brake light converstion. My question is for those who have added the LED lights: how did you cut the holes for the lights? DIY or a machine shop ($$$) or what? Also, any tips on the overal instal/quarter panel trimming would be great. Thanks. | ||
michael burt (Mikeyb) Senior Member Username: Mikeyb Post Number: 657 Registered: 03-2002 |
as far as trimming...measure eleven times and cut once. or twice. this is a case where too much will really be too much. damn thing is heavy...bribe friends. good luck! mike | ||
Bill Mallin (Billmallin) Member Username: Billmallin Post Number: 96 Registered: 09-2003 |
My buddy Dr. Josh and I used a metal cutting hole saw after some precision measurements and pilot holes were drilled in his Safari Gard rear bumper. Final product here: 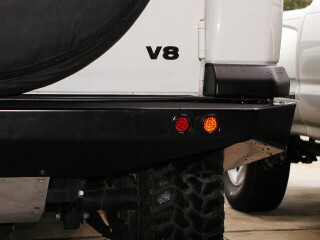 Bigger picture here: http://www.houstonlandroverclub.com/images/members_vehicles/josh_gorman6.jpg The hole saw works, just measure precisely and be very patient. Drill a pilot hole before you whip out the hole saw. And, make sure the hole saw is for metal. Kind of on the same topic: I was also trying to explain to another friend how he could fabricate a light guard for his GD bumper... you may want to have a peak here: http://www.houstonlandroverclub.com/discoweb/gd_bumper.htm Bill Mallin Web Dood Houston Land Rover Club http://www.houstonlandroverclub.com 2001 Disco AKA "Sherman" | ||
david summers (Texmoto) Member Username: Texmoto Post Number: 98 Registered: 12-2002 |
Bill, Thanks for the info. The picture on the link is the one that has inspired me to do this modification. I also have those exact same lights to install. I just need to find a METAL hole saw; don't know if Home Depot is going to have that  David | ||
Joseph Bilyk (Denverrover) Member Username: Denverrover Post Number: 135 Registered: 02-2003 |
Home Depot does sell metal hole saws. They are pretty cheap. They have barbed teeth - last about 15 cuts in 16 guage metal. Very accurate & the best way to drill these holes...they come with a bit for pilot holes. joe |