| Author | Message | ||
Ian Kreidich (Ian95rrc) Member Username: Ian95rrc Post Number: 147 Registered: 03-2003 |
Warning: This is ugly and long! It all started when I decided to do some minor touch up to my rear lift gate. Thinking it would be a good idea to check out the condition of things under the carpet, I pulled it apart. Needless to say, I was very pissed at what I found. I took at the largest rust spot with a screw driver. I was soon left with this: 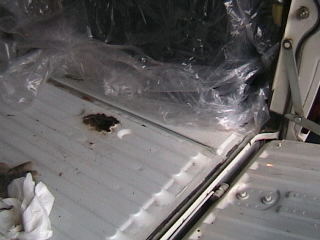 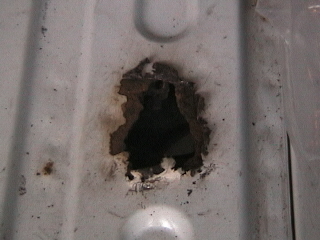 At this point, I didn't quite know what action to take. My options where: 1)Ghetto patch the floor with sheet metal. 2)Weld in a patch over the large hole. 3)Install a new floor which cost over $700. 4)Install a salvaged floor($250) I went with a salvaged floor from http://www.roverlandparts.com/ I knew the floor was rusting around the edges, so I wanted to fix the entire thing for good. The body around the floor was simply cut out so I had to remove the floor panel. Just like my floor, everything looks rust free until you start pulling things apart. 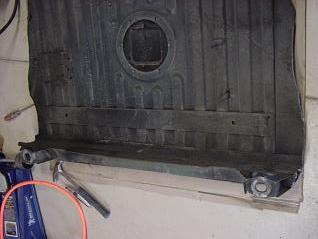 Here you can see once some pieces are taken apart the rust appears. 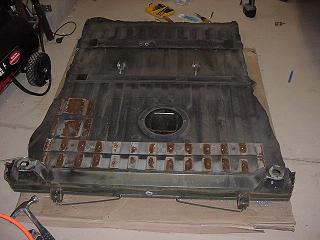 LR appears to only prime these parts. They then spot weld them in place, leaving a gap for moisture to enter and not exit. This is the offending piece that caused the hole in my floor. 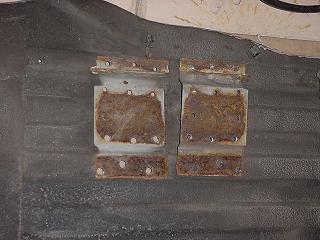 I removed the spot welds using this spot weld cutter. http://www.matcotools.com/Catalog/toolcatalog.jsp?cattype=T&cat=2283&select Ok, now on to removing the existing floor. The salvage floor gave me a chance to practice drilling spot welds so I had my technique down pat. I first marked all the spot welds with a fine point sharpie. I found this to be an important step because you want to hit the spot weld dead center. Next, I used a center punch on all the spot welds. I then used a 1/4" drill bit to start the hole. Once started I moved on to using the spot weld cutter. I started with the drill bit to reduce the wear on the cutter, because I had to remove way too many spot welds. Ok, so now all the spot welds are gone. Surely the floor will simply come up, right? Nope, there are some welds at the rear to grind away. Then it requires a lot of prying to get the floor to pop up.  Woo Hoo! it's finally up! Ok, time for some major cleaning. You can see the major rust around the edges of the floor.  My rover is relieving itself on the driveway. Now that things are reasonably clean, it's time for POR15. 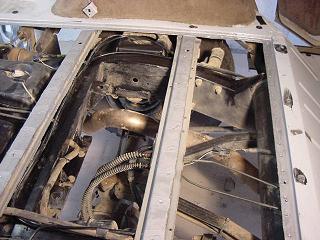 I painted all the rust and any bare metal with POR15, both on the body and the new floor panel. At this point I wasn't totally sure what I was going to use to attach the floor in place. A series rover friend offered the suggestion I use Marine epoxy to fasten and seal the floor. There are some down sides to using it, but it was the best choice for me at the time. http://www.westsystem.com I used the 105 resin, 205 hardener, and 404 high density filler. It's interesting stuff to say the least. It was about 40 degrees in my garage at the time, so I had to use the faster setting hardener. Even with the temp at the near minimum to use the epoxy, it started setting up a little quicker that I thought. That's one of the reasons I have no pictures of this process. It was a very messy job, but I soon had the floor in place. In order to hold some compression on the floor I used about 16 stainless steel screws to fasten the floor tight with the body. This worked ok, but I would probably ad more scews if I had to do it over again. 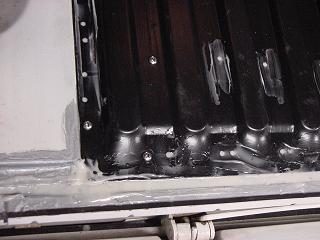 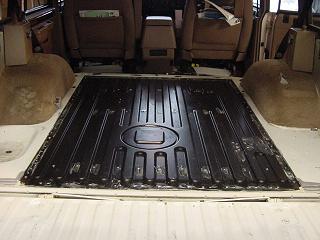 The finished project. It was a lot of work and ended up taking me the greater portion of December to complete. My hope is that by posting this people will have a greater knowledge of what problems may be lurking under the surface of their rovers. My rover only has 83,000 babied miles on it, so I was not expecting to be doing this type of work. I'm sure there are many ways to fix these problems and I am by no means saying this method is the best. This design flaw is also found in the D1, although they do seem to lack the lower part that caused my large hole in the floor. | ||
Gary Potter (Potter) New Member Username: Potter Post Number: 1 Registered: 11-2003 |
Nice article, rusting on rangerover floors is quite common over here in the UK. The main problem appears to be the type of foam used under the rubber floor covers. It acts like a sponge and keeps the metal damp. I have removed the foam from the front foot wells in my rangerover and periodically check the rear load space as I had that replaced a few years back due to rust. |