|
I have an OME 3� lift on �Sherman� (2001
Disco II) �751 springs up front and 781 springs
with 1� spacers in the rear. I like the ride of
the vehicle; I also like the lift�the truck looks
aggressive (that�s my opinion� to each his or
her own).
One of the questions I have asked a few
times�to folks in our club and to folks on various
�boards��is... what sort of difference does having
your sway bars disconnected with a 3� OME lift
make? I�ve heard varying stories, but no
definitively documented cases; hence, I decided to
see what I could figure out on my own... besides,
my wife is out of town... what a better reason to
do "man stuff"?
The Experiment:
I took my truck over to Magnolia Marc�s. Marc has a Nissan forklift and a warehouse
where I could conduct my "research." Basically, I
set out to lift up one of Sherman�s wheels with
the front sway bar connected and take some
measurements... then disconnect the sway bar and
take some more measurements and see what the
difference was. 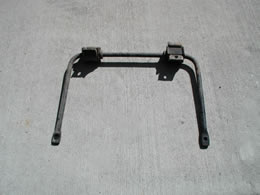 I
also wanted to check the brake lines and ABS wires
at full flex to see if there was any stress on
them as well. I
also wanted to check the brake lines and ABS wires
at full flex to see if there was any stress on
them as well.
Marc and I proceeded to lift the truck with his
forklift... with and without the front sway bar
connected.
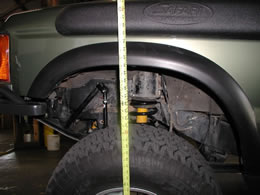
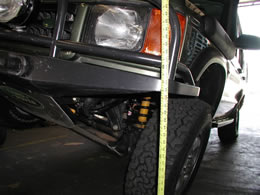
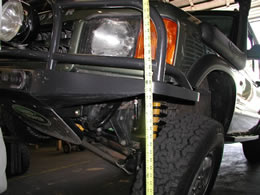
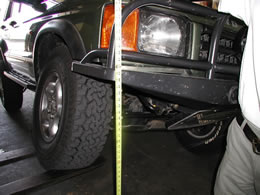
The rear sway bar... picture to the right...
had been permanently removed from the vehicle
prior to this "investigation."
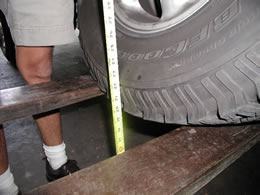
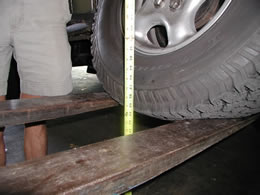
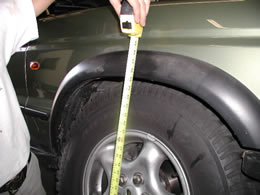
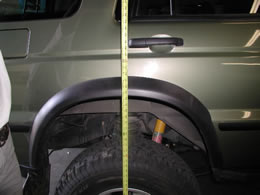
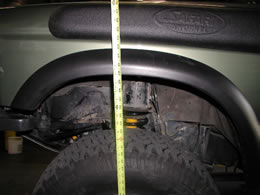
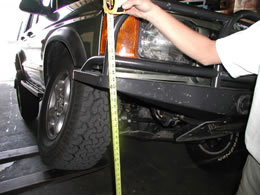
As you can see from the pictures, we were able
to lift the front wheel a little less than 20� off
the ground before the rear wheel came off the
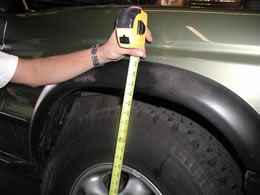
ground. We continued around the vehicle taking
various pictures to use as a comparison. The
pictures in the table below show the comparison.
I�ll let the pictures speak for themselves and let
you make the call on your own.
Notes:
-
We originally did this experiment with the
original equipment, but we didn't have a camera.
I went back the following day to
photographically capture what I was talking
about.
-
And, make sure you read
below regarding the even bigger difference it
makes when the tire pressure is 25 psi. When we
did this with 25 psi in the tires, the results
were even more amazing.
You can click any of the images on this
page to enlarge them. For the side-by-side
comparison below, I have the right side opening in
one popup window and the left side opening in
another. This way you can compare two large
pictures to each other if you like. A picture may
get hidden behind this browser window...
|
Sway
bars connected |
Sway
bars disconnected |
|
|
|
 19 1/2" |
 24
1/2" |
 53
1/2" |
 55
1/4" |
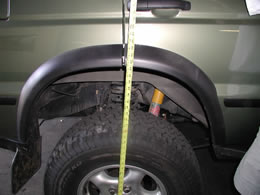 42 1/4" |
 42
1/4" |
 39
3/4" |
 41" |
 32 3/4" |
 34
1/2" |
 46" |
 48" |
I'm really impressed with the 5 additional
inches of height on the raised wheel prior to the
rear tire coming off the ground.
One thing I do want to point out: Marc and I
took a long hard look at the brake lines and ABS
wires to ensure that they would not be too
stretched with the sway bars disconnected at full
flex. We had the shocks completely bottomed out
and neither the ABS wires nor brake lines were
under any tension.
Though these results are impressive, there�s an
even larger difference when the vehicle�s tires
are aired down (this thought struck us when we
didn�t have a camera available, but you get the
idea from the pictures above). Interestingly
enough, when the pressure in the tires is reduced
from 35 psi to 25 psi, the results are even more
dramatic.
We were able to lift the front tire to 25 1/2�
before the rear tire came off the ground. Even
more impressive was that there was an 8�
difference in articulation between having the
front sway bar connected and disconnected with
only 25 psi as opposed to a 2" difference with 35
psi. Yes... 8".
Once again, we took a long hard look at the
brake lines and ABS wires with this additional
flex to ensure that they would not be
over-stretched and neither were under any tension
(Life good!).
Since I was extremely impressed with the
results of the experiment (especially with the 25
psi results... I mean, let's face it, we air down
on the trail in the first place), I decided to
install quick disconnects on Sherman.
My Disclaimer:
I am not recommending you use these
instructions to install JKS Quick Disconnects on
your vehicle. My advice is to take your
vehicle to an authorized dealer
and have the disconnects installed by a
professional.
The following is simply a documentary of how I
installed my disconnects. If you decide to
purchase and install any brand of disconnects and
end up damaging your car... it's your
fault...
Take it to an authorized dealer!
That said... if you are a club member, obviously
I'll help you...
The Install:
I had done some reading on the DiscoWeb with respect to this topic
and found some information on JKS Quick Disconnects for a Jeep
TJ. With some slight modifications, these disconnects
work perfectly. Below is the narrative of the
installation:
The JKS Quick Disconnects needed are
are follows:
JKS �Quicker Disconnects��, TJ, 1997-03
w/ 2-1/2"-6" lift; Cherokee, 1984-01 w/ 3 1/2 -
6" lift; Grand Cherokee, 1993-98 w/ 4 1/2" - 6"
lift
Product Number: 2001
Price: $125 -
$135. |
 |
The most important thing to do is put
on some safety glasses and leave them on.
I should have worn ear plugs for the grinding. I
found I needed a hard hat as well because I
smashed the crap out of my head more than one on
that damned $G bumper...
I also wore gloves because I am constantly smashing
or cutting my hands on some random piece of metal;
the gloves help... and like my
snorkel... they look cool!
I chose to get help. I employed the services of
Dr.
Josh Gorman (hehe). These aren't teeth, but...
close enough. In addition to helping with turning
wrenches and drilling and grinding, Josh also
helped take the pictures.
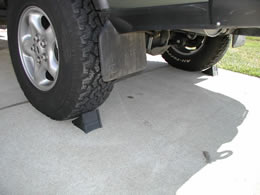
The next thing is still safety related: we made
sure to chalk my wheels and fully set my emergency
brake.
Next, we removed my front tires and placed jack
stands under the radius arms where the bottle jack
is supposed to go for lifting the vehicle.
We used an 18 mm socket and a 16 mm wrench to
remove the old OME links. One side was a complete
bitch to get off, while the other came off
extremely easily.
After removing the top, we removed the bottom.
We used a T840 Torx and an 18 mm wrench to get it
off. We had to hold the wrench steady while using
the Torx. Something to remember, since we were on
the opposite side of the bolt-head, we had to
"tighten" the end of the Torx... which was
essentially loosening it.
(Does this make sense? "Righty-tighty,
Lefty-loosy"... but since we were on the end of
the bolt instead of the head of the bolt,
"Righty-tighy" was actually loosening it.
Similar to the top bolts, one was a bitch to
get off while the other came off easily. We
cheated and used an impact wrench on the Torx
socket to "help."
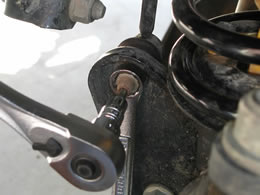
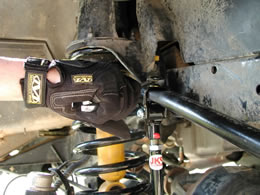
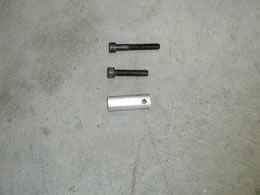
Next we removed the sway bar with a 13 mm
socket. Again, we cheated and used an impact
wrench.
The second photo shows the link and sway bar
removed.
The first picture shows the first modification
that we had to make. See how the "strap" (as JKS
calls it) does not go over the sway bar? The
grinder fixed this problem.
The grinding required was minimal; hence, the
structural integrity of the sway bar was in no way
jeopardized. Essentially we just grinded off the
rounded over sides on the sway bar until the strap
fit properly.
The first picture shows the strap in the proper
location.
Since we grinded the sway bar, we painted the
bare metal with some Rust-Oleum High Performance
Enamel to protect the metal.

Here's the second modification we had to make.
See how the bolt on the stainless steel pin does
not go through the existing hole on the axle
bracket?
We had to drill it out just a smidgen (1/2"
bit) to allow the bolt on the stainless steel pin
to go through.
Once the hole was drilled and the bare metal
painted, we installed the stainless steel pin
ensuring the little hole for the lynch pin (the
little pin with the ring that holds quick
disconnect together) was horizontal to the ground
per the manufacturer's recommendation.
The next thing we did was to dry fit everything
together and see how it looked.
We placed the old OEM link and the new JKS side
by side and unscrewed the two halves of the JKS
until it was the same length at the original
(pretty simple to do; we simply forgot to
photograph that).
We also noticed a couple of "things" and made
some adjustments:
First, we had to bolt the strap to the sway bar
before we bolted the main assembly together
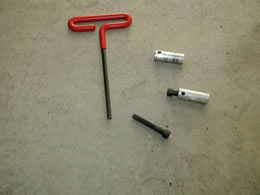
because we had to get a 1/4" Allen wrench (I
wonder who the hell Allen is?) in there to hold
the bolt while tightening the nylon lock nut.
Obviously if we had it all together, we would not
have been able to get the Allen wrench in
there.
Second, we noticed the hole in the sway bar was
larger than the bolt and the hole in the strap, so
Josh scrounged up a couple of washers and we put a
washer on the bottom as well as the washer JKS
provided for the top.
JKS says to use Loctite (or something similar)
to the bolt holding the bottom of the strap to the
main assembly, so we did.
The next thing we did was tighten up the jam
nut holding the two halves of the quick disconnect
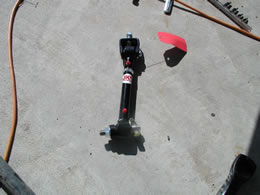
together and then reinstall the sway bar.
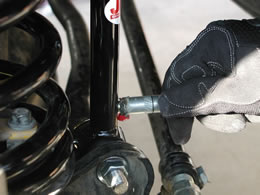
The Quick Disconnects have two grease fittings
on them. They do not come from JKS with grease in
them; hence, we greased the fittings.
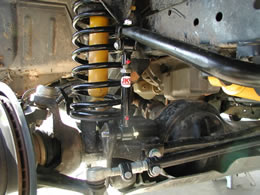
Here's a picture of the Quick Disconnect
installed.
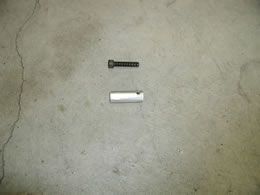
JKS sends two little "storage pins" to hold
everything out of the way when the sway bar is
disconnected. Apparently, there is a hole in a
Jeep where these things mount and you simply bolt
them in. Well, I don't drive a Jeep, so I thought
maybe I would simply use a Bungee cord to hold them up...
then I thought... "umm... no."
The issue is... there is no where to bolt these
things on permanently without them being in the
way of the sway bar. So I decided on the
following: I decided to install a Riv-nut on each
side of the vehicle and simply screw in the
storage pins when I disconnected. Now at this
point you might be saying, "that is a pain." I
thought that too, but the fact of the matter is...
I have to get out of the vehicle to disconnect the
sway bars; the extra minute it's going to take me
to install these is irrelevant, and these are much
nicer and more secure than Bungee cords for this
application.
So...
I dug through my "bolt coffee can" and found
two Riv-nuts. These can be a bitch to find and are
not generally available at your local hardware
store. I got mine from RoverTym a while ago and just
happened to have two left.
(By the way, the picture quality goes to crap
here because I am doing the "doing" and the
"photoing" at the same time.)
I lifted the disconnected sway bar up as high
as it would go and marked and drilled a hole on
each side where my Riv-nut was to be installed.
Next I took a big hammer and beat the Riv-nut
in the hole.
I then used a 1/2" socket and a 5/8" wrench to
install the Riv-nut.
Note: I originally used a 13 mm socket because
1/2" is about the same as a 13 mm. This was where
I needed the hard hat, because when the socket
slipped off, my head slammed into the %$@#ing $G
bumper (solid steel) and left me with a nice bump
that hurts like hell even as I type this. Use a
1/2" socket.
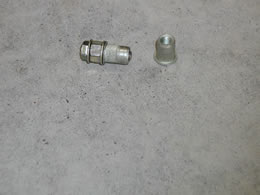
As you can see above, the original bolt for the
storage pins is a tad shorter than the upper bolt
I purchased at my local hardware store. I needed
the extra length for the Riv-nut because the
threads of the Riv-nut are set back about 1/4"
when it is installed.
I installed and tried out my new storage pins.
Works perfectly.
So, yes. Yes, I have to bolt the "sway bar storage
pins" to the vehicle every time I disconnect.
But like I said above, I have to get under the
vehicle to pull the lyunch pins and disconnect
anyway; the extra minute it takes is screw the
storage pins on is irrelevant. I'll simply place
the items above in my "off-road" Pelican case where I can easily
get to them when it is time to go off-road.
By the way... you'll be happy to know I spent 5
hours detailing Sherman today. He is no longer all
junky looking.
If you have any questions or need any help, let
me know.
- Bill
Mallin
Web Dood
Houston Land Rover Club
http://www.houstonlandroverclub.com
2001 Disco AKA "Sherman" | 


