pictures and text by Kyle Van Tassel
Installing your springs and shocks in a Discovery is a fairly easy and straightforward task, thanks to the solid axles. The following is here to answer any questions you may have about doing it yourself. With a few basic hand tools and a few hours of spare time you can install your new springs and shocks yourself . Before you get started working under the truck I would recommend taking it to a car wash and pressure wash the underside, concentrating on the areas where you will have to work, it makes the job go smoother if you are not fighting the remains of the mud hole you ran through last week.
Now that you have the truck nice and clean underneath, we will go through what you will need. The list is surprisingly small.
Okay... I think we are ready to get started...
Step one
With the truck sitting on a hard flat surface (we are about to disable it) open
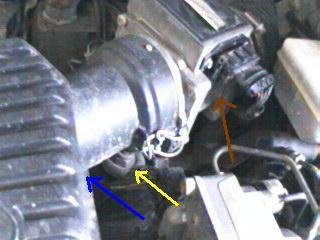
the hood and go to the drivers side front of the engine bay. Here is where your
air box (Blue arrow) and mass airflow sensor (Red arrow) are located. The air
flow sensor is going to be in your way when you try to remove the drivers side
shock tower (Yellow arrow) so we are going to remove it.
Remove the airbox cover clips (There are four on the box , two connecting it to the Mass Air Flow (MAF) sensor (Yellow arrows) for a total of Six. And remove the Air Box lid.
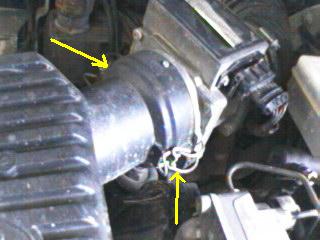
Then remove the clamp that holds the intake duct to the throttle
body (Yellow Arrow) with the flat head screw driver.
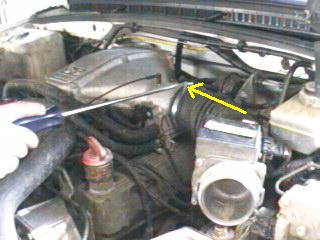
Once the clamp is losened the duct will slide off easily, then just set the assembly to the side (You don�t need to unplug the sensor) just set it off to the side out of the way of the Shock tower
Step2
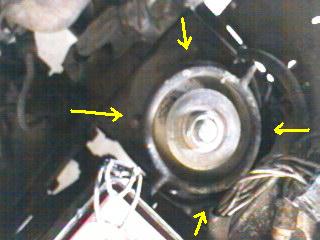
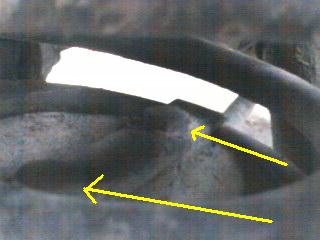
Now that the MAF is out of the way you can see the Shock tower and the attaching
bolts clearly, there are four � or 13mm bolts (Yellow arrows) the picure bellow
doesn�t show all the bolts clearly but they are there.
Remove the four nuts and lock washers using your Ratchet, long extension and � or 13mm socket. After removing them you will need to slide under the Truck with your � or 19mm wrench and your large channel locks or vise grips.
Step 3
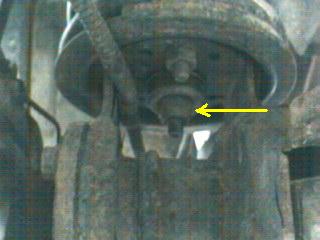
Just below the spring you will see a � nut (Yellow arrow) that is the lower shock nut. You will need to remove this nut. These are difficult most of the time and probably the worst part of this job. The problem is that when you try to loosen the nut, the whole shock body will spin, if you don�t have a shock tool you have to use what you have, by sticking your channel locks through the coils of the spring and grabbing the shock body with them, you can hold it from spinning, if you arent changing your shocks you will have to be delicate as to not mess up the shock too bad.
Once the nut is off, the shock tower is ready to come off, I like to mark things so they go back the same way. Even if it might not matter. So mark the towers before lifting them out so you can put them back in the same way Land Rover did. After marking you can just lift the whole shock and tower out from the top, being carefull not to hang any wires on the way. After removing the tower and shock put two of the nuts you removed back on the studs on opposing sides, you only need to run them on a few threads, this is to hold the plate that they are attached to out of your way when you remove the spring.
Once the tower is out you can remove the top nut and install your new shock. After installing your new Shock into the tower just set it aside till after the spring is changed. Then repeat the steps on the passengers side (except for the MAF) to remove that shock and tower also.
Step 4
Now that the shocks are out of the way the suspension is free to drop a lot
lower then it would usually easing the spring installation. So now we need to
jack it up and get it on stands. (Before jacking it might be a good idea to
beak the lug nuts free) Place your floor jack right under the front axel just
to the left of the Diff, this will raise the Truck equally on both sides. Then
place your stands under the frame just behind where the trailing arms connect
(Yellow arrows)

Lower the Jack until the truck is on the stands but make sure the tires are still clearing the floor / ground. At this time you should be able to remove the tires and wheels from the front axle. After the tires and wheels have been removed you can let the floor jack down slowly being careful not to over extend the brake hoses or any of the ABS wiring until the front axle won't go any lower, then lock the jack down and give it one pump to take the stress off of things. Now you are ready to remove your stock springs.
Step5
Now you can attach your spring compressor to the spring and compress it, be
carefull in this step, take your time and make sure the compressor is attached
securely then slowly compress the spring and remove it from its home, be careful
when removing it as the ABS wires get tangled on the way out sometimes. If you
have followed the steps correctly and your stands are tall enough you wont need
to compress the spring all that much to get it out. Once out remove the compressor
from the spring and get your new spring out. The Discovery springs are �Handed�
meaning there is a right and a left hand spring, the front and rear springs
are also different. Be sure you have the springs laid out correctly for installation.
The rears will be taller then the front, and the passengers side springs will
have thinner coils then the drivers side. If you have problems with identifying
the springs the Vendor you bought the springs from will be happy to help...
I am sure.
In stalling the new ones is obviously the reverse of removing the old ones,
after you have the new ones in, make sure they are sitting properly on their
seats, if not, adjust them accordingly.
Now start to jack the truck up with the floor jack, do this slowly and check
to make sure the springs are still sitting properly on their seats. Once the
jack is holding the weight of the truck and it is off of the stands, you can
remove them and lower the truck to the floor, now you just need to put your
shocks and towers back in, reinstall the MAF, duct and airbox cover, and you
are done with the front.
Now for the rear,,,its much easier�..
Step 6
Break your rear lugs (don�t remove them) and jack the rear of the truck up as
high as you can get it (You may have to place the jack a few times to raise
the rear evenly) then put your stands under the frame just in front of where
the rear trailing arms connect. Lower the weight of the truck onto the stands
but don�t let the rear �Drop out� keep some pressure on the jack and go ahead
and remove your rear wheels.
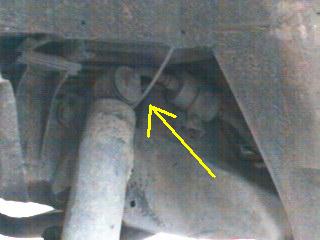
The rear springs are much the same as the front, the only differences being
the lack of shock towers and a spring retaining plate at the bottom of each
rear spring (Size I didn�t include) I believe it is 11/16 (Yellow arrows) top
and bottom
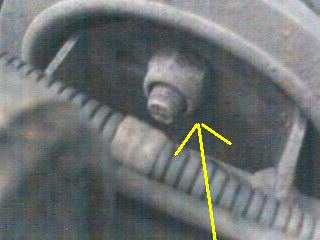
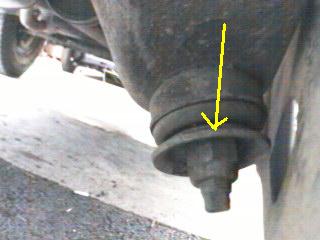
The shock nuts (Yellow arrows) are the same size as the front and are a bit easier to remove
Once the shocks are removed you can slowly lower the jack being carefull not to over extend the brake hose. At this point I am sure you already know what to do so I will stop running on.
I hope this helps to install your new springs and shocks.
Remember, if I didn�t include it here all you have to do is ask I will be happy to answer any questions or comments please E Mail me [email protected] .