
For the longest time I have searched high a low for a simple way to connect my ipod / mp3 player to my factory stereo. I believe I have figured out the simplest way to do so.
The first catch... YOU MUST HAVE A WORKING CD PLAYER IN YOUR TRUCK!
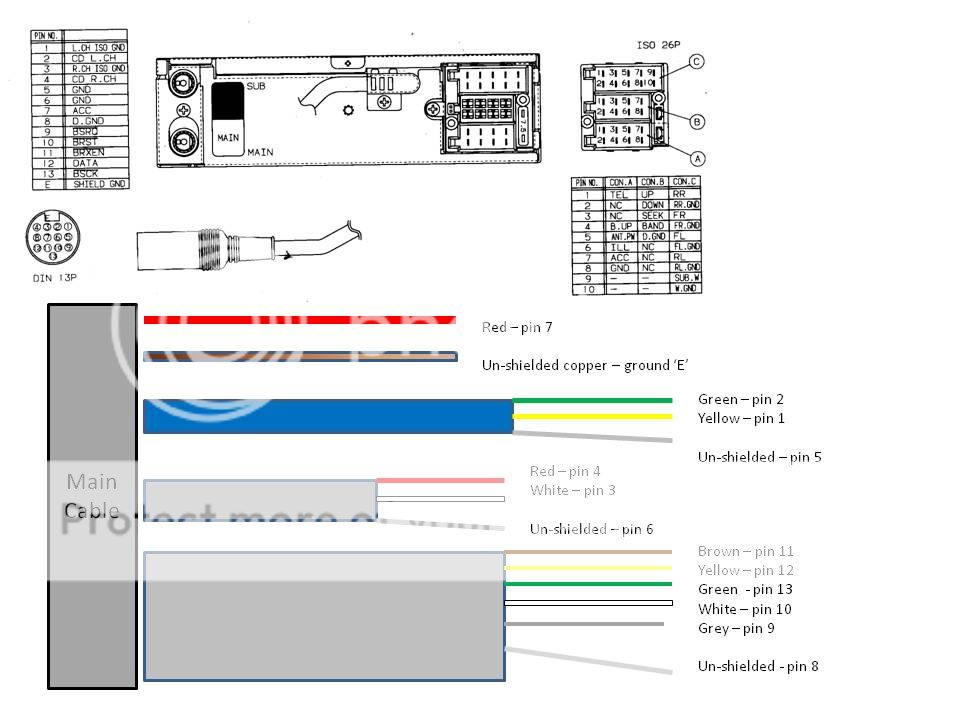
The main cable between the factory head unit and the CD player has 13 wires in it (plus a ground). Using the diagram we see that pins 1,2,3 & 4 carry the audio signals.
1. Left channel ground
2. Left channel positive signal
3. Right channel ground
4. Right channel positive signal
Put a switch along wires 1,2,3, & 4 we can add an input for an audio device and fool the factory head unit into thinking it is playing a CD when, in fact, the audio is coming from our new inputs.
The other 9 of the 13 wires carry control codes so I just put jumpers in between them so the CD and head unit can continue to ?talk? to each other.
Finally there is the ground which again can simply be re-connected.
Below is the key for figuring out which wire inside the main cable goes to which pin.
Inside the main cable there are two grey, a blue, and a red wire as well as an unshielded ground. The grey wires and the blue wire have wires inside them so in reality you have three ?layers? of wire.
When I did mine I needed a ground loop isolator between the MP3 player and the switch to eliminate alternator noise completely.
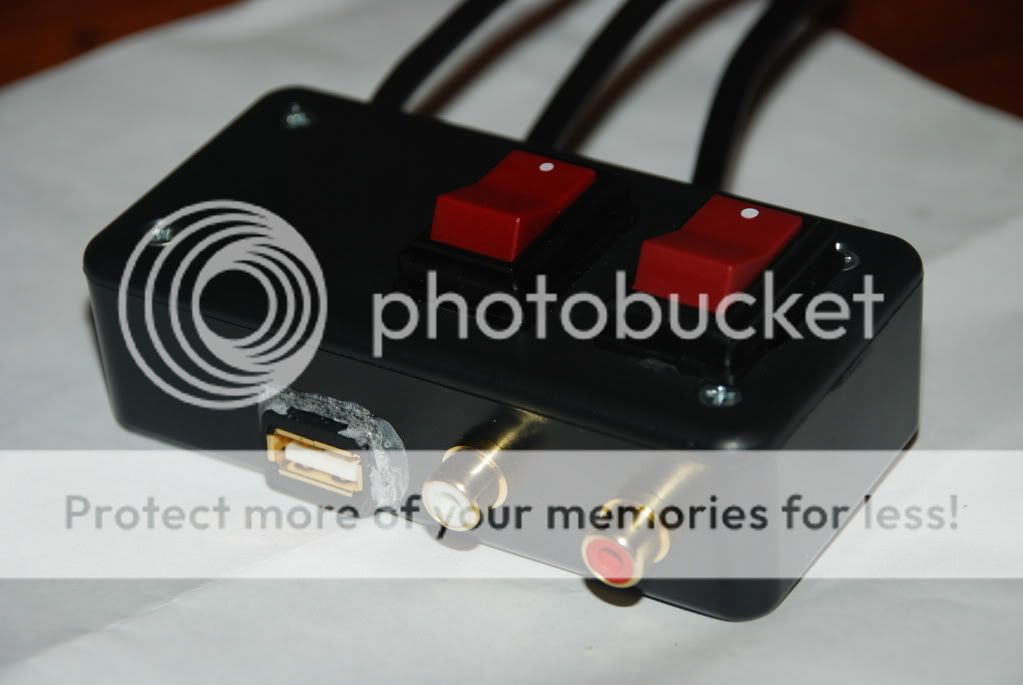
The project box I built on which to mount the switch is in my cubby and I drilled a hole in the cubby to get the wires under the passenger seat where the CD player is located. I used two DPDT witches. One for each channel of audio but I believe if you just tie all the negative audio lines together from both inputs and the wires back to the head unit, you can switch only the positives and get away with one rocker switch. Notice that I put RCA jacks on my project box in order to accommodate any type of MP3 player. I also installed a female USB port in order to power the MP3 player (which happens to be an iPod in this case).
The result is crystal clear sound from my iPhone and it charges it at the same time!
The first catch... YOU MUST HAVE A WORKING CD PLAYER IN YOUR TRUCK!
The main cable between the factory head unit and the CD player has 13 wires in it (plus a ground). Using the diagram we see that pins 1,2,3 & 4 carry the audio signals.
1. Left channel ground
2. Left channel positive signal
3. Right channel ground
4. Right channel positive signal
Put a switch along wires 1,2,3, & 4 we can add an input for an audio device and fool the factory head unit into thinking it is playing a CD when, in fact, the audio is coming from our new inputs.
The other 9 of the 13 wires carry control codes so I just put jumpers in between them so the CD and head unit can continue to ?talk? to each other.
Finally there is the ground which again can simply be re-connected.
Below is the key for figuring out which wire inside the main cable goes to which pin.
Inside the main cable there are two grey, a blue, and a red wire as well as an unshielded ground. The grey wires and the blue wire have wires inside them so in reality you have three ?layers? of wire.
When I did mine I needed a ground loop isolator between the MP3 player and the switch to eliminate alternator noise completely.
The project box I built on which to mount the switch is in my cubby and I drilled a hole in the cubby to get the wires under the passenger seat where the CD player is located. I used two DPDT witches. One for each channel of audio but I believe if you just tie all the negative audio lines together from both inputs and the wires back to the head unit, you can switch only the positives and get away with one rocker switch. Notice that I put RCA jacks on my project box in order to accommodate any type of MP3 player. I also installed a female USB port in order to power the MP3 player (which happens to be an iPod in this case).
The result is crystal clear sound from my iPhone and it charges it at the same time!