
I have searched the forum and for the life of me I can't find any info. I have done this on my RR before but can anyone give me some info about doing this on a 96 Discovery.
Radio Backlight Bulb Replacement
- Thread starter wrldky
- Start date
You are using an out of date browser. It may not display this or other websites correctly.
You should upgrade or use an alternative browser.
You should upgrade or use an alternative browser.
If it's a '96 D1, then your head unit is probably the LR branded Pioneer Model: KEX-910ZRV.
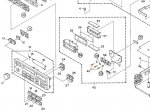
I just looked through the manual and it appears there are 3 "lamps" on a board behind the LCD screen (see attached image). I can't tell from the drawing, but these are probably mini bulbs (not LEDs) similar to the ones used for the illumination of dash switches.
Item No.: 40
Qty: 3
Description: Lamp (IL981-983)
Part No.: CEL1229
To get to the bulbs, you will definitely need to take the radio apart to get to the LCD screen assembly. I have my stock radio sitting on a shelf in my shop. Let me know if you need more instructions and I'll pop mine open.
Kev
Attachments
I have at least one burned out bulb .......I had the radio out "for other reasons"..... but i poped the cover for a look....seems like a daunting task to replace bulbs...........am i right?
I've had this radio stripped down to the circuit boards when I was trying to integrate my iPod into the stock sound system. Disassembly is not that difficult if you're half way competent with taking small stuff apart. The entire tape player assembly comes out as 1 piece which lets you get into the guts of the radio. It's been a while since I had my unit stripped apart, but as I recall it wasn't a big deal.
When I work on electronics, I usually keep a paper & pencil handy to jot down notes and make sketches, and if it's a fairly complex job I use my cell phone cam to take pics as I go, particularly showing where the many screws go, and what components go where and in what order. The more pics and info you have the better, specially if you get sidetracked and come back to it a week later") Also, usually I lay out a piece of wide masking tape sticky side up to group screws together (e.g.: rear panel, upper housing, circuit board, etc) and I scribble notes on the tape with a fine tipped indelible marker. I also place the screws on the masking tape in the same layout as where they go on the component. Little things like these ensure that you use the same screws in the same holes and prevents stripping a hole with a larger screw or breaking something with a longer screw.
Also, usually I lay out a piece of wide masking tape sticky side up to group screws together (e.g.: rear panel, upper housing, circuit board, etc) and I scribble notes on the tape with a fine tipped indelible marker. I also place the screws on the masking tape in the same layout as where they go on the component. Little things like these ensure that you use the same screws in the same holes and prevents stripping a hole with a larger screw or breaking something with a longer screw.
Kev
When I work on electronics, I usually keep a paper & pencil handy to jot down notes and make sketches, and if it's a fairly complex job I use my cell phone cam to take pics as I go, particularly showing where the many screws go, and what components go where and in what order. The more pics and info you have the better, specially if you get sidetracked and come back to it a week later
Also, usually I lay out a piece of wide masking tape sticky side up to group screws together (e.g.: rear panel, upper housing, circuit board, etc) and I scribble notes on the tape with a fine tipped indelible marker. I also place the screws on the masking tape in the same layout as where they go on the component. Little things like these ensure that you use the same screws in the same holes and prevents stripping a hole with a larger screw or breaking something with a longer screw.Kev