
How do you remove the snap rings that don't have the little holes for the snap ring pliers? I'm trying to replace the heims in the Bilsteins with bushings and one snap ring comes out easily. I am unable to remove the other one because no holes. :banghead: Any suggestions?
Bilstein, Snap... not!
- Thread starter Kavic
- Start date
You are using an out of date browser. It may not display this or other websites correctly.
You should upgrade or use an alternative browser.
You should upgrade or use an alternative browser.
B
bazzle
Guest
bazzle said:Thin screwdrivers and safety glasses.
Bazzle
That what I've been trying but it ain't working. And for me they're bifocal safety glasses. :ack:
What bushings are you using and where did you get them? My heims are a little noisy, and the inserts I got with the shocks are deteriorating.
p m said:... and a good search party....
LOL just put a big blanket over you and sit on the floor so that the blanket completely covers you and touches the ground. Put a light under there too.
Have fun,
Mike
:victory:
MyR1isFun said:What bushings are you using and where did you get them? My heims are a little noisy, and the inserts I got with the shocks are deteriorating.
I'm using Prothane Part # 19-919, 1/2" ID. I got them from eshocks.com for $11 each.
Found the trick to getting the cheap bastard snap ring out. It's called a Dremel grinding tip, grind the middle of the ring flush with the loop and then apply a little pressure to the ring end and SNAP, out they fall. 
I have no interest in the heims or the snap rings.
I have no interest in the heims or the snap rings.
I used a pair of needle-nose pliers and a small screwdriver. Hold one end of the ring in place with the pliers so that it won't rotate then pick out the other end with the screw driver.
flyfisher11 said:LOL just put a big blanket over you and sit on the floor so that the blanket completely covers you and touches the ground. Put a light under there too.
Have fun,
Mike
:victory:
So the lady of the house walks in and sees the man alone and hunched under a blanket with a flashlight, rocking from left to right, and slowly chanting:
Damn it. Damn it. Damn it. Damn it. Shit. Damn it. Damn it. Damn it. Damn it. Shit.
Oh, that will look good. :rofl:
Cheers,
Kennith
once you go ploy you will never want the sanp rings again.
a pic is the tool of choice IMHO
there is no pressing in...the bushings are split.
I have run mine a long time now and they ROCK!!!!!
a pic is the tool of choice IMHO
there is no pressing in...the bushings are split.
I have run mine a long time now and they ROCK!!!!!
I tried the pliers and screwdriver. I tried a pick. I tried a neat little tool called a bone scraper which didn't work too bad but the dremel worked best and was very fast.
The split Poly bushings go in faster than the heims come out. The Poly bushings look like a much better setup than heims so I'm glad you guys were talking about them and I waited for them to arrive to finish the install.
Thanks Dweb!
The split Poly bushings go in faster than the heims come out. The Poly bushings look like a much better setup than heims so I'm glad you guys were talking about them and I waited for them to arrive to finish the install.
Thanks Dweb!
Attachments
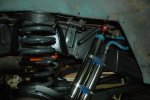
what did you spray under your truck? everything looks brand new! oh, and how much did those shocks run yah?
Kavic said:I tried the pliers and screwdriver. I tried a pick. I tried a neat little tool called a bone scraper which didn't work too bad but the dremel worked best and was very fast.
The split Poly bushings go in faster than the heims come out. The Poly bushings look like a much better setup than heims so I'm glad you guys were talking about them and I waited for them to arrive to finish the install.
Thanks Dweb!
Damn that thing is clean!
Note of caution!!!! I know many have their reservoirs attached like you have yours. I did originally and once you start wheelin' with them or even just driving around you up your chances of leakage around the swage fittings on the reservoir hoses. That is a great deal of stress on those fittings and lines. After blowing a line I moved my reservoirs to the bottom of the cargo floor (externally behind the coil spring tower). I had to remove my upper retainers to get the lines up on top of the spring tower then ran them aft and mounted the reservoirs along the bottom of the floor. There are many ways to do it but what I did was take the rubber "separators" for lack of better terms and cut them in half. That way I had a flat side to mount up to the floor and the concave side to the res. I cut a small rectangle in the carpet from the inside where I needed to run the band clamps. After threading the band clamps down and out of the cargo area. I touched it all up with some primer and wax-oil. Attach the reservoir and then clear rtv to the band clamp areas from the inside and she's dry and there is not real stress on the lines from shock to reservoir. Hope this helps but a leaky 7100 is a sad thing to see.
Cheers,
Mike
Just noted DI. You can run your reservoirs similar to what I mentioned above just go forward instead of aft. Try to make the hoses as straight as possible.
Last edited:
DiscoveryXD said:what did you spray under your truck? everything looks brand new! oh, and how much did those shocks run yah?
I wirebrushed for hours and hours with a large assortment of wire brushes to get rid of as much rust as possible, then I painted with Rustoleum Hammered Metal using a brush. Very kewl stuff, it can be painted over rust and it gets thick and covers up uneven areas. There is still some small areas I haven't hit but I thought it needed to get done before it got any worse. The undercoating was about gone and it makes cleaning much easier. I think I'll waxoyl inside the frame next.
The shocks were around $180 each.
Last edited:
Mike,
When I was mounting those reservoirs I was thinking this can't be right it's really putting a lot of pressure on those hoses to bend them like that. But then I thought, well seems everyone else is doing it and the bands and spacers seem to be made to do it so I'll just do it. I may take your advice and move them but I think I get the front end done first.
Thanks for the advice!
Kavic said:I wirebrushed for hours and hours with a large assortment of wire brushes to get rid of as much rust as possible, then I painted with Rustoleum Hammered Metal using a brush. Very kewl stuff, it can be painted over rust and it gets thick and covers up uneven areas. There is still some small areas I haven't hit but I thought it needed to get done before it got any worse. The undercoating was about gone and it makes cleaning much easier. I think I'll waxoyl inside the frame next.
The shocks were around $180 each.
well from that pic it looks great. I live in a very dry area so rust isn't an issue, but it does look great.
Thanks.
JohnK was painting something on his truck with it and I really liked it. I did the front end last year and finally got around to doing the rear end. About $10 bucks a quart at Lowes (takes less than 2).
My wife and I cleaned up a M416 trailer and painted it with hammered metal and it came out pretty nice too.