Discovery 2 rear bumper build
Issues;
Original bumper is lightweight plastic, with a heavier interior piece, this often touch’s the ground whilst off-roading, causing the lightweight outer to separate and deform, often causing you to loose the lights and or the upper cheek pieces.
Current bumper offering for the D2 is restricted both in choice and can cost to up to
$ 1200 plus shipping.
Design approach
Having looked at the offerings on the net , including slim line versions etc etc
a few concerns were highlighted.
Cutting of body work……..I move a lot and I want the toy’s to come with me…so any cutting must be coverable with the existing factory plastic side pieces so that I can re-sell the vehicle as “near original” with a few mods…
Simple construction……….I have welder and hand tools only
Must be capable of housing lights for the indicators, do not want expense of replacing upper light clusters
Cost………. cheap and cheerful but not ugly
Want it to be wider than standard without having to have rails to protect the rear quarters
Materials
1 off 6 ft length of 4”X 4” box section,
2 off 3 ft 3” X 3” angle
2 off 1 ft 2” X2” box
a couple of off cuts of 3” and 1.5” flat bar.
Cost from the local steel supplier……….. $ 71
Simple hole mountLED mounts………… $ 50
10 Dewalt Cut off discs………………………… $ 20
and 1 case of beer……………………Total $155
Build Construction.
Keep it simple stupid……..I’m no expert welder
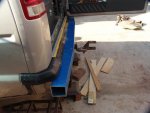
First was to remove the existing original, a 5 min job with two bolts a couple of clips and the light connections.
Measure off the mounting holes carefully and mark and drill the 4x4 section.
½” mounting holes
In order to access both the originals with captive nuts and use the existing extra holes cunningly installed by Landrover for us modders alongside
4 off 2” holes were drilled in the underneath of the section aligning with the mounting holes but keeping the corner lip in tact for strength.
This was then bolted on and the thought process engaged whilst removing mud flaps and lower quarter plastic covers, I used a grinder to cut off the rivets.
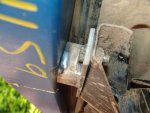
How and where to cut…….I put the original plastics up against the vehicle to see how far I could cut and still replace the panel later without making it look like a bodge job..
The other issue was how to make a neat join between the angle and the box section insuring it would be able to take hits and still look OK.
This turned out to be about 3-4 inches in a line from the existing wheel arch surround rearwards to the outer edge of the bumper main section.
Ie the wheel arch flare was not touched and the 3X3 section was put against the vehicle touching the bottom of the flare and the lower rear of the box section.
On looking behind there is the inner wheel arch which needed removal as well but instead, I ground off the lower mounting point rivet and simply bent up the panel towards the rear at the higher stanchion.
Then simply re-drilled the wing and re-riveted the panel in place
I made a cardboard 3” strip and cut it to suit the box section, then cut the 3x3 angle the same.
The other side I measured to insure they were the same and did that one too.
Both were tack welded in place, there’s nothing worse than an amateur welder welding upside down.
The corners I cut to suit 3” wide strip at an angle and 1.5” filled the gap, this was also tacked in place sort of matching the existing angles on the cheek pieces.
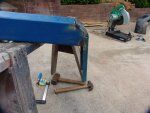
Next was how to cover the rear part of the quarter panel below the plastic cheek pieces…..looking through my bits bin there was a short length of 2x2 box with a 45 deg angle that looked useful and when offering up to the truck, found it to be ideal…just cut to length and fit, however the down and out angle of the 3’ angle iron means the bottom of the 2’ box section requires trimming to make it fit.
The 2’ box was mounted flush with the end caps and at 90 deg to the main section
Only issue with this was the gap between the 2x2 box and the angled 3” angle, to fill the gap I had to make up some small filler strips to fill the space.
Off the vehicle all the welds were completed, rough ground then flap wheeled.
The existing factory light was then looked at to see if it would easily fit…….
the answer is no, it would require some brackets and a bunch of holes filled.
So a quick trip to the local auto store won me two off LED waterproof trailer tail lights.
These simply require the correct size oval hole……draw the oval, chain drill the curves or use a hole saw, then cut out the straights with the angle grinder.
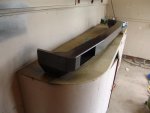
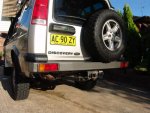
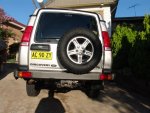
The entire assembly was given two coats of matt black paint and remounted,
lights fitted and tested.
Time to complete to this point was roughly 12 hrs in total including thinking and drinking beer time.
To finish
Need to find and purchase shackle mounts
Need to weld on my bottle opener
Maybe add a hitch tube, but as yet untill the tank is protected, I'll happily just bash the towing assembly
Need to take yet another look at possibly fixing the lower quarter protectors to the frame some how….just in case, although with the construction method it would need to bend the angle iron, as the unit its self won’t move.
(note the safari guard mounts to the body at this point…..a no no as far as I’m concerned as the body moves separately to the chassis)
Maybe tie in the main section with some more brackets….but the bumper is strong enough on its own at present if hit hard in an accident the bumper mounts would move first.
Making things stronger only move the crumple zone inward, Id rather bend the mounts than damage the main chassis…
Hope this is useful
Photo's are here....
http://s56.photobucket.com/albums/g165/POshaughnessy/Disco%20bumper/
Issues;
Original bumper is lightweight plastic, with a heavier interior piece, this often touch’s the ground whilst off-roading, causing the lightweight outer to separate and deform, often causing you to loose the lights and or the upper cheek pieces.
Current bumper offering for the D2 is restricted both in choice and can cost to up to
$ 1200 plus shipping.
Design approach
Having looked at the offerings on the net , including slim line versions etc etc
a few concerns were highlighted.
Cutting of body work……..I move a lot and I want the toy’s to come with me…so any cutting must be coverable with the existing factory plastic side pieces so that I can re-sell the vehicle as “near original” with a few mods…
Simple construction……….I have welder and hand tools only
Must be capable of housing lights for the indicators, do not want expense of replacing upper light clusters
Cost………. cheap and cheerful but not ugly
Want it to be wider than standard without having to have rails to protect the rear quarters
Materials
1 off 6 ft length of 4”X 4” box section,
2 off 3 ft 3” X 3” angle
2 off 1 ft 2” X2” box
a couple of off cuts of 3” and 1.5” flat bar.
Cost from the local steel supplier……….. $ 71
Simple hole mountLED mounts………… $ 50
10 Dewalt Cut off discs………………………… $ 20
and 1 case of beer……………………Total $155
Build Construction.
Keep it simple stupid……..I’m no expert welder
First was to remove the existing original, a 5 min job with two bolts a couple of clips and the light connections.
Measure off the mounting holes carefully and mark and drill the 4x4 section.
½” mounting holes
In order to access both the originals with captive nuts and use the existing extra holes cunningly installed by Landrover for us modders alongside
4 off 2” holes were drilled in the underneath of the section aligning with the mounting holes but keeping the corner lip in tact for strength.
This was then bolted on and the thought process engaged whilst removing mud flaps and lower quarter plastic covers, I used a grinder to cut off the rivets.
How and where to cut…….I put the original plastics up against the vehicle to see how far I could cut and still replace the panel later without making it look like a bodge job..
The other issue was how to make a neat join between the angle and the box section insuring it would be able to take hits and still look OK.
This turned out to be about 3-4 inches in a line from the existing wheel arch surround rearwards to the outer edge of the bumper main section.
Ie the wheel arch flare was not touched and the 3X3 section was put against the vehicle touching the bottom of the flare and the lower rear of the box section.
On looking behind there is the inner wheel arch which needed removal as well but instead, I ground off the lower mounting point rivet and simply bent up the panel towards the rear at the higher stanchion.
Then simply re-drilled the wing and re-riveted the panel in place
I made a cardboard 3” strip and cut it to suit the box section, then cut the 3x3 angle the same.
The other side I measured to insure they were the same and did that one too.
Both were tack welded in place, there’s nothing worse than an amateur welder welding upside down.
The corners I cut to suit 3” wide strip at an angle and 1.5” filled the gap, this was also tacked in place sort of matching the existing angles on the cheek pieces.
Next was how to cover the rear part of the quarter panel below the plastic cheek pieces…..looking through my bits bin there was a short length of 2x2 box with a 45 deg angle that looked useful and when offering up to the truck, found it to be ideal…just cut to length and fit, however the down and out angle of the 3’ angle iron means the bottom of the 2’ box section requires trimming to make it fit.
The 2’ box was mounted flush with the end caps and at 90 deg to the main section
Only issue with this was the gap between the 2x2 box and the angled 3” angle, to fill the gap I had to make up some small filler strips to fill the space.
Off the vehicle all the welds were completed, rough ground then flap wheeled.
The existing factory light was then looked at to see if it would easily fit…….
the answer is no, it would require some brackets and a bunch of holes filled.
So a quick trip to the local auto store won me two off LED waterproof trailer tail lights.
These simply require the correct size oval hole……draw the oval, chain drill the curves or use a hole saw, then cut out the straights with the angle grinder.
The entire assembly was given two coats of matt black paint and remounted,
lights fitted and tested.
Time to complete to this point was roughly 12 hrs in total including thinking and drinking beer time.
To finish
Need to find and purchase shackle mounts
Need to weld on my bottle opener
Maybe add a hitch tube, but as yet untill the tank is protected, I'll happily just bash the towing assembly
Need to take yet another look at possibly fixing the lower quarter protectors to the frame some how….just in case, although with the construction method it would need to bend the angle iron, as the unit its self won’t move.
(note the safari guard mounts to the body at this point…..a no no as far as I’m concerned as the body moves separately to the chassis)
Maybe tie in the main section with some more brackets….but the bumper is strong enough on its own at present if hit hard in an accident the bumper mounts would move first.
Making things stronger only move the crumple zone inward, Id rather bend the mounts than damage the main chassis…
Hope this is useful
Photo's are here....
http://s56.photobucket.com/albums/g165/POshaughnessy/Disco%20bumper/
Last edited: