
I replaced the head gaskets on our '99 DII recently. Tore it down Memorial Day weekend and reassembled it the next weekend after I got the heads back from the shop. Things went pretty smoothly, but there were a handful of small surprises I thought I would share here.
First, there were ground wires attached to the rear of the upper manifold, one on each side, bolted under the ignition wire looms. No big deal, but they were not documented in the RAVE so when I went to pull out the upper manifold it was still tethered.
A bracket on the bottom rear of the LH head holding the crankshaft position sensor connector and plug was also not documented in the RAVE. The connector is supposed to slide out of the bracket but mine would not budge so I had to unbolt the bracket. Again not a big deal but it was annoying to try to pull off the head and find it also still tethered.
A 3-foot cheater pipe was a real plus for both removing and doing the final torque on the head bolts. As others have stated many times a 5/8" impact socket gripped the bolt heads well. I had no worries about rounding off any bolts.
When putting it back together I found that the rear valley gasket bracket bolt was blocked by the fuel pipe at the rear of the lower intake so I could not put a socket on it to torque it to spec. I was able to use a short, open-end 1/2 inch wrench from my dad's Model A Ford to tighten the bolt as much as possible.
One of the exhaust manifold bolts twisted off when I was tightening it to the first torque setting (just 11 lb. ft.). Luckily it twisted off just beneath its head and I was able to remove the stud with only a pair of pliers.
The loaner fan clutch tool from Advance Auto Parts was mis-sized. It was stamped 36mm but measured 39mm, making it too big to work. All the fan clutch tool sets at the store were the same. I later found a set at another Advance that was sized correctly. The Autocraft fan clutch tool sold by Advance is sized correctly. I used Vise Grips instead.
The day after the truck was up and running the throttle body heater gasket sprung a big leak. I ordered and installed the replacement. I think that getting the head gasket leak fixed put pressure on the rest of the system and revealed the throttle body heater gasket weak point. After that the heater inlet pipe started leaking around the O-ring, so I replaced that again.
Once I got these leaks fixed the truck has held its water for a few weeks and over 1,000 miles. Woo hoo!
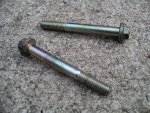
I did end up with a couple of "mystery bolts" and I cannot figure our where they go. Any ideas? (See picture.)
First, there were ground wires attached to the rear of the upper manifold, one on each side, bolted under the ignition wire looms. No big deal, but they were not documented in the RAVE so when I went to pull out the upper manifold it was still tethered.
A bracket on the bottom rear of the LH head holding the crankshaft position sensor connector and plug was also not documented in the RAVE. The connector is supposed to slide out of the bracket but mine would not budge so I had to unbolt the bracket. Again not a big deal but it was annoying to try to pull off the head and find it also still tethered.
A 3-foot cheater pipe was a real plus for both removing and doing the final torque on the head bolts. As others have stated many times a 5/8" impact socket gripped the bolt heads well. I had no worries about rounding off any bolts.
When putting it back together I found that the rear valley gasket bracket bolt was blocked by the fuel pipe at the rear of the lower intake so I could not put a socket on it to torque it to spec. I was able to use a short, open-end 1/2 inch wrench from my dad's Model A Ford to tighten the bolt as much as possible.
One of the exhaust manifold bolts twisted off when I was tightening it to the first torque setting (just 11 lb. ft.). Luckily it twisted off just beneath its head and I was able to remove the stud with only a pair of pliers.
The loaner fan clutch tool from Advance Auto Parts was mis-sized. It was stamped 36mm but measured 39mm, making it too big to work. All the fan clutch tool sets at the store were the same. I later found a set at another Advance that was sized correctly. The Autocraft fan clutch tool sold by Advance is sized correctly. I used Vise Grips instead.
The day after the truck was up and running the throttle body heater gasket sprung a big leak. I ordered and installed the replacement. I think that getting the head gasket leak fixed put pressure on the rest of the system and revealed the throttle body heater gasket weak point. After that the heater inlet pipe started leaking around the O-ring, so I replaced that again.
Once I got these leaks fixed the truck has held its water for a few weeks and over 1,000 miles. Woo hoo!
I did end up with a couple of "mystery bolts" and I cannot figure our where they go. Any ideas? (See picture.)
Attachments
Last edited: