
I have been wanting some extra light out back for a while, esp since my back windows are tinted, and while I had seen pictures of some installs I liked, I hadn't seen much detail on the forums about them. Easiest place for these is usually a roof rack, but I don't have a roof rack, so I had to come up with something else. I went with the Rigid SR-M backup light kit. Lifetime warranty, excellent wiring harness and install kit, and I found them for a good price on Amazon. I won't be covering the installation of the wiring, because it's so damn easy to do.
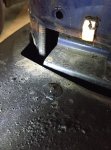
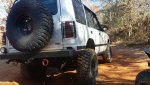
Initially, I mounted them underneath the rear bumper, using some existing holes on either side of the hitch. They were probably tucked high enough away that they would have avoided trail damage, but the spread of light wasn't what I was looking for. They needed to come up higher. At first I thought of just mounting them to my bumper, but it's plastic and not long for this world, and the access underneath for affixing the nut to the light's bolt was tight. Some people have mounted a light on the rear door handle, but I had a pair, and their wiring harness is rather thick. This left me with the D-pillars.
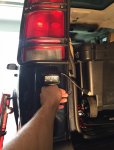
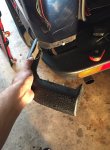
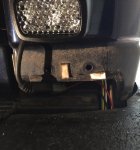
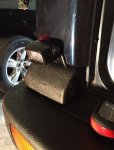
I have seen some smaller lights installed right below the factory taillight housings, but the SR-Ms are much larger, and getting the cable to run under the tail lamp housing would have required trimming both the light and the lower portion of the opening. Plus, looked pretty stupid (see first picture, idk how to get the pictures to post within my text here). The nice thing about these D-pillars though is that they have an ABSURD amount of room inside them. I figured out I was able to reach my arm all the way to the bottom of the inside, meaning I could easily put the nut on the back of the bolt for the light. I popped the small bumper corner cap off (remove the single phillips head screw on the side and then just pull straight back) and found even more room back there. Bingo.
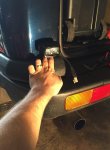
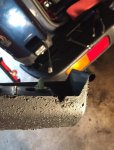
I checked clearances, theorized how I would run the wires, measured where to center the hole, and started mutilating my bodywork. Hole was drilled an inch above the corner cap, centered widthwise on the panel. I recommend starting with a 5/32" bit, then moving to a 1/4", and the final diameter needed is 5/16". I bolted the light up using a 13mm wrench and the supplied hardware (bolt through the light fitting, washer on either side of the mounting surface, lock washer+nut on the back end), plus an O-ring just as extra insulation. I cut a small divot in the bumper cap to accommodate for the light's wire. It had to be off center, as the center of the cap has a boxed in portion where the plastic tabs mount. From underneath, I pushed the harness connectors through the very conveniently located hole right at the corner, and there was plenty of room to tuck the large connector out of the way. After that, just slap the cap back on, zip tie the excess wire length underneath, and you're all done.
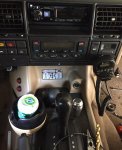
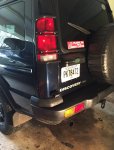
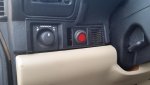
The Rigid lights are very bright and give a good spread from this position. One more advantage of moving them up from underneath is that I could use them as work lights in a pinch, although really a higher mount (roof rack) would be more ideal for that purpose. Best feature of the Rigids is their high quality wiring harness, IMHO. Came with a relay, three position switch (On/Off/On in Reverse), and a VERY long wiring loom already jacketed in flexible plastic. Only challenge I had was finding a switch location I could live with (ended up putting them on the left side of the center console.)
Initially, I mounted them underneath the rear bumper, using some existing holes on either side of the hitch. They were probably tucked high enough away that they would have avoided trail damage, but the spread of light wasn't what I was looking for. They needed to come up higher. At first I thought of just mounting them to my bumper, but it's plastic and not long for this world, and the access underneath for affixing the nut to the light's bolt was tight. Some people have mounted a light on the rear door handle, but I had a pair, and their wiring harness is rather thick. This left me with the D-pillars.
I have seen some smaller lights installed right below the factory taillight housings, but the SR-Ms are much larger, and getting the cable to run under the tail lamp housing would have required trimming both the light and the lower portion of the opening. Plus, looked pretty stupid (see first picture, idk how to get the pictures to post within my text here). The nice thing about these D-pillars though is that they have an ABSURD amount of room inside them. I figured out I was able to reach my arm all the way to the bottom of the inside, meaning I could easily put the nut on the back of the bolt for the light. I popped the small bumper corner cap off (remove the single phillips head screw on the side and then just pull straight back) and found even more room back there. Bingo.
I checked clearances, theorized how I would run the wires, measured where to center the hole, and started mutilating my bodywork. Hole was drilled an inch above the corner cap, centered widthwise on the panel. I recommend starting with a 5/32" bit, then moving to a 1/4", and the final diameter needed is 5/16". I bolted the light up using a 13mm wrench and the supplied hardware (bolt through the light fitting, washer on either side of the mounting surface, lock washer+nut on the back end), plus an O-ring just as extra insulation. I cut a small divot in the bumper cap to accommodate for the light's wire. It had to be off center, as the center of the cap has a boxed in portion where the plastic tabs mount. From underneath, I pushed the harness connectors through the very conveniently located hole right at the corner, and there was plenty of room to tuck the large connector out of the way. After that, just slap the cap back on, zip tie the excess wire length underneath, and you're all done.
The Rigid lights are very bright and give a good spread from this position. One more advantage of moving them up from underneath is that I could use them as work lights in a pinch, although really a higher mount (roof rack) would be more ideal for that purpose. Best feature of the Rigids is their high quality wiring harness, IMHO. Came with a relay, three position switch (On/Off/On in Reverse), and a VERY long wiring loom already jacketed in flexible plastic. Only challenge I had was finding a switch location I could live with (ended up putting them on the left side of the center console.)
Attachments
Last edited:

") maybe I need to invest in a 3d printer???
maybe I need to invest in a 3d printer???