Excellent ! Look forward to the final verdictCandiMan said:Today I received my motors from eBay. By this weekend I should have it installed and I'll post an update.
")
Excellent ! Look forward to the final verdictCandiMan said:Today I received my motors from eBay. By this weekend I should have it installed and I'll post an update.
It's nice to know that my own problems have generated such a flurry of DIY projectsScott said:Well, I just ordered the Parts express 4pcs set that has the 5wire and 3 2wire. My driver side has been going out for the last few months seeing this post I am giving them a shot. I will post back here what I find out.
That's what I have been doing too, but as I said in the original message, I only realized that the driver's door was not working by chancecjw said:Kev,
I Should have gotten to this party sooner... I have the same issue with the drivers door. It's the wiring loom in the door that's the culprit for me. There are a couple of broken wires, and if I jiggle the wires about with the door all apart I can make the accuator work. No jiggle, no work.
My solution... open the door with the key. One day I'll fix it.
When I used the remote, I would hear the usual door locking sounds and the signal lights would flash, and the alarm LED in the dash would also flash, indicating that the system was armed, yet the driver's door was unlocked ! Who knows how long this had been going on before I noticed ?!Thanks for the info ! I will have a look at the harness in that area to see if there are any signs of unusual kink or wear. On my driver's door there was a zap strap right beside the actuator pulling the harness connector onto the inner door skin, and also a short zap strap holding the actuator harness. I did not bother to look further towards the front edge of the door for more straps. The vinyl draft sheet and sticky putty get pretty hard to remove when it's cold, so I only peeled away what was necessary to remove the actuatorcjw said:Mine are broken about three inches from the edge of the drivers door. If they aren't held in properly (there is a zap strap holding it to the door frame that I'm not sure is original) the window will strike the harness; the first time I had it apart I didn't get it back properly and the window would tap against the harness on the way down, locking all of the doors!
I also found that if I wiggled the wires enough I could lock and unlock the other doors as well, so it's more than one wire that's broken at that location. It's definately a weak point, but I don't know whether it was the PO or not.
Somewhere around I have a spare actuator... I assumed the old one was the problem only to discover the "new" (used) one didn't work, either.
If it makes you feel any better, your alarm was armed and would have gone off if someone (or you) had opened the door. Ask me how I know...
CJW
Roverjoe said:If your actuator looks like it's working properly make sure the linkage is set up properly. The fulcrum point which has the up/down linkage is fairly sensitive to how it receives positive action from the actuator. The plastic bushing can wear out. At least, mine did. So i replaced it with a bolt and brass bushing. Should last longer than the rest of the vehicle. If you have more questions I can explain further.....
If true, this would mean that the door light switch is actually more of a door position sensor... It not only controls the courtesy light, but also reports door position to the alarm system. I don't have access to my RAVE wiring diagrams at the moment, but it's something I'll check later out of interest.cjw said:I think it's the door light switch.
If I unlock the front passenger lock with the key the lock itself will physically unlock, but it won't disarm the alarm. On a date one night, being the gentleman that I am, I unlocked her door first and opened it to let her in.... only to fumble with the key fob trying to shut off the alarm that was now sounding.
I've always wondered about the running vehicle-key fob thing... now I don't have to try it myself!
Chris
I'm not sure if that should be considered a design flaw or a high security feature. I guess it's nice to know that someone trying to pick the lock of a door other than the driver's will set off the alarm CandiMan said:Update - the motor swap went well. Very little modification was needed to install the new motor. Here's a tuturial I created for swapping the motor. It's on my Cardomain site.
http://www.cardomain.com/ride/3002336/9
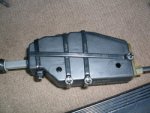
But (and this a big but) I have a problem. Due to losing a vital internal piece of the actuator, I can not install my newly rebuilt actuator. The piece I'm missing is the white adaptor piece that goes in between the shafts of the actuator. I've looked everywhere and can't find it. I wouldn't be surprised if I had discarded the piece not knowing what it was.
From looking at this pic you can see the piece I'm refering to. It fits right under the actual shaft that goes in/out.
http://memimage.cardomain.com/member_images/2/web/3002000-3002999/3002336_295.jpg?121617-319
Does anyone have a known bad actuator they want to sell. The new motor has been tested and pass. I've come too far to be stuck on technicality like this. Please assist.
My multimeter was registering a very short pulse of over 10 VDC to the 2 motor power pins.Roverjoe said:I think that most of the actuator problems seen on discoweb are actually linkage problems. Considering how finicky the linkage & trip point actually are to go from unlocked to locked. With the door skin off it's fairly easy to see whether or not the plunger on the actuator is working properly.
In my opinion the whole design is poor. The stress point of the whole system is a cheap 1/8" nylon busing.
CandiMan said:Kev, first I would like to say I'm sorry your motor and harness has tested ok, considering it was me who suggested it was the motor. Second, I took your suggestion and changed the wording in my tutorial. Along with checking for proper voltage (before cracking the actuator open) I also mentioned to check for proper linkage adjustment. I took a trip to a salvage yard out of town to grab some misc interior parts and a actuator if they had one available. I was able to get the spring loaded clip from the tail gate actuator and installed it into my actuator. After getting the spring load clip into the actuator I zip tied the covers back together. It doesn't look pretty, but my LF actuator is not working as design. Problem resolved.
I've been working on cars long enough to have learned that by now, and I think your tutorial will be a much more useful reference now that you've added the preliminary bench test AND the linkage check that I should have mentioned ! CandiMan said:Let's see if I can answer your questions.
The reason I used zip ties was because they were readily available in my tool box. We have a glue gun that the Mrs. use for her craft hobbies but that wouldn't be strong enough to hold the cover together. The actuator motor creates a lot of torque which wants to spread the cover apart. That's why it was so hard to seperate the factory heat weld. I guess I could have used those 2-part epoxy but I didn't think about it.
CandiMan said:When I assembled my actuator, I did not place the grey "plate" in no particular position. I figured once the actuator goes through a lock and unlock cycle, it will put the plate in the correct position. As you stated, the plate does interact with the spring loaded clip. Both the plate and spring loaded clip keeps tension on the rod when in the lock and unlock position.
One thing I realized, in order for the actuator to work properly, the two halves of the cover needs to be tight with no flexing. The operation of the spring loaded clip and plate depends on a tight cover.
With my hose clamp in the middle of the actuator body, I can see that the 2 ends are actually bowed up a little, which would probably interfere with the proper operation, and also lead to premature gear wear. When I put the casing back together I will use work clamps to tightly squeeze the casing together as I apply the epoxy/glass fiber tape.CandiMan said:Like yourself I've yet to figure out how the micro switch inside a actuator works. But I think it comes into play when you use the door key to unlock/lock the doors. Since you are manually unlocking the door with the key, it moves the plunger to activate or de-activate the micro-switch, which sends a signal to the locking system to lock or unlock the other locks. This is why the other locks will still work with the LF actuator disconnected. At that point the locking system is getting it's signal from the remote instead of the door key.
CandiMan said:No I did not use the voltmeter to check for voltage, I just used my test light.
The motor seems fine, the harness is getting power (maybe not for a complete cycle though), and the mini switch is working. I will try bench testing the assembly to see if I can hear the motor spin and the gears turn. Maybe the reason it didn't work when I did a quick test on the vehicle was that the plunger was in the wrong position and was telling the lock system that the door was already unlocked... So I removed the motor from it's position in the casing and spun the shaft a little. Reapplied voltage and it worked, but got a little wisp of smoke