Inspirations:
Frank's D2 long travel front sway bar setup (lacking pics due to Photobucket change): https://discoweb.org/showthread.php?t=80297
Foundry 4x4 X-Deflex unlocking rear sway bar: https://foundry4x4.co.uk/index.php?route=product/product&product_id=78&search=sway [read a couple of overseas forum threads showing problems with the curved arm of this kit, mainly it bending/being too weak and needing reinforcement]
Pirate4x4 thread on sway bars: http://www.pirate4x4.com/forum/general-4x4-discussion/817454-sway-bar-calculator.html
TK 1 sway bar kits and recommendations (link length, offset, etc.): http://store.tk1racing.com/SearchResults.asp?Cat=56
Parts:
Speedway Engineering for torsion bar and arms: http://1speedway.com/index.php?route=product/category&path=76
Appropriate ID bushing (based on torsion bar OD) and locking collars
Mounting can be done to the factory brackets with a spacer, or with custom mounts to the frame, or to the face of a strong gas tank skid plate
Links of the appropriate length
Mounts of some kind to connect the links to the axle housing
Why: With the challenging flex from the radius arm front, a rear sway bar can force more work/flex from the front. Also, I had grown tired of the sway on the road (partly due to my shocks being way overdue for a rebuild).
My specifics, as this can be tailored six ways to Sunday so don't get locked into what I did:
Torsion bar length: Can be had in many different lengths. I went with 40.5" overall to ensure the arms, particularly the driver's side, cleared everything which was mainly the exhaust pipe (mine exits out the rear).
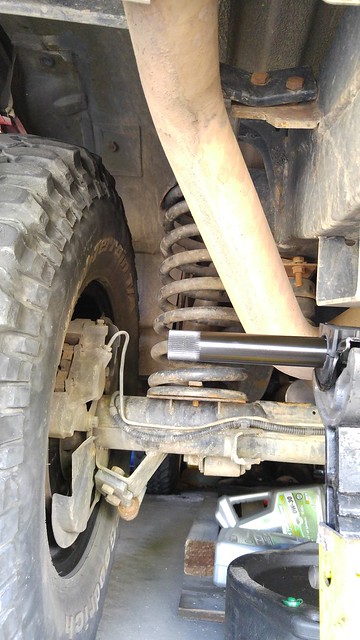
Torsion bar size: I didn't want to go too strong and make a mess of the handling. I went with a hollow (versus solid) 1" OD .120" wall (Speedway Engineering # 608-100-120). This one was selected in conjunction with the arm length I expected to have (~12" IIRC; I'll need to measure). I like the feel of it on my setup, but I really don't have much to compare to (bought my rig already lifted and no sway bars)... I can say it definitely helps on the road without feeling like it's overpowering.
Arm distance between the torsion bar and link mount: Think of this as a lever. This chart is for the torsion bar I chose (mine is specifically the 608-100-120-40.5): http://1speedway.com/index.php?route=information/information&information_id=18 As you will see, the longer the distance, the less of an effect the setup has. This is why you see race trucks, etc. with arms or brackets with multiple holes in them... so they can adjust. So, you need to have this number mostly figured out so you pick the appropriate torsion bar.
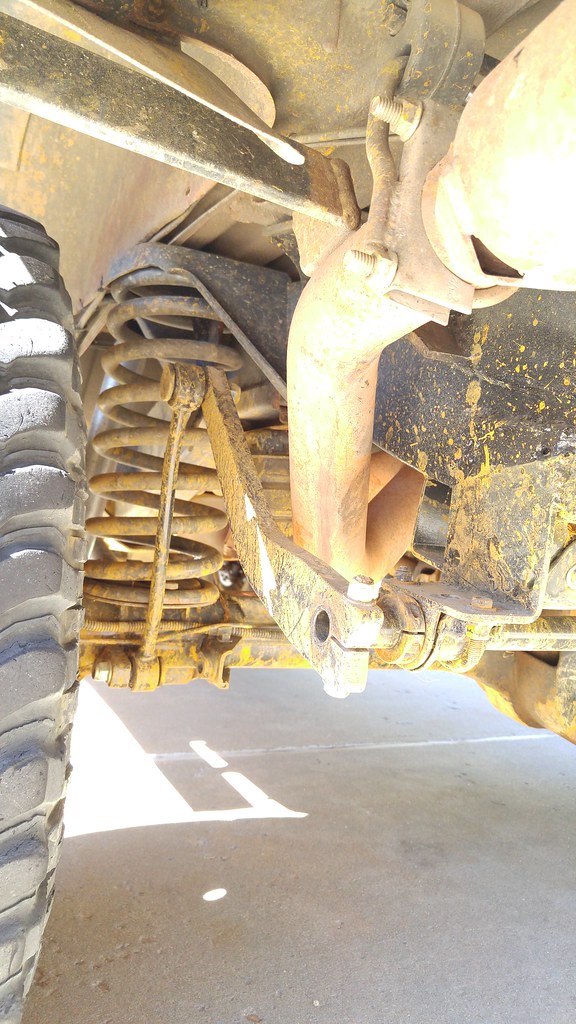
Arms: Make sure they match the OD and spline count of your torsion bar, for one. Also, account for the travel. I went with the 30 degree angled steel arms (Speedway Engineering # 617-1) on both sides. It is really handy on the driver's side to get around the exhaust; technically you probably could get a straight arm for the other side, but my OCD tendencies preferred the same arm on both sides.
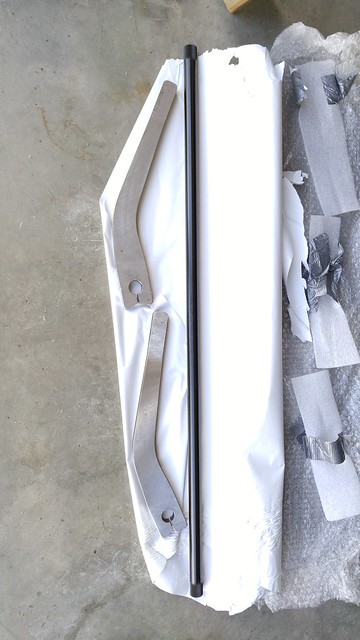
Links: Go with whatever floats your boat. I prefer a rubber/poly bushing to a metal, spherical bushing. You have to drill the arms to mount, so take this into consideration with whatever you choose. Recommendations I found said to use a link length which matches or exceeds the shock travel, which in my case is 12". I dug around and decided to go with a Ford truck link (Moog K80269) with a stud size of 1/2" (IIRC). Since the arms I used are 3/4" thick, these links just barely worked; a regular nut threads on fully without the stud poking through. Provided were nylon locking nuts and they didn't thread on far enough to engage the nylon portion (so, just throw on thread locker). I looked for some time for a ball joint-style link, but never found one I though would work (most were car links and looked too weak to hold up to wheeling). The Ford ones use rubber, and even after flexing it way out, the rubber hasn't torn yet (turns out it doesn't get as abused as I initially thought).
Torsion bar mounting bushing: Must match the bar OD. Since mine was 1", there's plenty of choices. I needed the bracket which wraps around the bushing too, so you can go with a poly kit (several companies out there), or find an OEM option. I went with a Toyota [4Runner, I think] front sway bar bushing (Dorman 928-361), as I liked the embedded cloth within the bushing which allows the bar to turn smoothly.
Putting it all together:
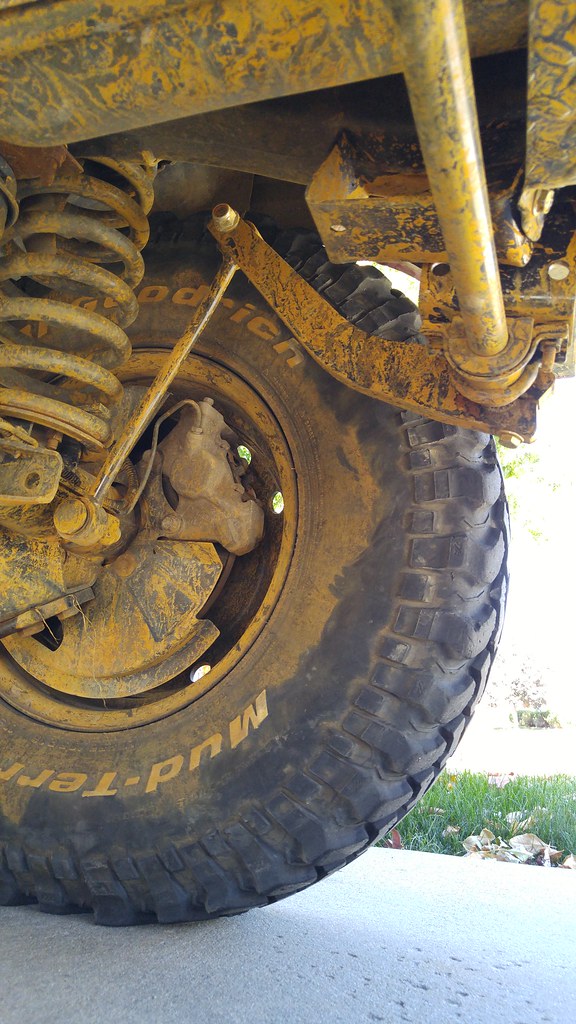
As I said above, there's a few ways to mount the bar. I scrapped the idea of using the factory bracket, as I had smashed one at some point, which also buckled/bulged the frame. I decided to do an L-bracket off the side of the frame. I positioned it so that the bar wasn't too exposed; it just barely peeks out from behind the 255/85s. Ensure the arms are still long enough to work wherever you plan to mount the bar.
Arm length: I had to cut mine down, which worked out well. The stub of arm left over from cutting was long enough to use as the axle-end link mount.
Arm-to-link mounting: Those steel arms were a treat to drill to 1/2" without a press [sarcasm]. It can be done with a hand drill - I did it - but it was a pain. As most know, start with a small bit and work your way up.
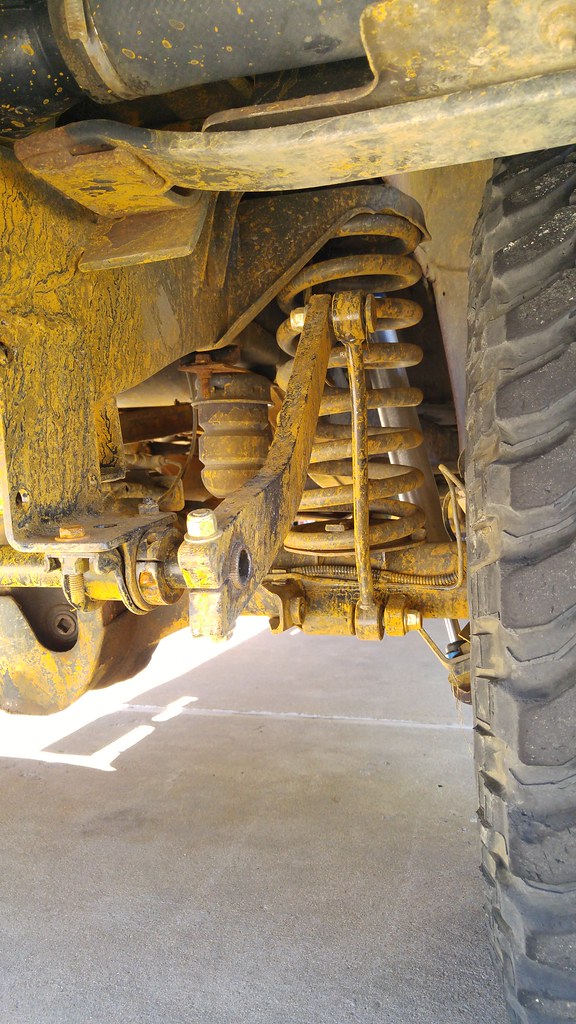
Link-to-axle mounting: Pay attention to what you have to work around... the coil mount, brake line, ABS sensor wire, existing tapered pin sway bar bracket mount (I really wanted to find a way to use these, but simply didn't), etc. Consider the link's travel when flexing - you don't want to mount it somewhere which allows the link body to come into contact. Also, the recommendation I saw was to have an inch or two of separation, but that wasn't going to work with my links. So far, so good on my setup.
Some pics installed (don't mind the pumpkin spice latte undercoating... that's a whole other story):
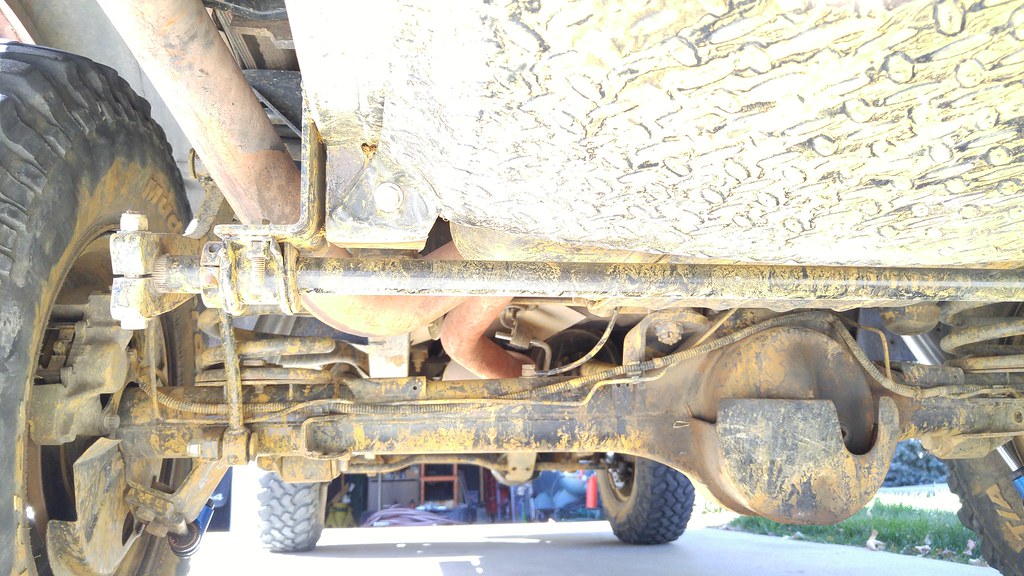
To help pick out the components:

Relative to the 255/85-16 tires:
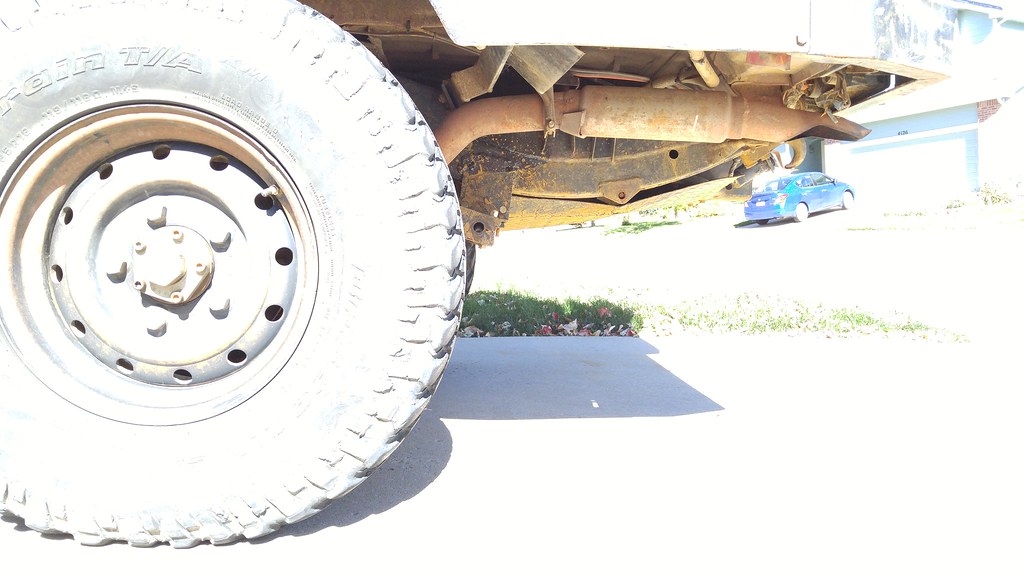
Other angles of the links and arms at ride height:
If I get it flexed out (and think of it), I'll post pics of that too.
Frank's D2 long travel front sway bar setup (lacking pics due to Photobucket change): https://discoweb.org/showthread.php?t=80297
Foundry 4x4 X-Deflex unlocking rear sway bar: https://foundry4x4.co.uk/index.php?route=product/product&product_id=78&search=sway [read a couple of overseas forum threads showing problems with the curved arm of this kit, mainly it bending/being too weak and needing reinforcement]
Pirate4x4 thread on sway bars: http://www.pirate4x4.com/forum/general-4x4-discussion/817454-sway-bar-calculator.html
TK 1 sway bar kits and recommendations (link length, offset, etc.): http://store.tk1racing.com/SearchResults.asp?Cat=56
Parts:
Speedway Engineering for torsion bar and arms: http://1speedway.com/index.php?route=product/category&path=76
Appropriate ID bushing (based on torsion bar OD) and locking collars
Mounting can be done to the factory brackets with a spacer, or with custom mounts to the frame, or to the face of a strong gas tank skid plate
Links of the appropriate length
Mounts of some kind to connect the links to the axle housing
Why: With the challenging flex from the radius arm front, a rear sway bar can force more work/flex from the front. Also, I had grown tired of the sway on the road (partly due to my shocks being way overdue for a rebuild).
My specifics, as this can be tailored six ways to Sunday so don't get locked into what I did:
Torsion bar length: Can be had in many different lengths. I went with 40.5" overall to ensure the arms, particularly the driver's side, cleared everything which was mainly the exhaust pipe (mine exits out the rear).

Torsion bar size: I didn't want to go too strong and make a mess of the handling. I went with a hollow (versus solid) 1" OD .120" wall (Speedway Engineering # 608-100-120). This one was selected in conjunction with the arm length I expected to have (~12" IIRC; I'll need to measure). I like the feel of it on my setup, but I really don't have much to compare to (bought my rig already lifted and no sway bars)... I can say it definitely helps on the road without feeling like it's overpowering.
Arm distance between the torsion bar and link mount: Think of this as a lever. This chart is for the torsion bar I chose (mine is specifically the 608-100-120-40.5): http://1speedway.com/index.php?route=information/information&information_id=18 As you will see, the longer the distance, the less of an effect the setup has. This is why you see race trucks, etc. with arms or brackets with multiple holes in them... so they can adjust. So, you need to have this number mostly figured out so you pick the appropriate torsion bar.
Arms: Make sure they match the OD and spline count of your torsion bar, for one. Also, account for the travel. I went with the 30 degree angled steel arms (Speedway Engineering # 617-1) on both sides. It is really handy on the driver's side to get around the exhaust; technically you probably could get a straight arm for the other side, but my OCD tendencies preferred the same arm on both sides.

Links: Go with whatever floats your boat. I prefer a rubber/poly bushing to a metal, spherical bushing. You have to drill the arms to mount, so take this into consideration with whatever you choose. Recommendations I found said to use a link length which matches or exceeds the shock travel, which in my case is 12". I dug around and decided to go with a Ford truck link (Moog K80269) with a stud size of 1/2" (IIRC). Since the arms I used are 3/4" thick, these links just barely worked; a regular nut threads on fully without the stud poking through. Provided were nylon locking nuts and they didn't thread on far enough to engage the nylon portion (so, just throw on thread locker). I looked for some time for a ball joint-style link, but never found one I though would work (most were car links and looked too weak to hold up to wheeling). The Ford ones use rubber, and even after flexing it way out, the rubber hasn't torn yet (turns out it doesn't get as abused as I initially thought).
Torsion bar mounting bushing: Must match the bar OD. Since mine was 1", there's plenty of choices. I needed the bracket which wraps around the bushing too, so you can go with a poly kit (several companies out there), or find an OEM option. I went with a Toyota [4Runner, I think] front sway bar bushing (Dorman 928-361), as I liked the embedded cloth within the bushing which allows the bar to turn smoothly.
Putting it all together:
As I said above, there's a few ways to mount the bar. I scrapped the idea of using the factory bracket, as I had smashed one at some point, which also buckled/bulged the frame. I decided to do an L-bracket off the side of the frame. I positioned it so that the bar wasn't too exposed; it just barely peeks out from behind the 255/85s. Ensure the arms are still long enough to work wherever you plan to mount the bar.
Arm length: I had to cut mine down, which worked out well. The stub of arm left over from cutting was long enough to use as the axle-end link mount.
Arm-to-link mounting: Those steel arms were a treat to drill to 1/2" without a press [sarcasm]. It can be done with a hand drill - I did it - but it was a pain. As most know, start with a small bit and work your way up.
Link-to-axle mounting: Pay attention to what you have to work around... the coil mount, brake line, ABS sensor wire, existing tapered pin sway bar bracket mount (I really wanted to find a way to use these, but simply didn't), etc. Consider the link's travel when flexing - you don't want to mount it somewhere which allows the link body to come into contact. Also, the recommendation I saw was to have an inch or two of separation, but that wasn't going to work with my links. So far, so good on my setup.
Some pics installed (don't mind the pumpkin spice latte undercoating... that's a whole other story):

To help pick out the components:

Relative to the 255/85-16 tires:

Other angles of the links and arms at ride height:


If I get it flexed out (and think of it), I'll post pics of that too.
Last edited:


