Recently lifted my disco1 2 inches and hear a noise at low speed cruising

Disoteka

Active member
Jun 22, 2023
28
5
Whittier
So I recently lifted my 95 disco 1 2inches and I hear a chattering kinda clunking metal noise coming from maybe the rear driveshaft area.

i attempted to replicate this several times and found the noise happens when I am cruising at 7-2 MPH when I let off the gas

it stops if I accelerate or apply the brakes. I have also placed it in neutral while the noise starts, and the sound continues even in neutral at low speeds.

I suspect the drive shafts but can not for certain say it’s that. I have stock drive shafts BTW.

Any other things I should be checking ? Could the drive shafts need replacing due too the lift?

Thanks in advance
 

kris812

Well-known member
Jun 11, 2014
266
93
Tucson AZ
Crawl underneath and give the driveshafts a shake! Sounds like you had a bad rear UJ or flex plate that got exacerbated by lifting.

I replaced everything, UJs on front and rear + the flex. Still had vibrations I covered in another post. Most went away converting the rear DS to a UJ getting rid of the the flex. I also had to add spacers to the rear arms to get axle and output flange Angles to match.

And I was unable to keep clean underwear on the freeway as lifting removed the caster and drove like a bad shopping cart. So I got 3 degree arms to help. Which made for some deceleration vibrations in the transfer case. Front Double Cardan DS helped that.

So springs and shocks was the CHEAPEST part of my lift! But on the plus side there were fools like me who already did this to help guide you.
 

Disoteka

Active member
Jun 22, 2023
28
5
Whittier
Crawl underneath and give the driveshafts a shake! Sounds like you had a bad rear UJ or flex plate that got exacerbated by lifting.

I replaced everything, UJs on front and rear + the flex. Still had vibrations I covered in another post. Most went away converting the rear DS to a UJ getting rid of the the flex. I also had to add spacers to the rear arms to get axle and output flange Angles to match.

And I was unable to keep clean underwear on the freeway as lifting removed the caster and drove like a bad shopping cart. So I got 3 degree arms to help. Which made for some deceleration vibrations in the transfer case. Front Double Cardan DS helped that.

So springs and shocks was the CHEAPEST part of my lift! But on the plus side there were fools like me who already did this to help guide you.
Thank you. The previous owner replaced the radius arms front and rear. Also I am in the process of installing a double cardan in the front. Also I failed to mention that there is a 1 inch spacer in the back bringing the grand total of 3 inches lift with the stock DS. Thinking of getting a rear DS. Any recommendations ? Hopefully this helps that annoying noise
 

kris812

Well-known member
Jun 11, 2014
266
93
Tucson AZ
Please read through this:


It's all about my noises and play adventure from lifting.

I also have about 3" in rear as I needed spacer on right side to level the dang truck. And for the rear DS lucky8 sells a conversion kit as you must change the rear axles flange as well. Biggest part of that job.

Now again once that is done your flange Angles aren't going to match with your 3 degree arms on the rear. I listed some 17$ exhaust flanges you can use to space the arms backwards. I used an angle finger app on my phone BTW

Also I had to send my Tom woods front DS back for another cuz the pilot was too long and the flanges never met. Be sure to check that as well!
 

kris812

Well-known member
Jun 11, 2014
266
93
Tucson AZ
Oh yeah, DON'T FORGET, you'll need to drop your front sway bar down ASAP! New larger front DS and the lift, is going to make your DS contact the sway bar when unsprung!! That's BAD BTW.. very bad..
 

terryjm1

Well-known member
Jan 23, 2011
1,490
376
Oh yeah, DON'T FORGET, you'll need to drop your front sway bar down ASAP! New larger front DS and the lift, is going to make your DS contact the sway bar when unsprung!! That's BAD BTW.. very bad..
I had to space mine down 2 inches.

Edit.. I should add that I made the decision to lower the sway bar solely due to the driveshaft contacting the sway bar when it was on my shop lift with no weight on the suspension. I didn’t do a practical test. i cant say with certainTy the suspension ever would have dropped enough to contact the sway bar otherwise but for the cost of adding the spacers and ease of the job I figured it was a good idea. I made my spacers out of some scrap square tube but I think you can buy spacers for around $50.
 
Last edited:

p m

Administrator
Staff member
Apr 19, 2004
15,634
864
58
La Jolla, CA
www.3rj.org
Oh yeah, DON'T FORGET, you'll need to drop your front sway bar down ASAP! New larger front DS and the lift, is going to make your DS contact the sway bar when unsprung!! That's BAD BTW.. very bad..
On my old D1, front sway bar never made contact with the driveshaft at about 3" of spring lift.
 

kris812

Well-known member
Jun 11, 2014
266
93
Tucson AZ
On my old D1, front sway bar never made contact with the driveshaft at about 3" of spring lift.
Caster Correction arms Greatly change this situation a lot as well, as it tilts the pinion angle closer to the sway bar at the same time. But I assure you, mine hit before the 3 degree arms; lifted off the ground suspension became bound on the Driveshaft.

Now IRL driving would it hit, probably not. But I've hoped over things like a concrete wash walls and both front wheels have came off the ground before. Definitely would grind if ever on a lift and spinning.

FTW: Ideally moving 2" down and 1" back puts the sway bar swivels back were they belong as well. I had some 1- 1/2" steal and used that and only went down not back. DS gets 1/8" away at full unsprung suspension. IF/when I re-do this I will go 2" down AND 1" back as well. OR just remove both the sway bars and be done with them.
 

Disoteka

Active member
Jun 22, 2023
28
5
Whittier
Update.
Checked all the UJ DS and all look good. No binding. Checked the brake shield and nothing stuck. I do have a massive leak coming from behind the parking brake drum / tcase which flings gear oil all over the undercarriage.

recently checked all oil levels on the drivetrain all good.

I noticed that in the morning at cold start and driving the clucking noise does not happen at crushing 5-7 MPH. But once I drive a couple of miles and get her warmed up it starts making the noise.

I have also tested at cruising the Tcase by placing it and the Trans in N and it still makes the noise.
I don’t have OCD but this is keeping me up at night. Lol
 

terryjm1

Well-known member
Jan 23, 2011
1,490
376
“I do have a massive leak coming from behind the parking brake drum / tcase which flings gear oil all over the undercarriage.”

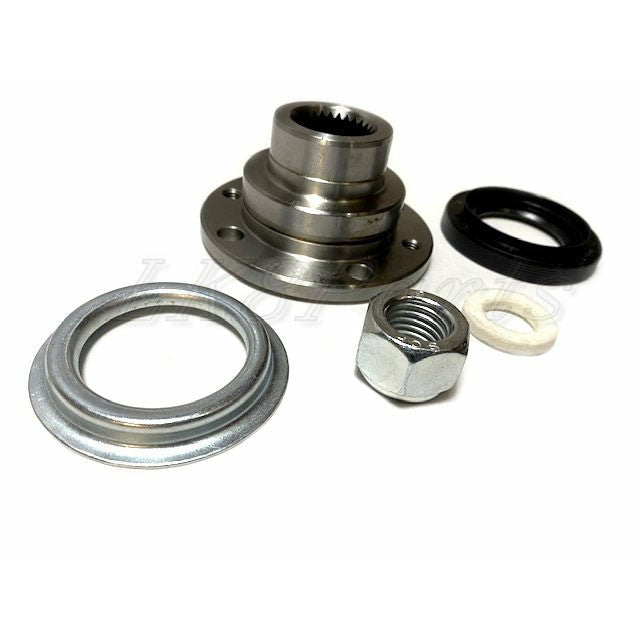
I purchased the seal/flange kit and it completely solved that problem on mine. My flange had a significant groove in it. The brake shoes were coated in oil but the parking brake was still holding well, surprisingly. I did replace the shoes.
 

kris812

Well-known member
Jun 11, 2014
266
93
Tucson AZ
Get under there and shake them while everything is warm!

Lastly my front DS was making snapping or clunking "feeling", felt like torque converter was warped like hell at low speeds. I blame that on the OG 40deg twist DS and it smoothed out completely with a DC DS.

Lock the CDL, and remove one drive shaft and go for a test drive. If it's anything like my lift, it vibrated on both single shafts and I had to fix issues on Both front and rear. You can also feel the UJ better with them off the truck.
 
  • Like
Reactions: Disoteka

Disoteka

Active member
Jun 22, 2023
28
5
Whittier
“I do have a massive leak coming from behind the parking brake drum / tcase which flings gear oil all over the undercarriage.”

I purchased the seal/flange kit and it completely solved that problem on mine. My flange had a significant groove in it. The brake shoes were coated in oil but the parking brake was still holding well, surprisingly. I did replace the shoes.
Atlantic British ? For the seal flange kit
 

kris812

Well-known member
Jun 11, 2014
266
93
Tucson AZ
I just
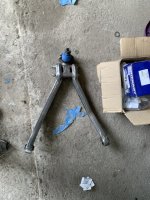
View attachment 65388
If you lift a D1 usually the clunk is from the upper tie rod/ball joint. I run the 45% unit with a zerk fitting.

Ball Joint 45 Degree Unit
I just replaced the ball joint itself with a Moog ball. My eye-cromiter said it did 45 degrees as well. Definitely more than the stock one did!

Now idk if this kit moves the ball forward or backwards but I had to add spacers on the rear arms to move them backwards to get Pinion angles to match. I have TF arms so that might change things idk, length appeared the same as stock on those arms.
 
  • Like
Reactions: best4x4

terryjm1

Well-known member
Jan 23, 2011
1,490
376
“Atlantic British ? For the seal flange kit”

I cant remember where I purchased it. It was on the shelf for a while but AB is a good.

In reference to that upper ball joint I went the cheap way and installed just the ball joint insert, reusing everything else. If you have a press it isn’t too hard to install. However, in mine, the bolts that hold the ball joint assembly to the arms were fused in the assembly. I had to grind off the heads, use a lot of heat, and a 5 pound hammer to beat it all apart. Just something to think about as you approach the job. I had a spare so I didn’t have to take it off the road before I had it all together again.

My impact rounded off the heads, and they are grade 8 bolts I believe. I even applied a good amount of heat as I tried to break the bolts loose with the impact. It’s a strong impact. I have to be careful with it to not break an arm. The really surprising thing is the assembly as a whole wasn’t rusty.

I also suggest replacing the bushings while you have the assembly out.

E4FCD7F9-2A91-406E-B540-C833F1B6C215.jpeg
 
Last edited:

kris812

Well-known member
Jun 11, 2014
266
93
Tucson AZ
“Atlantic British ? For the seal flange kit”

I cant remember where I purchased it. It was on the shelf for a while but AB is a good.

In reference to that upper ball joint I went the cheap way and installed just the ball joint insert, reusing everything else. If you have a press it isn’t too hard to install. However, in mine, the bolts that hold the ball joint assembly to the arms were fused in the assembly. I had to grind off the heads, use a lot of heat, and a 5 pound hammer to beat it all apart. Just something to think about as you approach the job. I had a spare so I didn’t have to take it off the road before I had it all together again.

My impact rounded off the heads, and they are grade 8 bolts I believe. I even applied a good amount of heat as I tried to break the bolts loose with the impact. It’s a strong impact. I have to be careful with it to not break an arm. The really surprising thing is the assembly as a whole wasn’t rusty.

I also suggest replacing the bushings while you have the assembly out.
I removed the whole A-Arm assembly from the truck and dealt with the ball like that, leaving those 2 bolts that hold the assembly together alone! I also took a Sledgehammer to it to remove the ball, even though I had a 30 ton press on hand. Inertia does more than pressure alone; it was also hard to gig up in the press being angled and homie didn't have time for that so I went to town tapping.

As for the rear flange kit check out Lucky8, do NOT forget to add NEW BOLTS to the orders!!
 

best4x4

Well-known member
Mar 1, 2015
595
72
Beaumont, TX
“Atlantic British ? For the seal flange kit”

I cant remember where I purchased it. It was on the shelf for a while but AB is a good.

In reference to that upper ball joint I went the cheap way and installed just the ball joint insert, reusing everything else. If you have a press it isn’t too hard to install. However, in mine, the bolts that hold the ball joint assembly to the arms were fused in the assembly. I had to grind off the heads, use a lot of heat, and a 5 pound hammer to beat it all apart. Just something to think about as you approach the job. I had a spare so I didn’t have to take it off the road before I had it all together again.

My impact rounded off the heads, and they are grade 8 bolts I believe. I even applied a good amount of heat as I tried to break the bolts loose with the impact. It’s a strong impact. I have to be careful with it to not break an arm. The really surprising thing is the assembly as a whole wasn’t rusty.

I also suggest replacing the bushings while you have the assembly out.
Yeah my XD took 2 entire days to remove the entire assembly. Bolts had fused to the arm. I used heat, grinder, sawzall, hacksaw, and a 25LB sledge finally had to just drill them out... 2 days for a 30min job.
 
  • Wow
Reactions: DiscoClay

kris812

Well-known member
Jun 11, 2014
266
93
Tucson AZ
Again, I just removed the whole A arm assembly and dealt with it on the bench. Took 30 mins to remove and install. But yeah, i probably would have had to cut those 2 long bolts of I didn't remove the assy.
 
  • Like
Reactions: DiscoClay