D2 Head Gasket home repair, Version Feb 2011

Dan B

Well-known member
Mar 11, 2009
162
0
W Melbourne, FL.
seanmcd said:
Hey Dan, have you done a head gasket yourself? Just wondering if I run into any snags I may ask some questions, I just saw you are in Melbourne and I am in Vero Beach. Would be helpful to have someone to ask a few questions as needed.

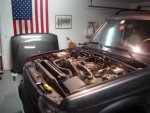
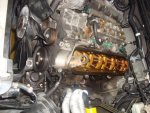
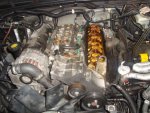
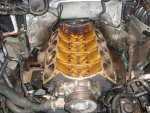
Well, I haven't finished the job, but I am nearly at the end of the tear down. I'm in no rush as my office is only 2.5 miles away from home and I bike to work.

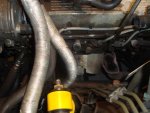
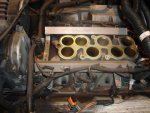
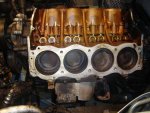
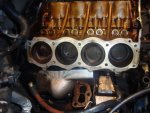
I am waiting on a 9 mm hex socket to take out the SAI pipe fittings (not in stock anywhere local and not in my hex set - annoyingly), then the heads will be off to a local automotive machine shop on Monday ($250).

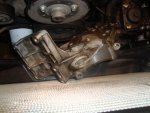
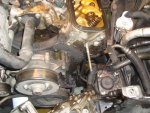
While I wait for the head work I'm doing all the front gaskets (water pump, front cover), front oil seal, the timing chain and sprockets, and the sump gasket.

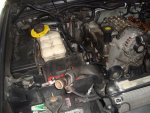
I'm simply just following RAVE, searching on here, and not rushing.

I am aiming for President's Day to have it all back together. No doubt I'll overlook or forget something (last time is was torquing down the rear valley pan gasket bracket bolt) and will have to do it all again next year :D
 

seanmcd

Well-known member
Apr 24, 2006
134
0
Ok, the heads are off and at the machine shop. The head gaskets looked good, I don't think they were the cause of the coolant leak but as has been said several times, once you have everything apart it makes sense to go and replace them.

The heads looked real good, I appear to have gotten a head gasket kit that was missing valve stem seals so I need to wait til they get here before the heads will be finished. I guess I will spend the weekend cleaning everything up and organizing tools and whatnot.

A few notes about the disassembly. The rear head bolts are an absolute bitch to get to. I thought I had stripped the drivers side bolt and literally started to panic at the thought of having to remove the engine to get it off. I was able to find a sae impact socket a little smaller than the 16mm and wedge it on the bolt head. I said a prayer and thank god it broke loose. Those bolts suck.

Other than that, the fan took a while to get off, even with the fan removal tool from autozone. As was said in another thread, the 36mm, wrench had stretched and was too large. I used a large hammer and vise to unstretch it to make it fit.

The rest was just time consuming and a pain, small spaces and tight bolts, but hey if it were easy everyone would be charging $2500 for the job. I will say that having done it once, at least the disassembly part, the next time will be a hundred times easier.

Anyway, here are a few pictures for those who like visual stimulus.
 

Attachments

  • DSC05150 (Small).JPG
    DSC05150 (Small).JPG
    66.7 KB · Views: 158
  • DSC05151 (Small).JPG
    DSC05151 (Small).JPG
    74.2 KB · Views: 159
  • DSC05152 (Small).JPG
    DSC05152 (Small).JPG
    67.5 KB · Views: 152

seanmcd

Well-known member
Apr 24, 2006
134
0
More..
 

Attachments

  • DSC05153 (Small).JPG
    DSC05153 (Small).JPG
    72.9 KB · Views: 148
  • DSC05154 (Small).JPG
    DSC05154 (Small).JPG
    76.7 KB · Views: 126
  • DSC05155 (Small).JPG
    DSC05155 (Small).JPG
    85.2 KB · Views: 155

seanmcd

Well-known member
Apr 24, 2006
134
0
A few more here...
 

Attachments

  • DSC05158 (Small).JPG
    DSC05158 (Small).JPG
    67.6 KB · Views: 97
  • DSC05157 (Small).JPG
    DSC05157 (Small).JPG
    88.1 KB · Views: 96
  • DSC05156 (Small).JPG
    DSC05156 (Small).JPG
    84.7 KB · Views: 126

seanmcd

Well-known member
Apr 24, 2006
134
0
And again .....
 

Attachments

  • DSC05160 (Small).JPG
    DSC05160 (Small).JPG
    90.5 KB · Views: 158
  • DSC05161 (Small).JPG
    DSC05161 (Small).JPG
    77.1 KB · Views: 149
  • DSC05162 (Small).JPG
    DSC05162 (Small).JPG
    74.2 KB · Views: 128

Dan B

Well-known member
Mar 11, 2009
162
0
W Melbourne, FL.
:applause:

Nice, Sean.

I took off the drivers side head this morning. My notes are as follows:

- I drained the coolant by pulling off the bottom radiator hose and thermostat. This doesn't fully empty the block and I pissed coolant everywhere (including into a cylinder) when I pulled the head off. I will definitely drain using the block drain points next time, as per rave, and not cut that particular corner.

- Before starting on the head bolts I needed to clean a whole load of gunk out of the areas around them. Worse was bolt "4" (inside the head next to the firewall). It took a good 30 minutes to scrap away the "coal" around the bolt head before I could comfortably get the socket on it. I had managed to loosen bolts 1-3 before I got to this one and was worried that having the 3 others undone might warp the head, but that probably doesn't matter. Next time I'll clean all the head bolts before staring to undo any of them.

- Don't even bother attempting to undo head bolts without a 5/8 or 16mm deep impact socket on a 1/2" inch drive with a breaker bar :D I broke a standard 16 mm deep socket before sending the father in-law to AAP to get a proper impact socket.

- The head gasket looked intact, but there is a distinct mark next to the firewall where it looks like coolant may have been escaping. I wouldn't be surprised if those bolts don't get the attention they need torque wise, as they are in a pig of a position.

- The tops of the pistons are caked in "coal". I think I'll simply vacuum them clean. I don't want a scrapy-scrapy tool inside a cylinder.

- No liners appear to be in the wrong place.
 

Bosbefok

Well-known member
Jul 20, 2010
420
0
Orlando, FL
Forget about the drain plugs on the block, you can't get to them and if you do they are fookin tight. Remove the hose from the water pump and siphon the coolant out with a hand pump, you will get enough out so that it does not swamp the cylinders when you pull the heads - or maybe I had the water pump off by then and drained from the 2 holes in the block, my memory fails me.
Get a shallow impact 6pt socket, it has less tendency to want to jump off the bolt heads.
 
Last edited:

seanmcd

Well-known member
Apr 24, 2006
134
0
Spent the weekend cleaning parts, tools, workspace, and going over reassembly procedures. I have a couple questions if anyones cares to offer advice.

1. When I hook the fuel rail back up, will I need to bleed the system at all? I notice there is no return line to the tank so how does it bleed the air from the system?

2. Can I get an inline thermostat from autozone/advance or napa or must I order it from Will Tillery or Atlantic British?
 

Bosbefok

Well-known member
Jul 20, 2010
420
0
Orlando, FL
1. Don't worry about it. You will see a schrader valve on the fuel rail, if you want to do something (like test fuel pressure) then you can use that, but you don't really want gas sprayed all over.
2. Just an FYI there are rumors about faulty thermostats, I'm not sure how true they are. Check with the usual parts guys like AB, DAP, bputah, pt, ect.
 

seanmcd

Well-known member
Apr 24, 2006
134
0
Thanks for the help Bosbefok.

Ok so when I disassembled the heads, I followed the manual but admit I didn't follow the procedure exactly as I was waiting for the fan removal tool. What I am trying to figure out is what is the best procedure to reassemble?

I am thinking it should go like this?

1. head gasket

2. Cylinder head

3. tighten head bolts to torque in sequence, then 90degrees, then 90 degrees.

4. pushrods, rocker assembly, torque rocker assembly.

5. gasket goop, valley pan gasket, rubber gaskets, end clamps, tighten?

6. lower intake, loctite on bolts, torque to spec.

7. valve cover gasket, valve cover.

8. Install coil at back of engine. run wires to spark plugs.

9. SAI hoses bolted to coil.

10. left side bracket for alternator, alternator, etc

11. right side bracket for PAS, A/C, ACE pump.

12. coolant hoses on left side engine, wires, etc..

13. SAI system, exhaust manifold.

14. upper intake

15. rest of hoses, PCV hoses, throttle cables, etc.

16. throw left over bolts in toolbox top drawer.

17. Change oil and filter

18. start engine, check oil pressure, engine function

19. test drive

20. 6 pack of Corona

Any comments?
 

Bosbefok

Well-known member
Jul 20, 2010
420
0
Orlando, FL
That sounds about right.
Take 1 or 2 old head bolts, cut off the heads and cut a slot in the end. Give the end a slight taper. Use these as locating pins in the block to guide the heads when you put them on. Use a screw driver to remove the pins.
 

rmuller

Well-known member
Apr 28, 2004
4,452
1
Northern NJ
www.njlr.org
Btw -- A few points I should have mentioned earlier in this before you got started, but hopefully they'll help someone else.

1) where you can, put the bolts back in the empty hole
2) If you can't, then use plastic freezer bags for your bolts, and label everything really well
3) clean everything as well as possible, get a wirebrush to clean up the bolts when you can
4) put a little bit of oil on bolts before you put them in

All of that will help you retain sanity, and make it easier to get things apart next time.
 

juha_teuvonnen

Well-known member
Aug 23, 2009
79
0
seanmcd said:
Thanks for the help Bosbefok.


3. tighten head bolts to torque in sequence, then 90degrees, then 90 degrees.

Personally, I prefer to use ARP studs that I buy from D&D Fabrications instead of stock torque-to yield bolts. I don't like 'em bolts and I don't trust them. I have no scientific evidence that they are bad, but so far I have seen quite a number of cars with these head bolts that also happened to have head gasket problems. Land Rovers, BMWs and certain Ford engines come to mind.

With stock bolts the material of the block (aluminum) and the thread pitch naturally limits the clamping force that you can apply. ARP studs have a different (finer) thread at the top end of the stud. With both the stud and the nut being quality steel you can apply more clamp down force, or whatever the proper engineering term for it is.

If you ever need to get the head off of that Rover engine again (you never know...) you'll be a much happier camper with ARPs. D&D will gladly provided the info on the proper technique for installing the ARP studs.
 

rovercanus

Well-known member
Apr 24, 2004
9,651
246
Quentin said:
:ack:
At least celebrate with a decent lager :drool:
Agreed. Corona is Mexican Budweiser. It's great if you have a urinary tract infection.
 

I HATE PONIES

Well-known member
Aug 3, 2006
4,864
0
Before putting it all back together I would strongly recomend a good cleaning of all threads. Either use a tap or a thread cleanup set. Make sure the holes for the head bolts are clean and dry.

I used a Craftsman thread restoring kit the last time. It works great and nearly every bolt will go in with fingers only.
 

brianhoberg

Well-known member
Apr 16, 2007
4,003
0
47
San Antonio, TX
www.brianhoberg.com
I HATE PONIES said:
Before putting it all back together I would strongly recomend a good cleaning of all threads. Either use a tap or a thread cleanup set. Make sure the holes for the head bolts are clean and dry.

I used a Craftsman thread restoring kit the last time. It works great and nearly every bolt will go in with fingers only.

Good idea, I'm getting ready to do my HG's and like this recommendation.
 

Quentin

Well-known member
Mar 19, 2006
419
0
Cape Town, South Africa
I HATE PONIES said:
Before putting it all back together I would strongly recomend a good cleaning of all threads. Either use a tap or a thread cleanup set. Make sure the holes for the head bolts are clean and dry.

I used a Craftsman thread restoring kit the last time. It works great and nearly every bolt will go in with fingers only.

Good idea, but work the tap how you would handle your wife with PMS ;)
The last thing you want to do is cross thread them :banghead: